Sending a Reward Through Rewards Points (Admin View)
If you’re managing rewards and want to send a reward to a recipient using Rewards Points, you can do so through the BlinkSwag dashboard:
1. Navigate to the Dashboard: From the main dashboard, locate the Send a Reward module highlighted in red in this example.
2. Select Send a Reward: Click the Send Now option under the “Send a Reward” tile. This will allow you to choose a reward for your recipient using available reward points or funds in your account.
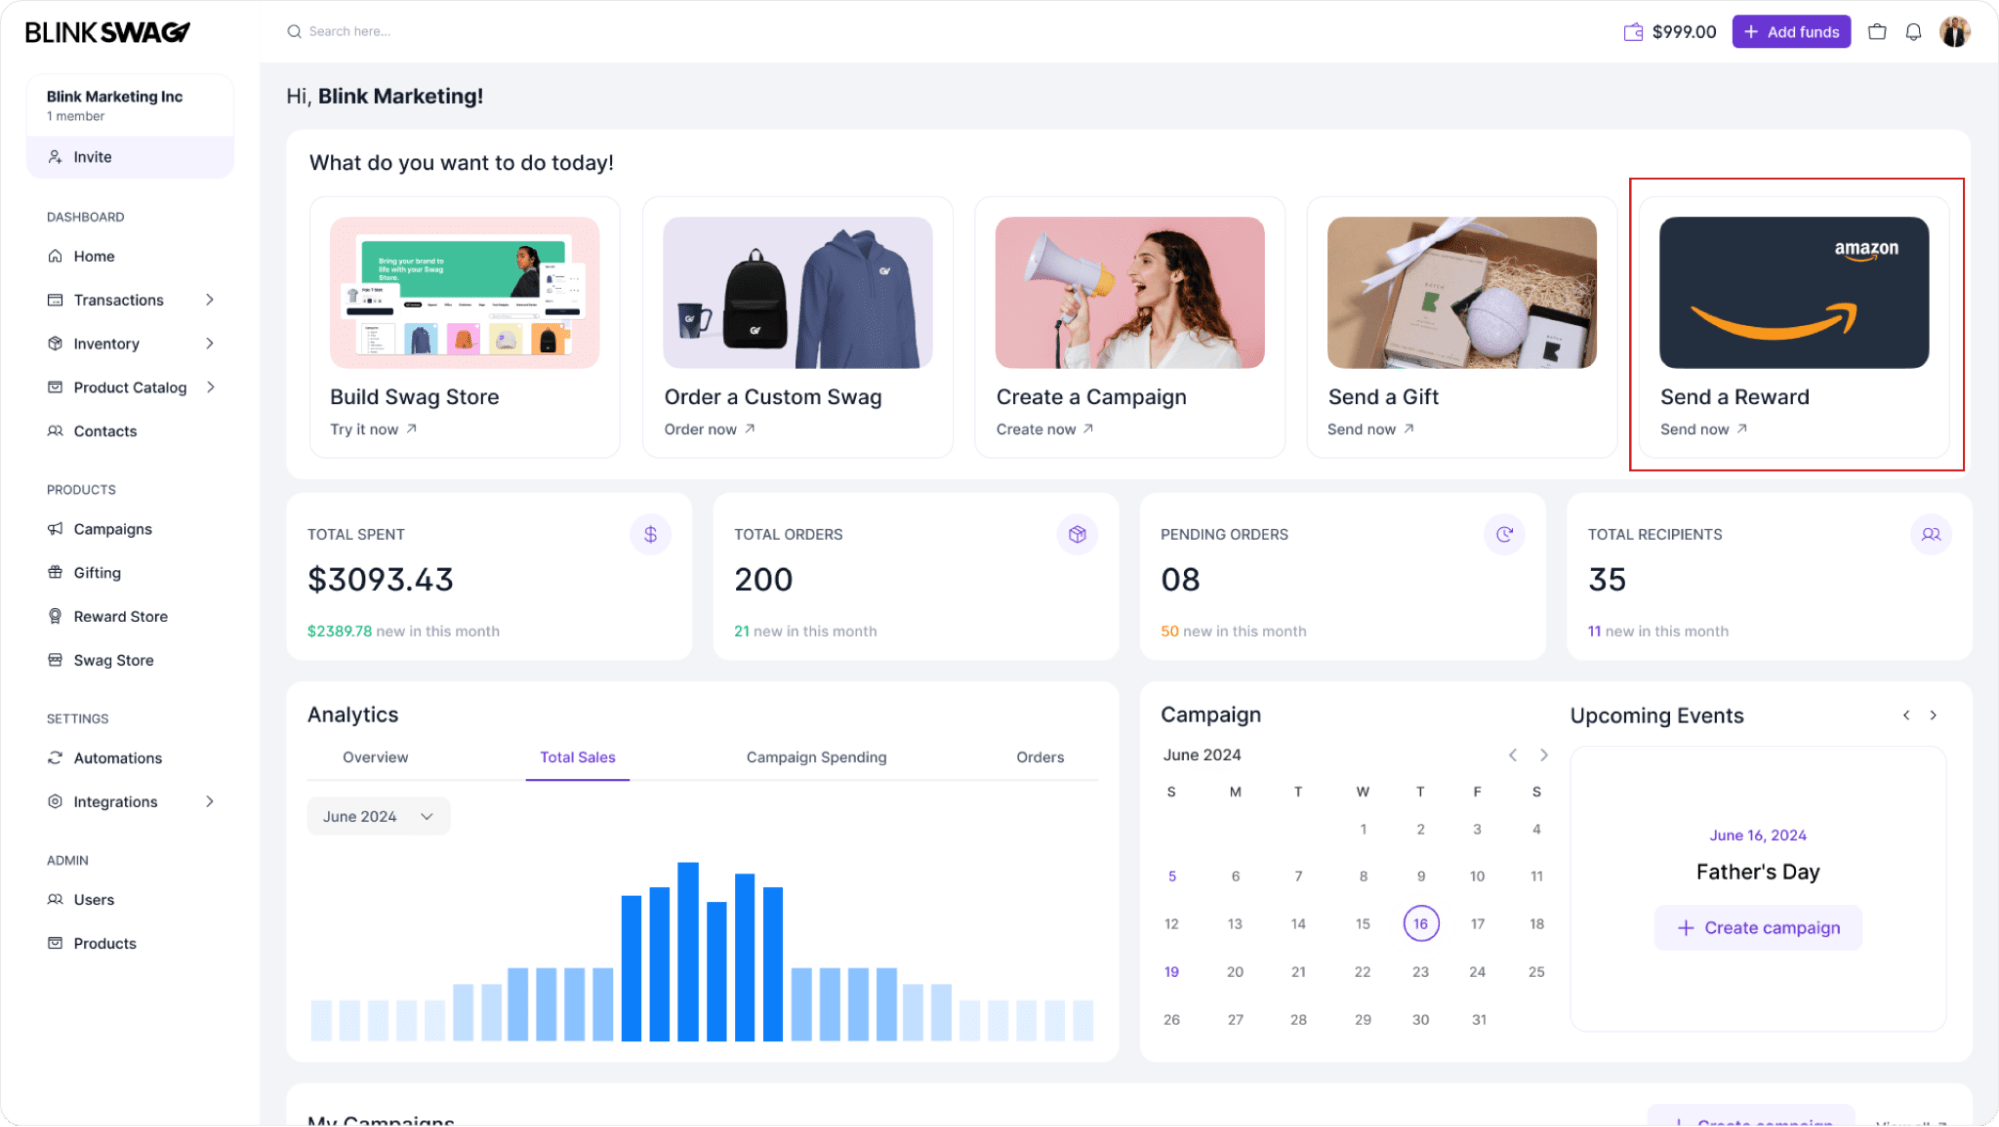
This module enables administrators to streamline reward distribution efficiently. Follow the prompts to complete the reward setup, customize it as needed, and send it to the chosen recipient.
Manage and Track Rewards in the Reward Store
You can manage and track all rewards sent to recipients in the Reward Store section. This dashboard provides an overview of:
1. Total Orders and Spending: View the total number of orders and the amount spent within a specific time frame.
2. Order Details: Each entry shows the order number (SO#), store name, recipient’s name, email address, reward amount, and date of order.
To send a new reward, click the Send a reward button highlighted in red. This action will allow you to initiate a new reward distribution.

This section monitors rewards, reviews past transactions, and ensures recipients receive gifts. This streamlined tracking makes reward management easy and efficient.
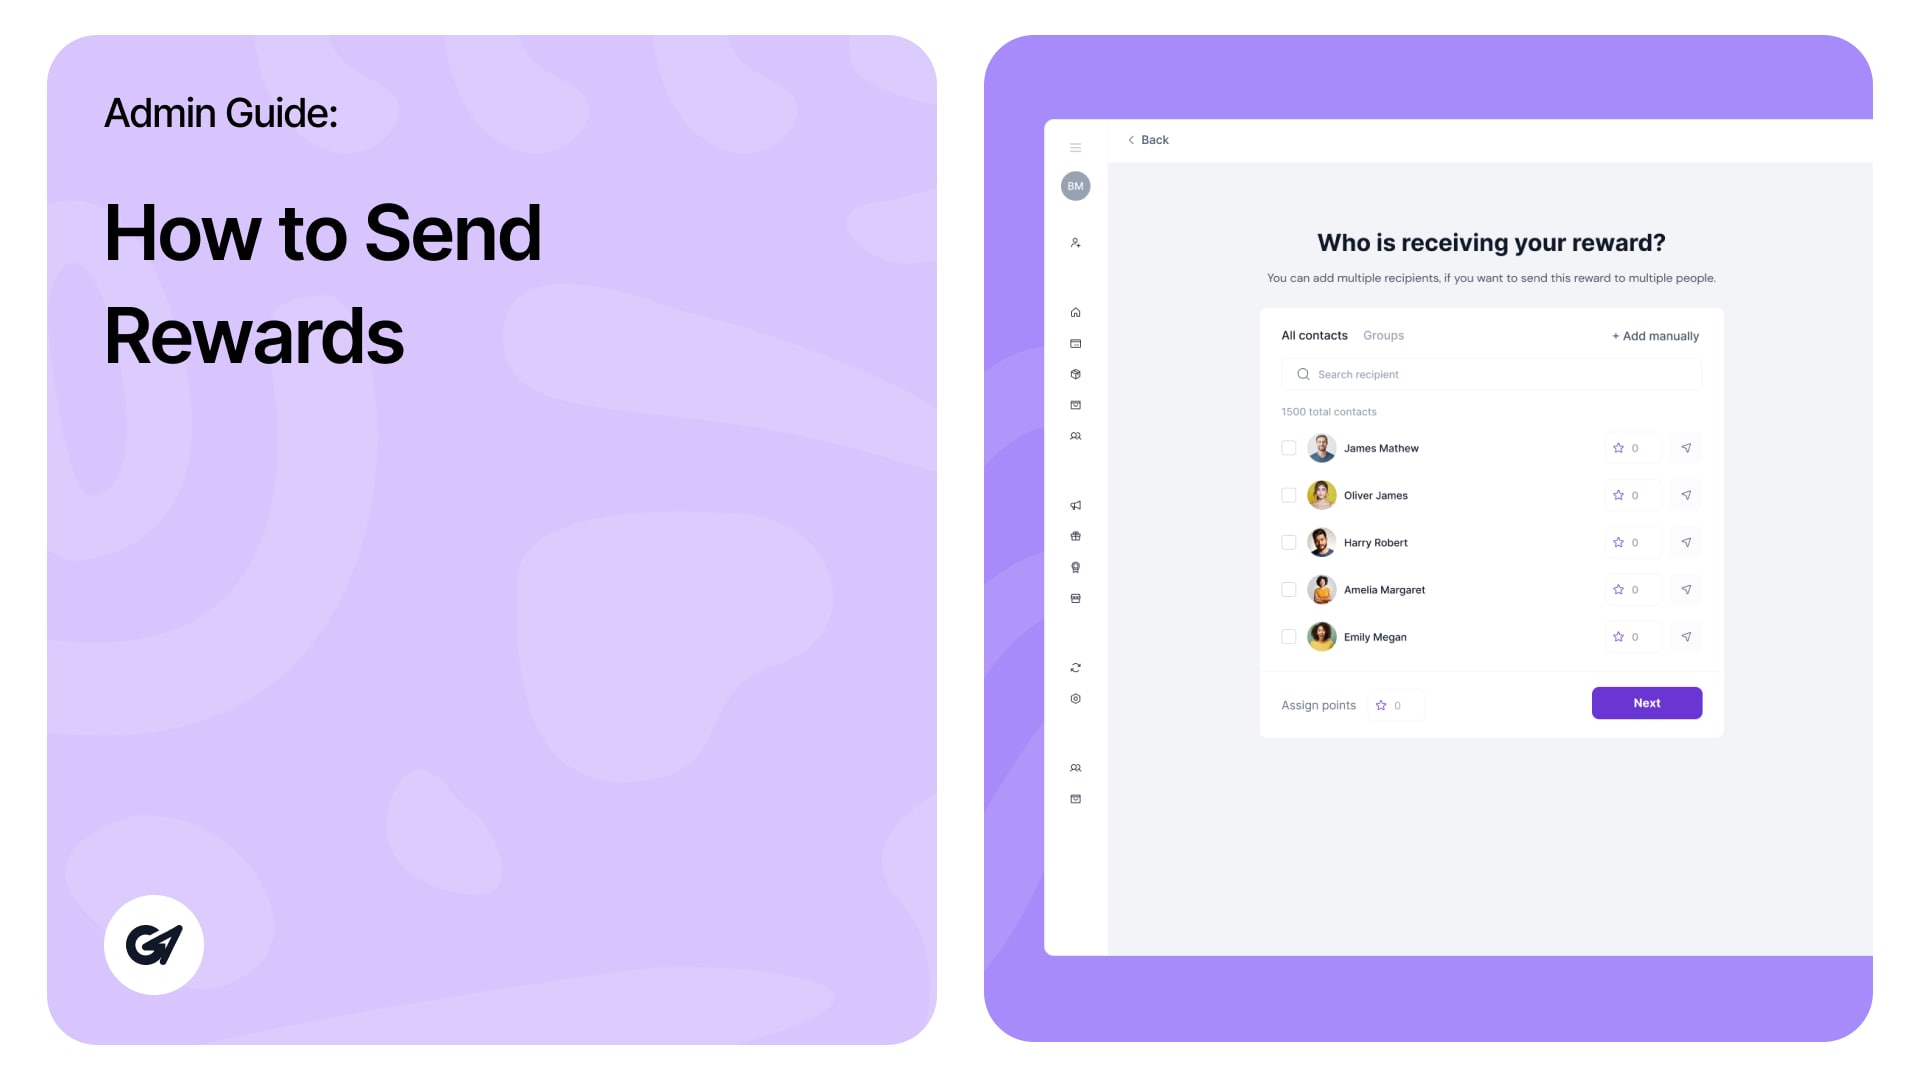
Select Recipients for the Reward
In this step, you can choose the individuals who will receive the reward:
1. Select Contacts: Use the contact list on the left side of the screen to select recipients. You can select multiple people by checking the boxes next to their names.
2. Assign Points: If applicable, you can assign a specific number of points to each recipient, controlling the value of the reward for each person.
3. Customise Email Preview: On the right side, you’ll see a preview of the email message recipients receive. This message can be customized to include a personal note or specific details about the reward.
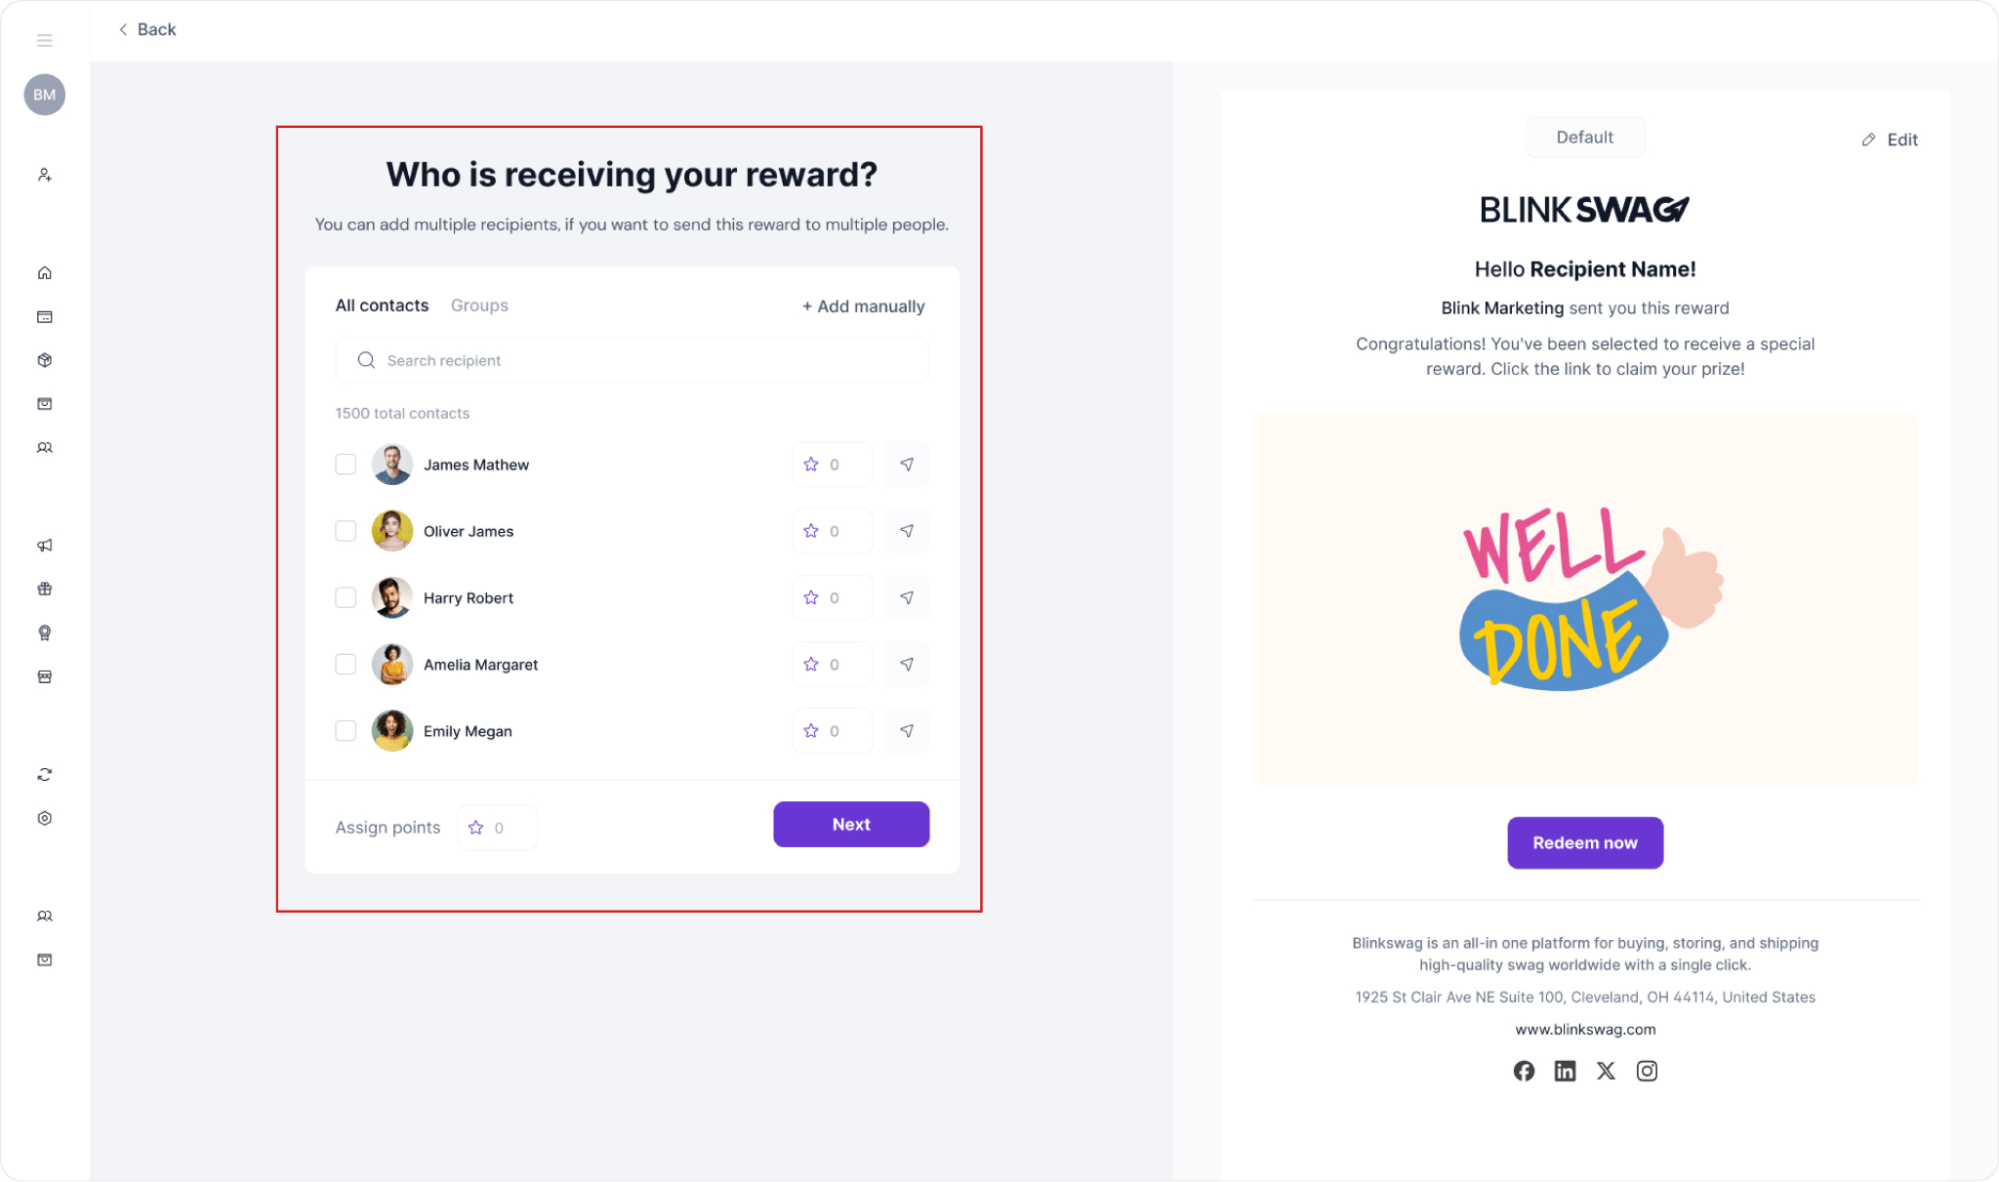
Once you have selected the recipients and assigned points as needed, click Next to proceed with the reward distribution. This enables efficient, personalized reward delivery for multiple recipients simultaneously.
Customize the Reward Email
In this step, you can customize the reward email sent to each recipient. The right side of the screen displays an Email Preview where you can:
1. Edit the Message: Click the Edit option to modify the default message. Personalize it to make the reward announcement more engaging, add the recipient’s name, or include specific instructions.
2. Visual Elements: If needed, you can update visual elements, such as images or graphics, to align with your brand or the message’s theme.
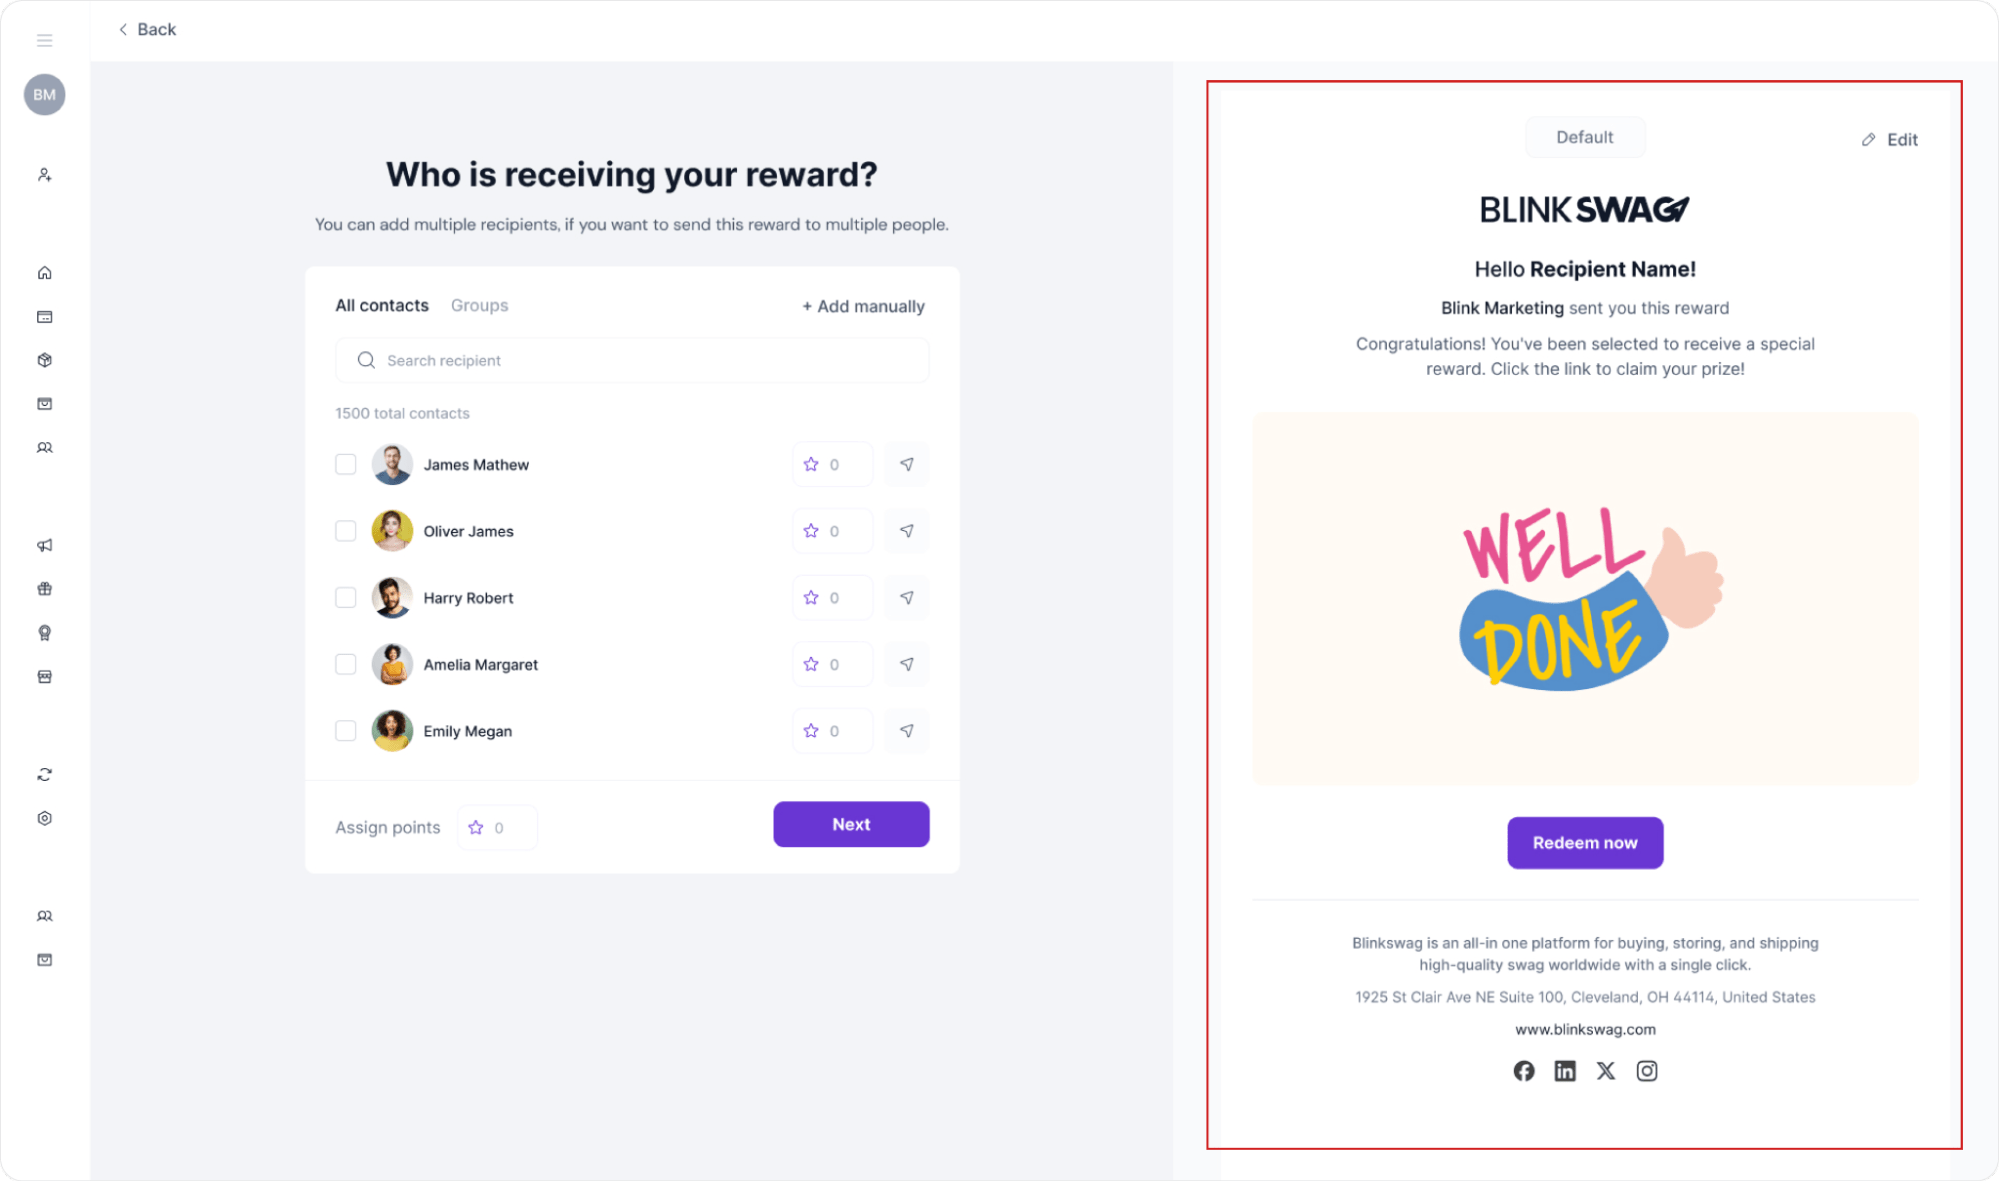
This customization ensures that recipients receive a personalized and memorable reward notification. Once satisfied with the email preview, send the reward by clicking Next or a similar action button.
How to Send a Reward to a Single Contact
To send a reward to a specific individual on BlinkSwag, follow these steps:
1. Select the Contact: From the list on the left, locate the contact you want to send the reward to. In this example, the contact James Mathew has been selected, as indicated by the checkmark in the box next to his name.
2. Assign Points (Optional): If applicable, you can assign a specific number of points for the reward by entering a value next to the contact’s name.
3. Preview the Email: On the right side, you can see a preview of the reward email that will be sent. Customize it if needed to personalize the message for the recipient.
4. Proceed: Once you’re ready, click the Next button to send the reward to the selected contact.

This process lets you easily send a customized reward to an individual recipient.
Final Step: Verify and Send the Reward
Before completing the reward process, you’ll reach a final confirmation screen to review all details:
1. Verify Recipient Information: Check that the recipient’s name, email address, and assigned points are correct. In this example, James Mathew is listed with 45 points assigned.
2. Preview Email: Review the reward email preview on the right side to ensure the message is personalized and accurate.
3. Send the Reward: Once everything looks good, click the Send a Reward button to finalize and send the reward to the recipient.
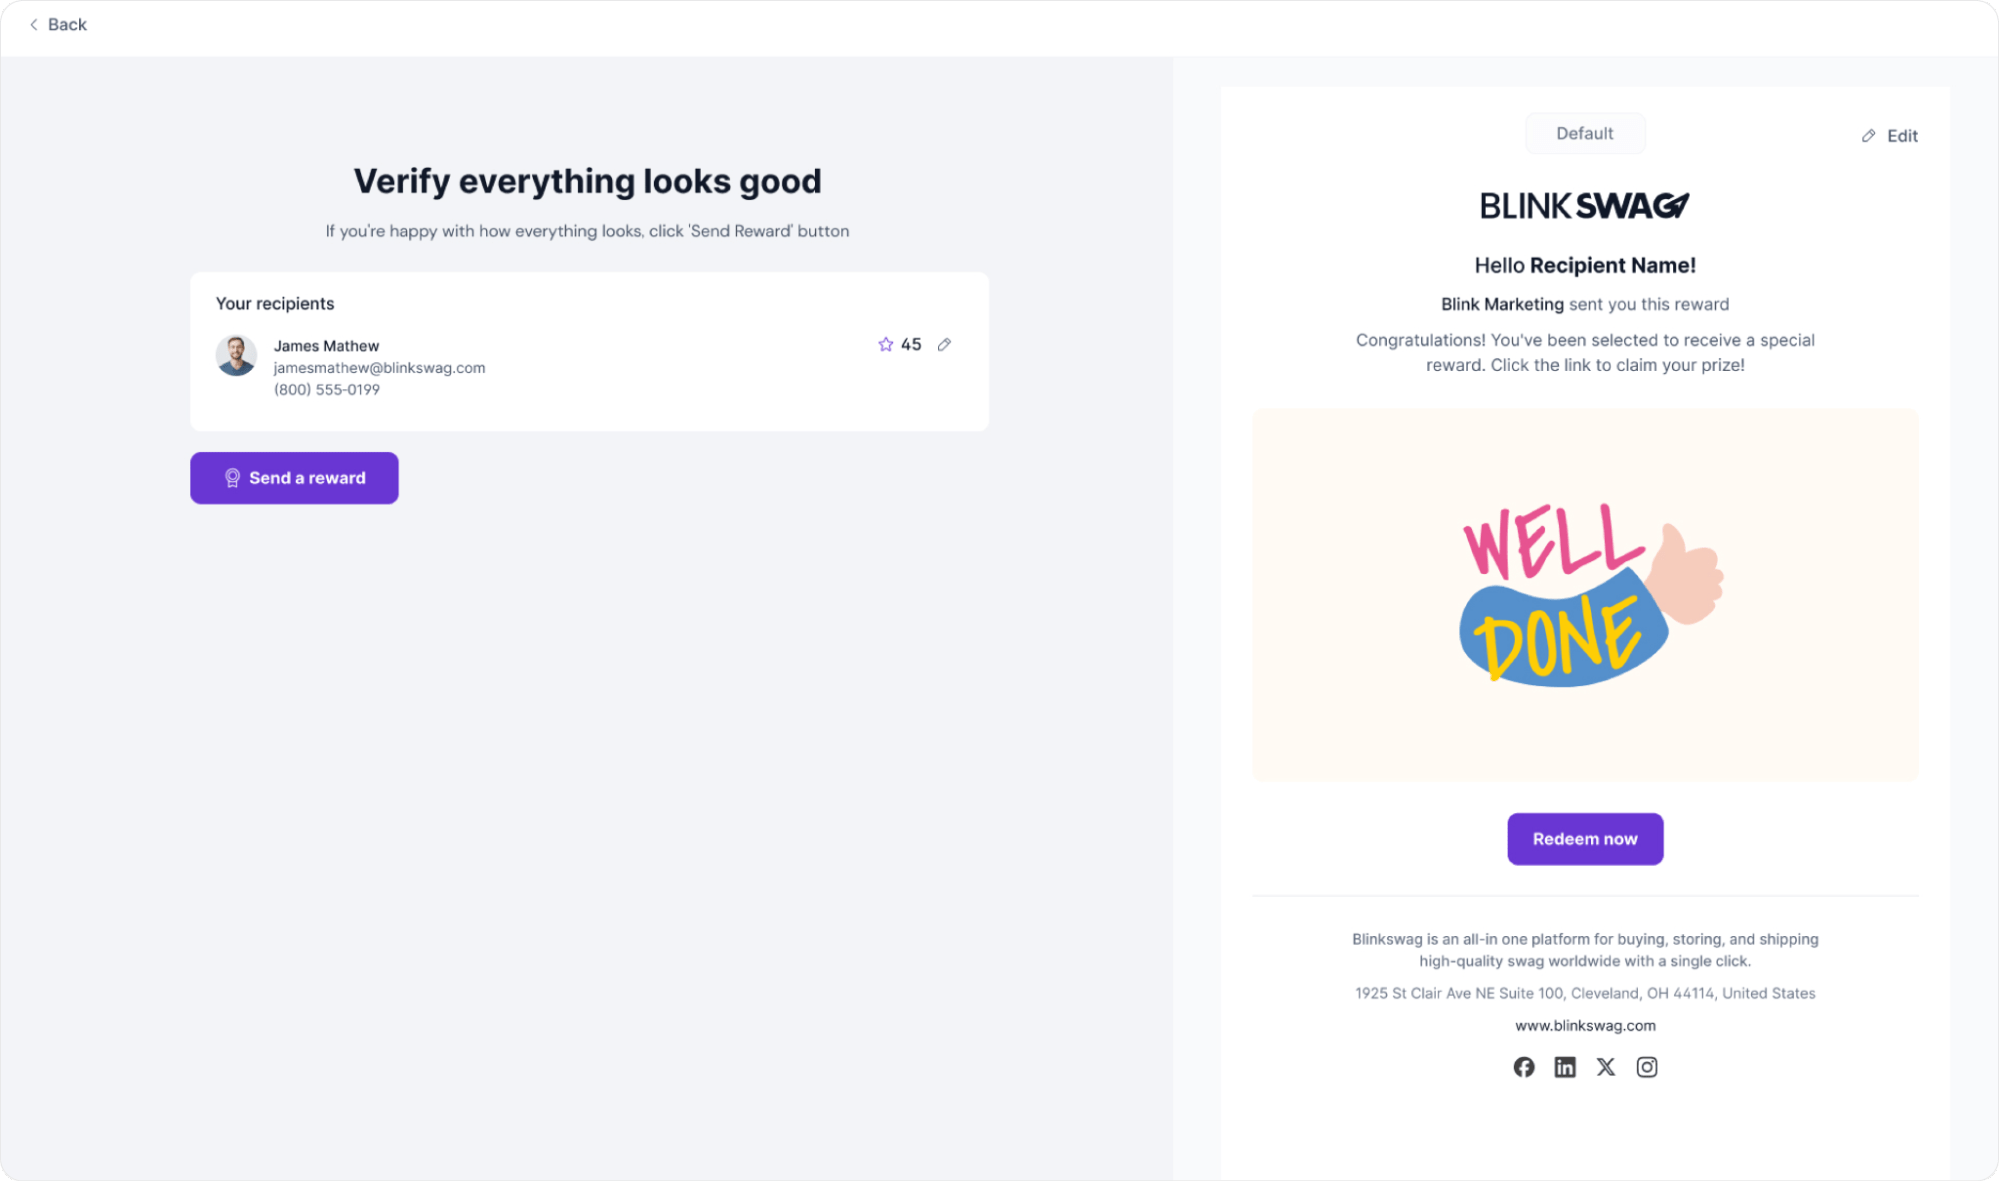
Your reward has now been successfully sent! The recipient will receive an email notification with instructions on how to redeem it.
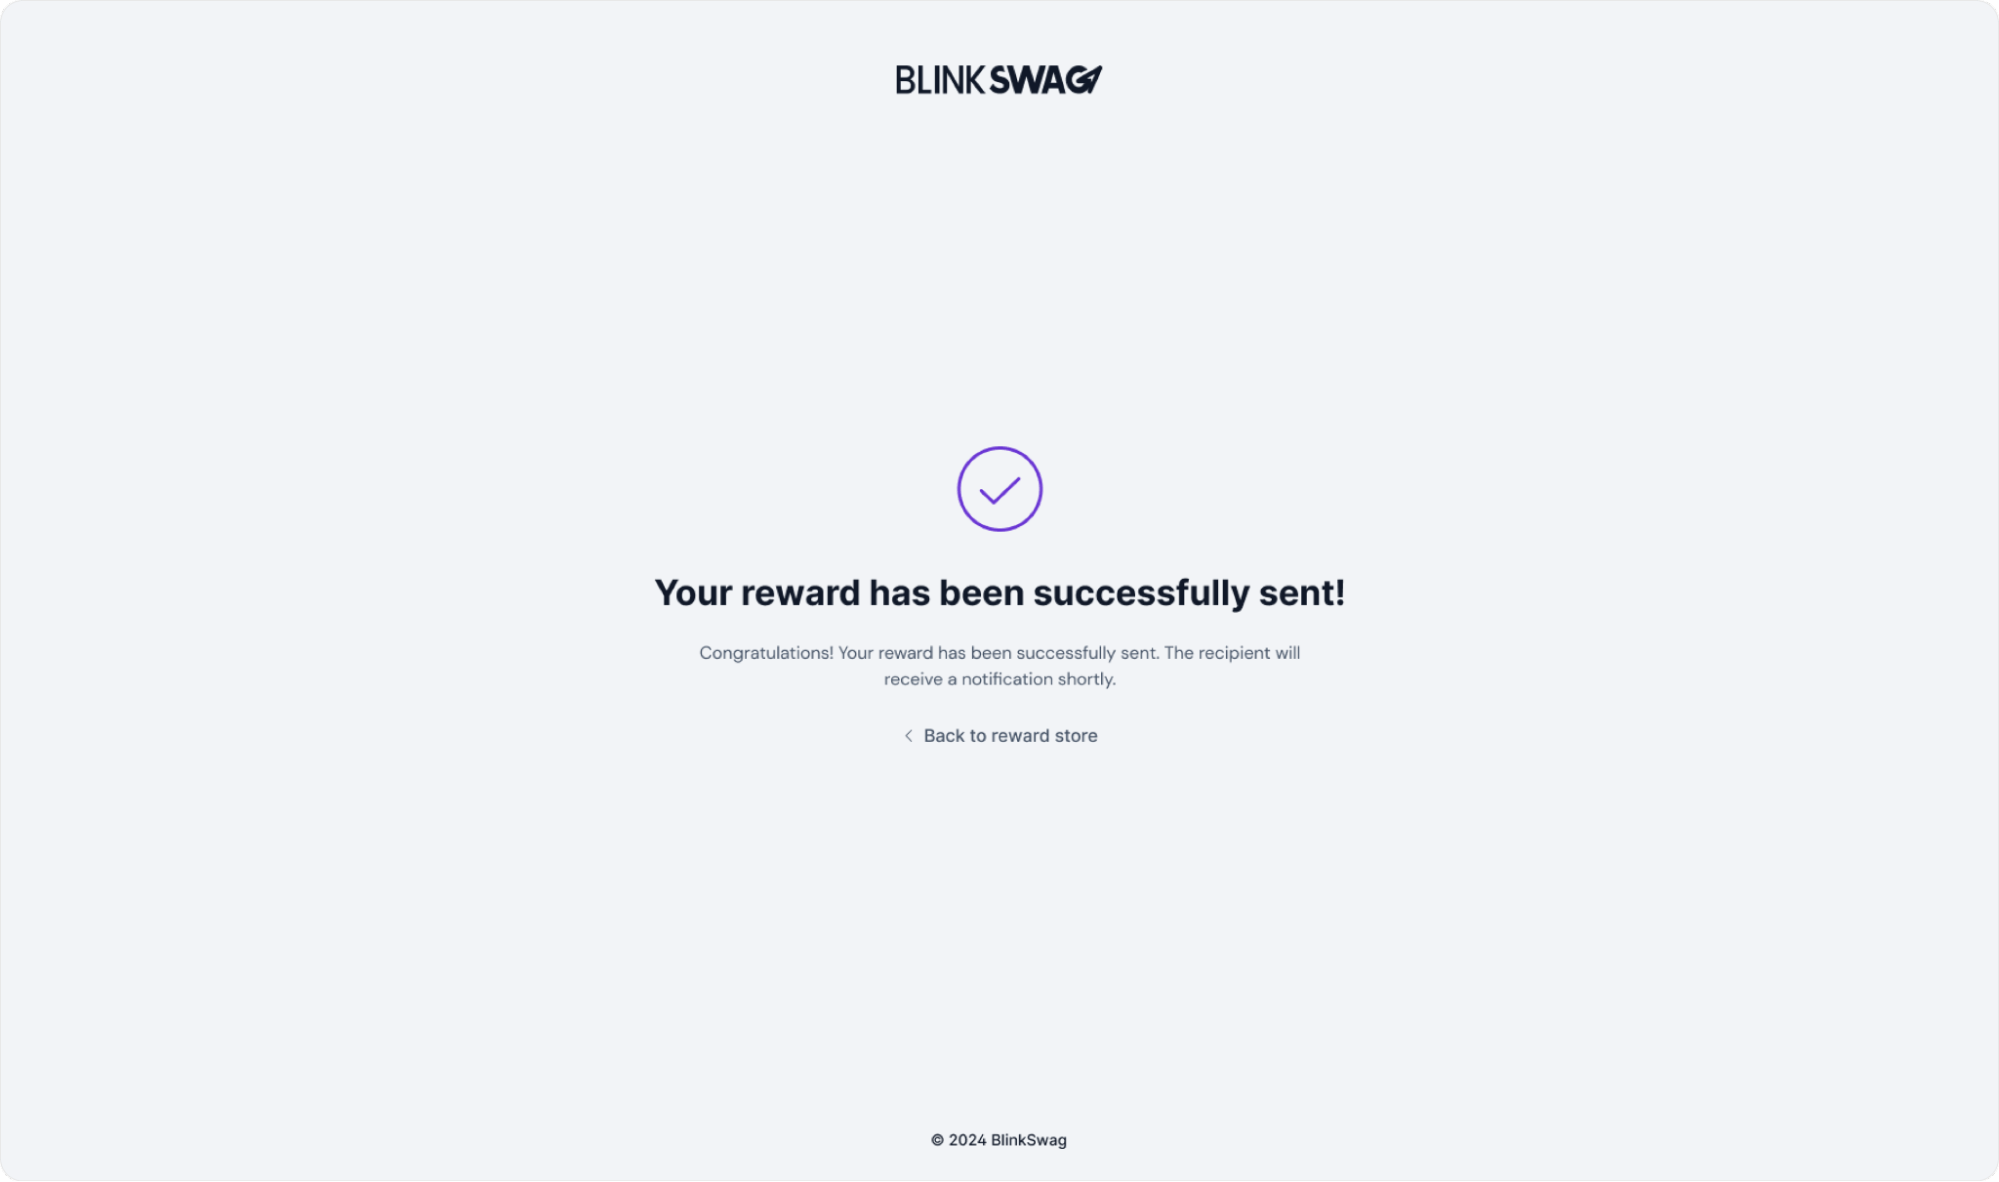
Final Confirmation: Reward Successfully Sent
Once you’ve completed all the steps to send a reward, you’ll see a confirmation screen that states:
“Your reward has been successfully sent!”
This message confirms that the reward has been delivered to the recipient. The recipient will receive a notification shortly with instructions on redeeming their reward.
To return to the main dashboard or reward store, click the back to reward store link.
Congratulations on successfully sending a reward!
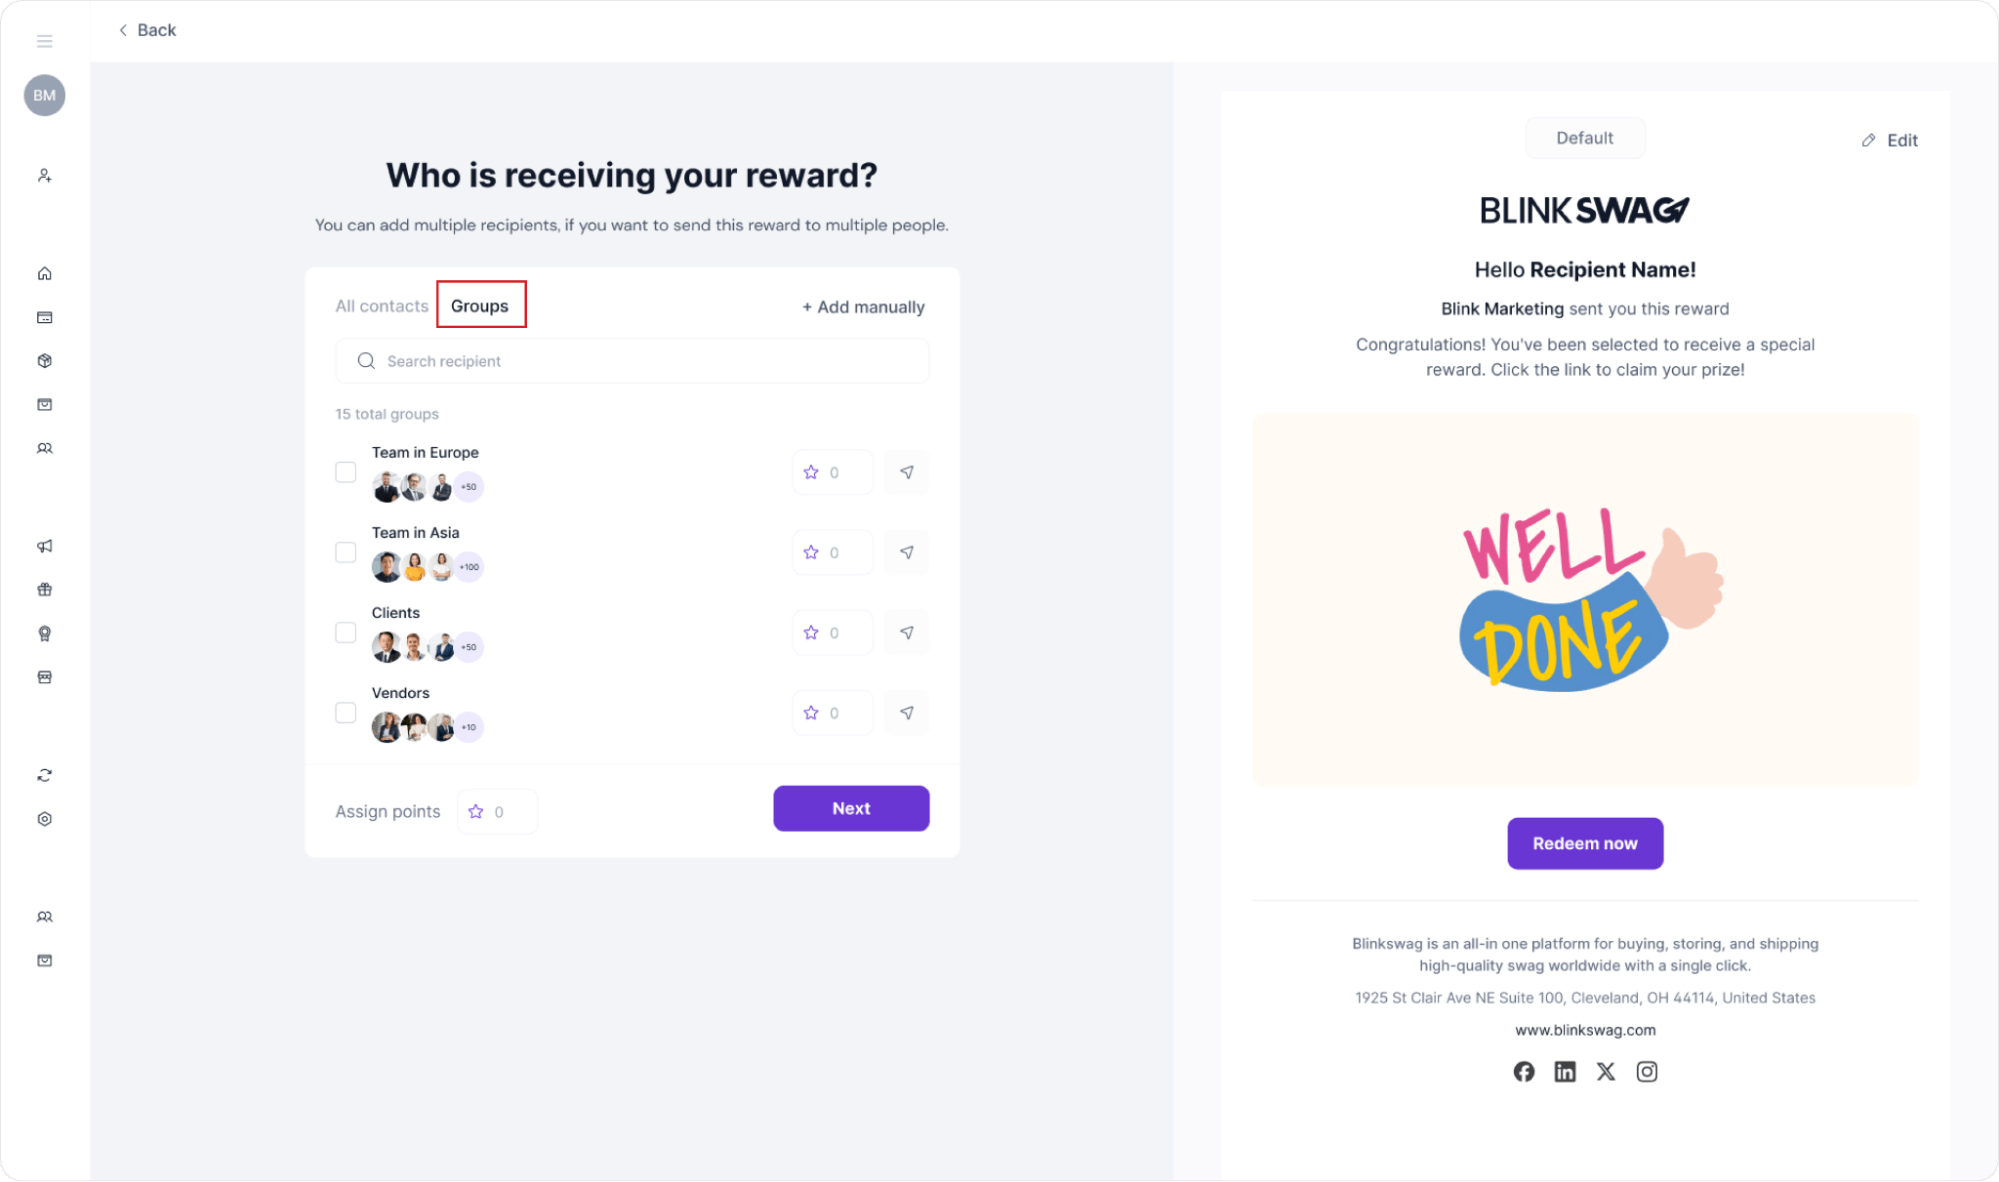
How to Send Rewards to a Group
To distribute rewards to a group of recipients, follow these steps:
1. Select the “Groups” Tab: Navigate to the Groups tab at the top of the recipient selection screen.
2. Choose a Group: From the list of available groups, select the one you want to send rewards to. In this example, groups like Team in Europe, Team in Asia, Clients, and Vendors are available.
3. Assign Points: You can allocate points for the entire group by entering a value next to the group name. This point value will be applied to each member of the selected group.
4. Preview the Email: The email preview on the right shows the message that each group member will receive. Customize it if necessary to make the communication more relevant to the group.
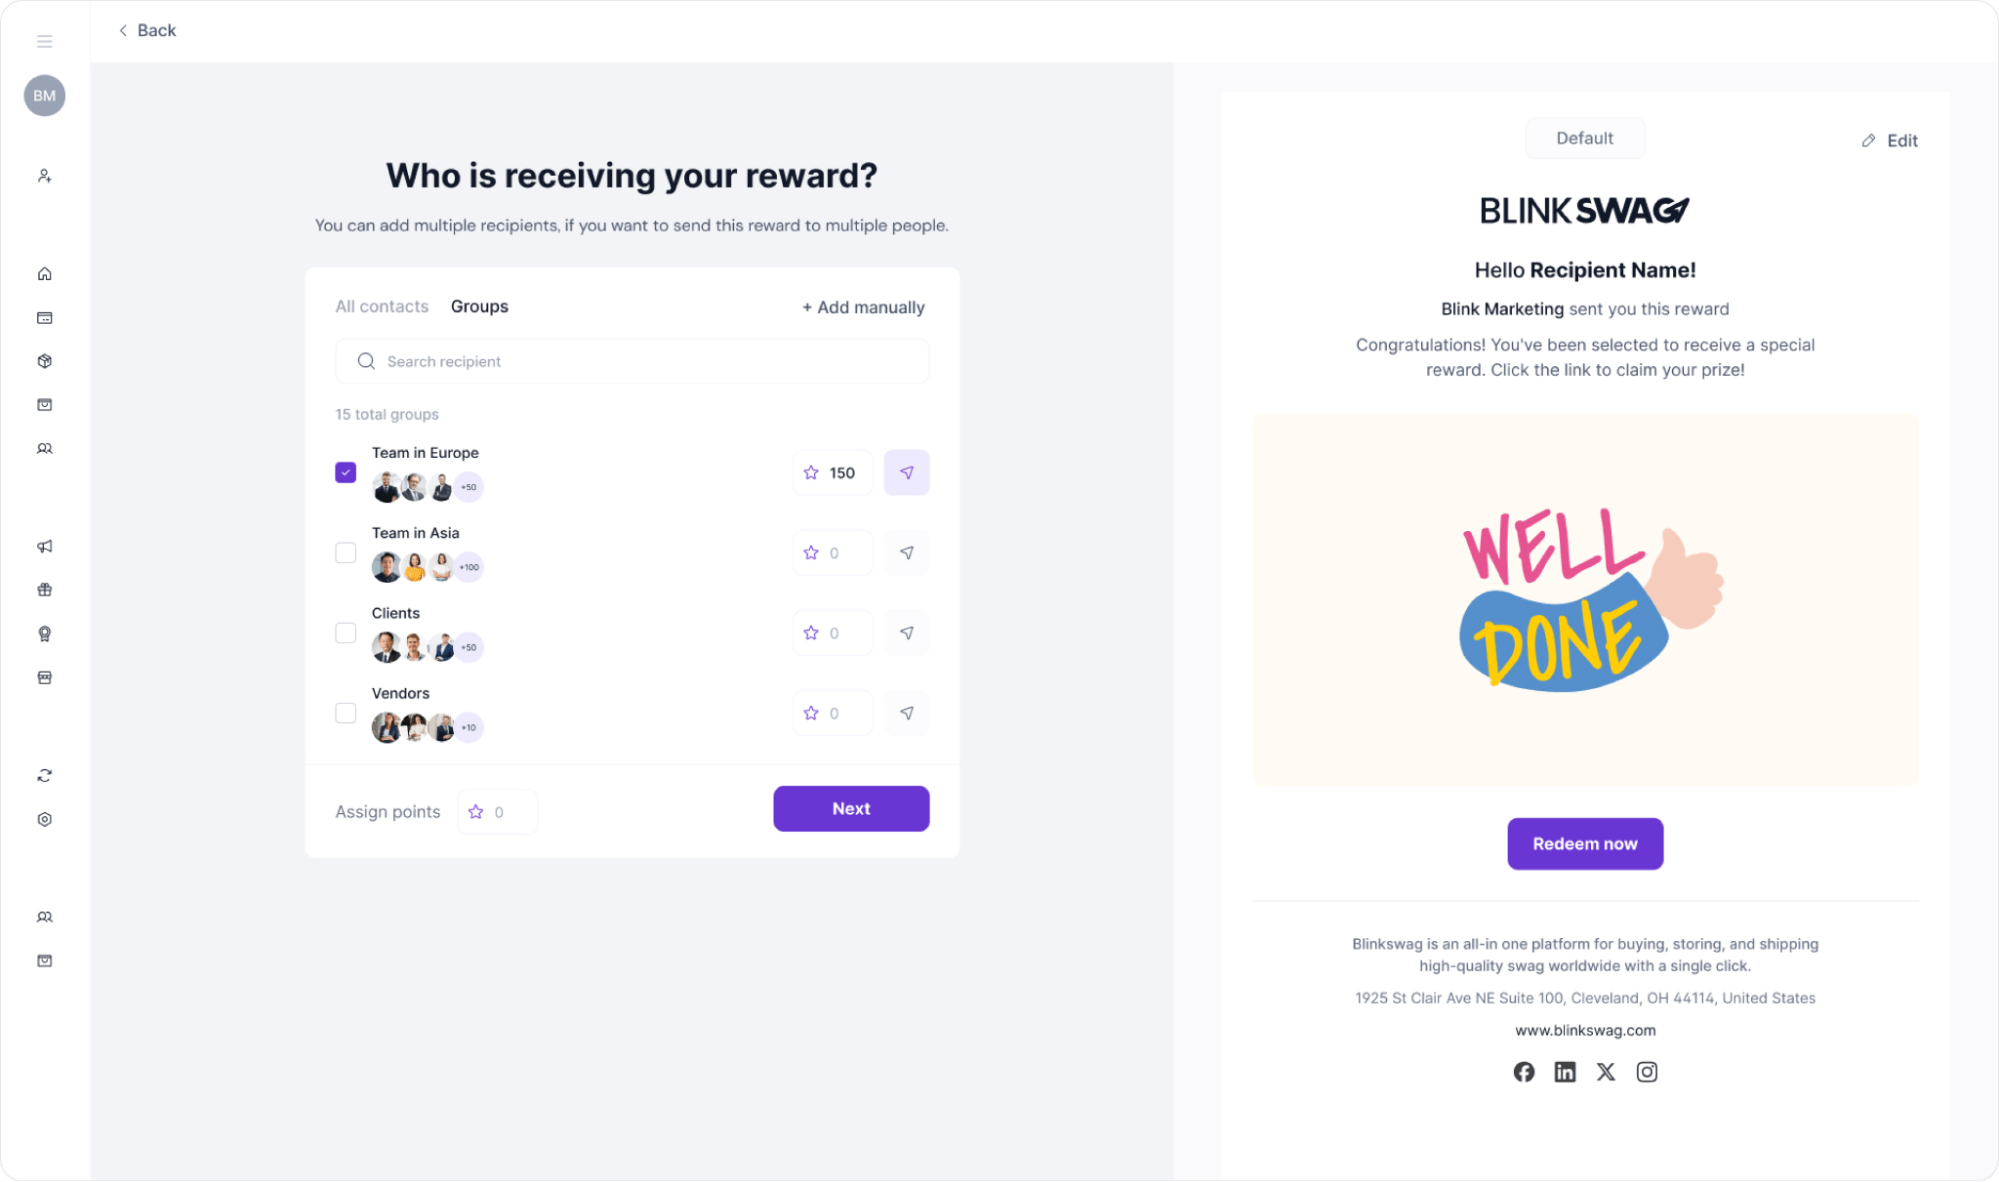
Once you’ve selected the group, assigned points, and reviewed the email, click Next to reward all group members. This allows for easy, efficient distribution of rewards to multiple recipients at once.
Final Step: Verify and Send the Reward to the Group
After selecting the group and assigning points, you’ll see a final confirmation screen to review all details before sending:
1. Verify Group Details: Check that the correct group (in this case, Team in Europe) is selected, along with the designated points per member (e.g., 150 points).
2. Review Email Preview: On the right side, confirm that the reward email message is accurate and personalized for the group. You can still click Edit to make any last-minute adjustments.
3. Send the Reward: Once everything looks good, click the Send a Reward button to distribute the reward to all selected group members.
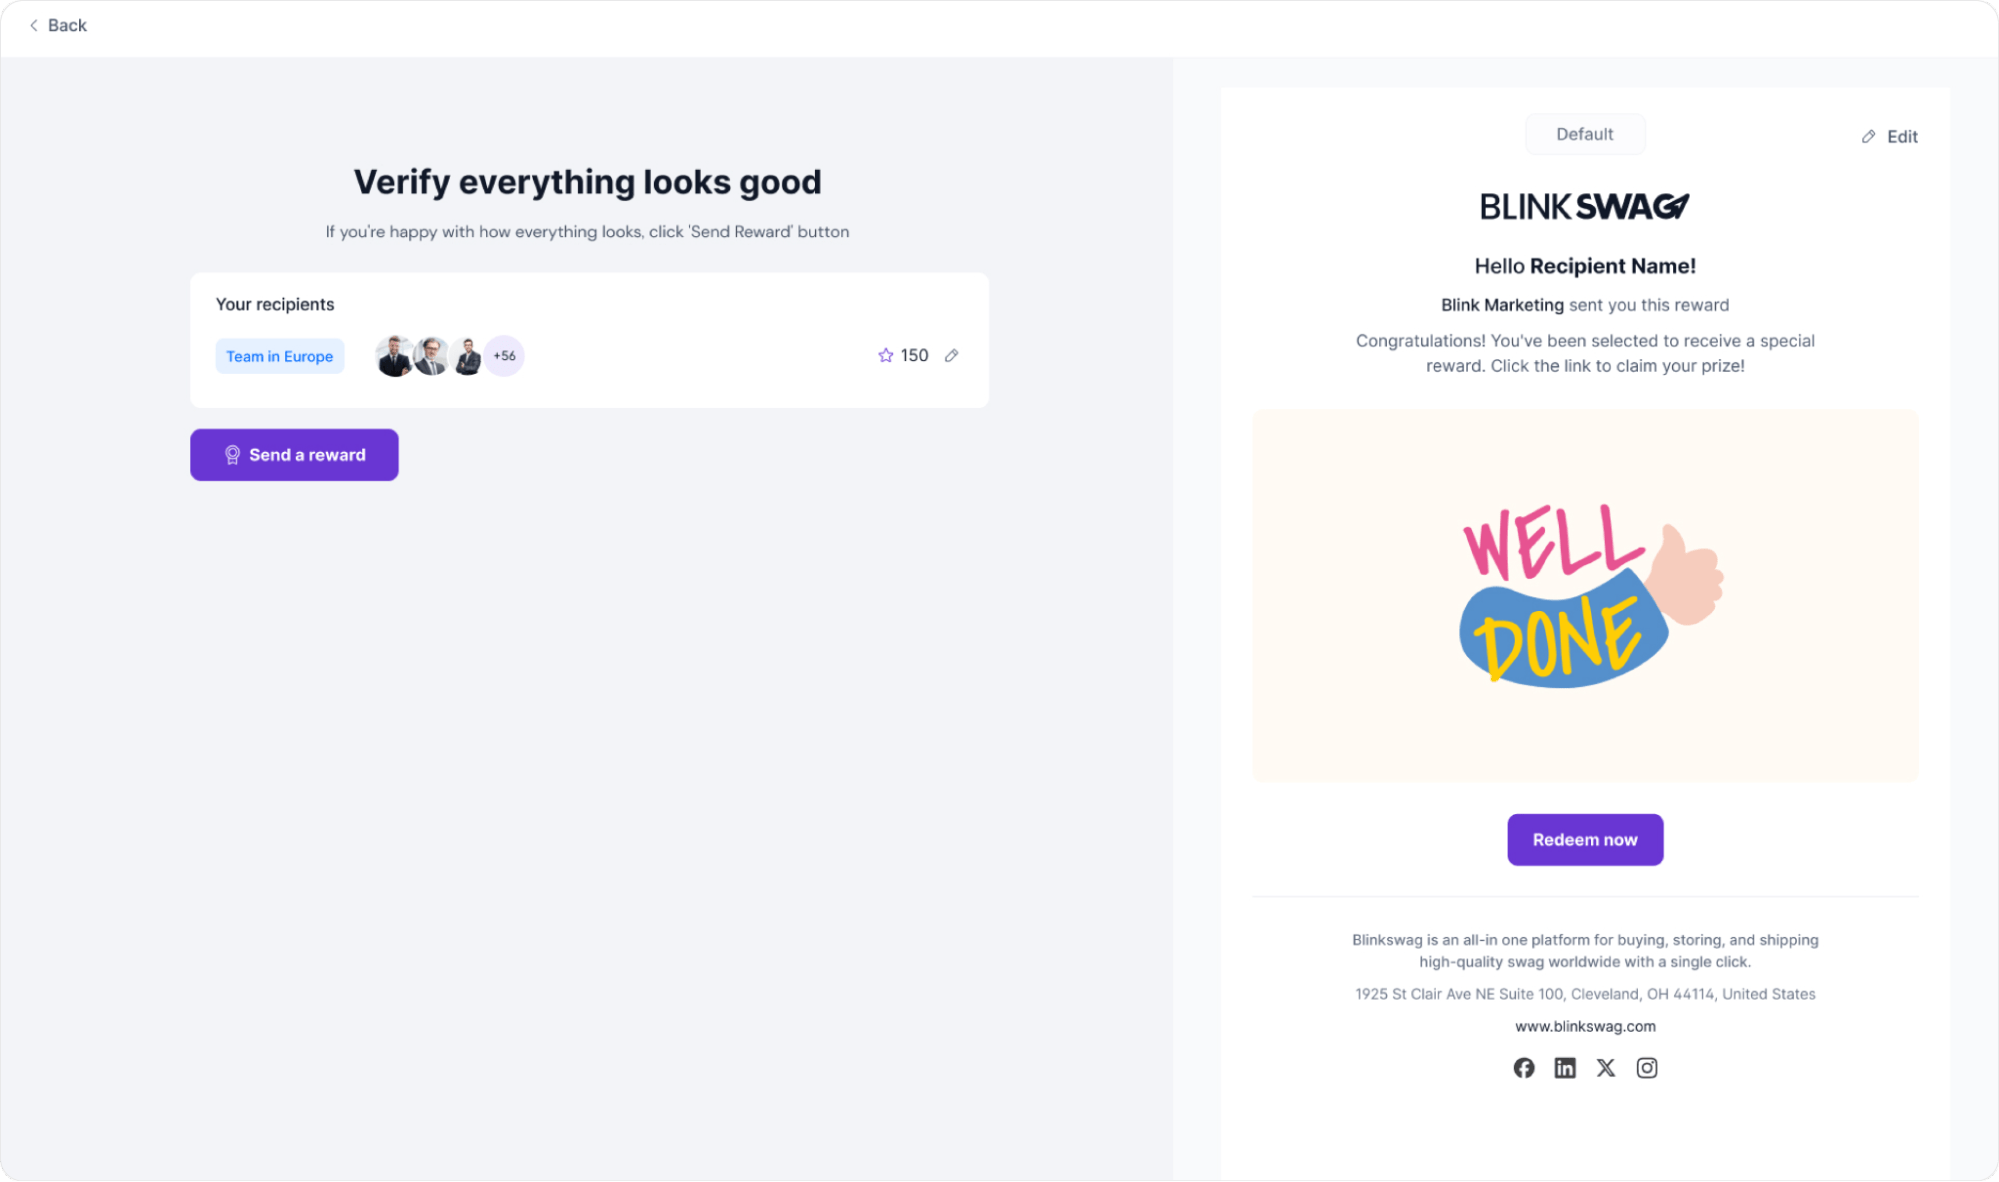
Your reward will now be sent to each group member, who will receive a notification with instructions on how to redeem it. This completes the group reward distribution process!
Confirmation: Group Reward Successfully Sent
After sending the reward to the group, you’ll see a final confirmation screen that reads:
“Your reward has been successfully sent!”
This message confirms that the reward has been delivered to all selected group members. Each recipient will receive a notification with instructions on redeeming their reward.
Click the Back to Reward Store link to return to the reward store. This completes the group reward distribution process—congratulations on successfully rewarding your team!
How to Send a Reward to Multiple Contacts
To send rewards to multiple individual contacts simultaneously, follow these steps:
1. Select the “All Contacts” Tab: Ensure you are in the All Contacts tab to view a list of all individual recipients available for selection.
2. Choose Multiple Contacts: Go through the list and check the box next to each name to select the contacts you wish to send rewards to. You can select as many individuals as needed.
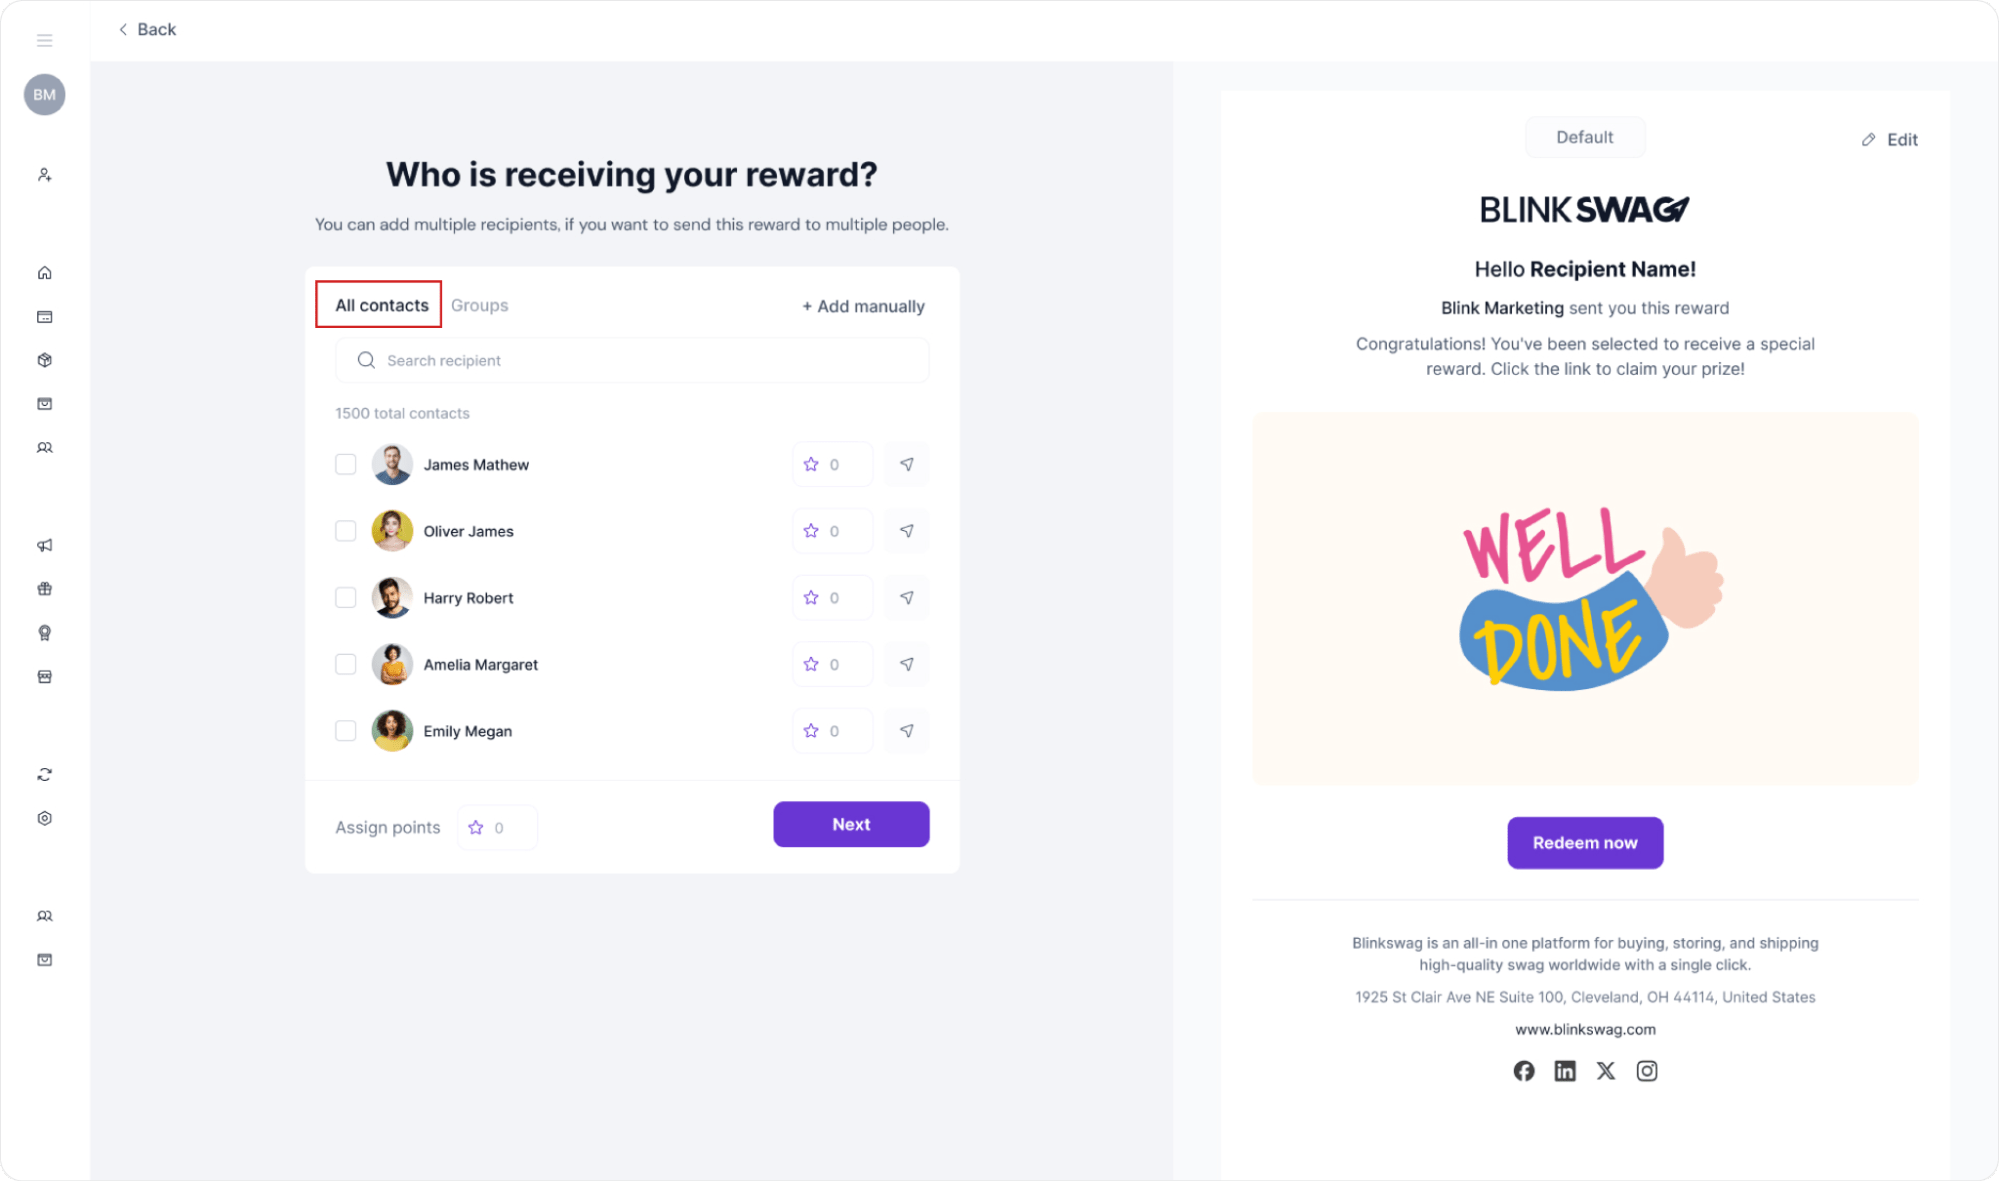
3. Assign Points to All: At the bottom of the contact list, you’ll see an Assign Points field. Enter the points value (e.g., 450 points) you want each selected contact to receive. This will apply the same reward value to all selected recipients.
4. Review Email Preview: On the right side, review the email sent to each contact. Click Edit to customize the message if needed.

Once you’ve assigned the points and reviewed the email, click Next to distribute the rewards. This method efficiently rewards multiple contacts with a consistent points value in a single action.
Verify and Send Rewards to Multiple Contacts
After assigning points and selecting multiple contacts, you’ll be directed to a final verification screen:
1. Review Recipient Information: Verify that all selected recipients are listed, along with their contact details and the points assigned (e.g., 450 points for each).
2. Check Email Preview: On the right, review the reward email that will be sent to each recipient. If necessary, make any last adjustments by clicking Edit.
3. Send the Reward: Once all details are confirmed, click the Send a Reward button to distribute the reward to all listed contacts.
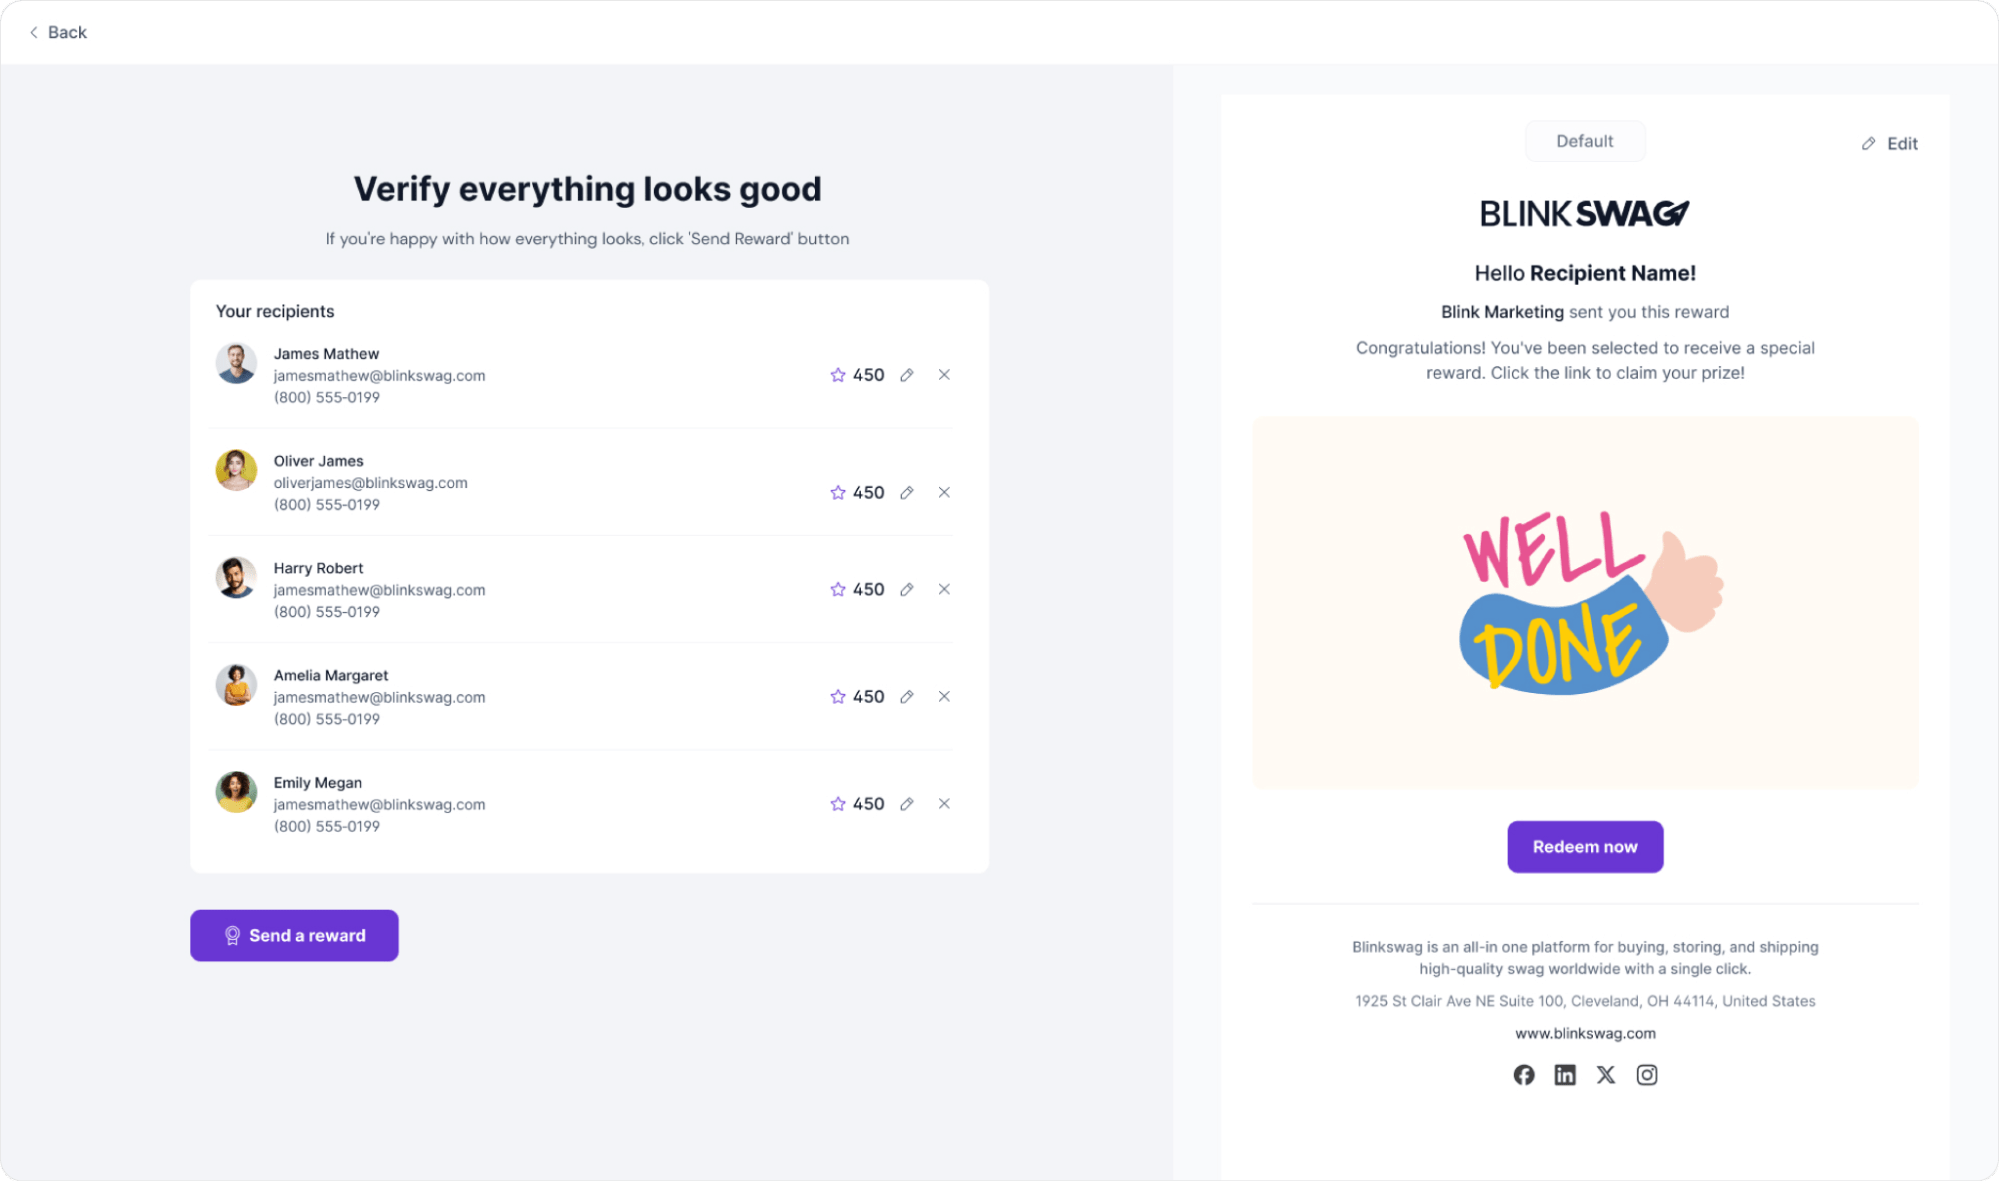
This completes the reward distribution process for multiple recipients, each receiving a personalized reward notification.
How to Send a Reward to Multiple Contact Groups
To distribute rewards to multiple groups of recipients at once, follow these steps:
1. Select the “Groups” Tab: In the recipient selection screen, click on the Groups tab to view a list of all available contact groups.
2. Choose Multiple Groups: Check the box next to each group name to select the groups you want to reward. You can select multiple groups, such as a Team in Europe, a Team in Asia, or Clients.
3. Assign Points to All Groups: At the bottom of the contact list, use the Assign points field to enter the total points each member within the selected groups should receive. Here, 250 points are assigned, meaning each individual in the selected groups will get 250 points.
4. Review Email Preview: On the right side, you can see the email that each group member will receive. Click Edit to customize it further, if necessary.
Once you’ve selected your groups, assigned points, and reviewed the email, click Next to proceed with the final confirmation before sending the reward.

Verify and Send Reward to Multiple Groups
After assigning points and selecting multiple groups, you’ll reach the final verification screen:
1. Review Selected Groups and Points: Verify that all selected groups (e.g., Team in Europe, Team in Asia, Clients, Vendors) are listed, along with the points assigned to each group (e.g., 250 points per member).
2. Confirm Email Preview: On the right side, check the reward email preview each group recipient will receive. Click Edit to customize the message before sending it.
3. Send the Reward: Once everything looks correct, click the Send a Reward button to distribute the reward to all members in the selected groups.
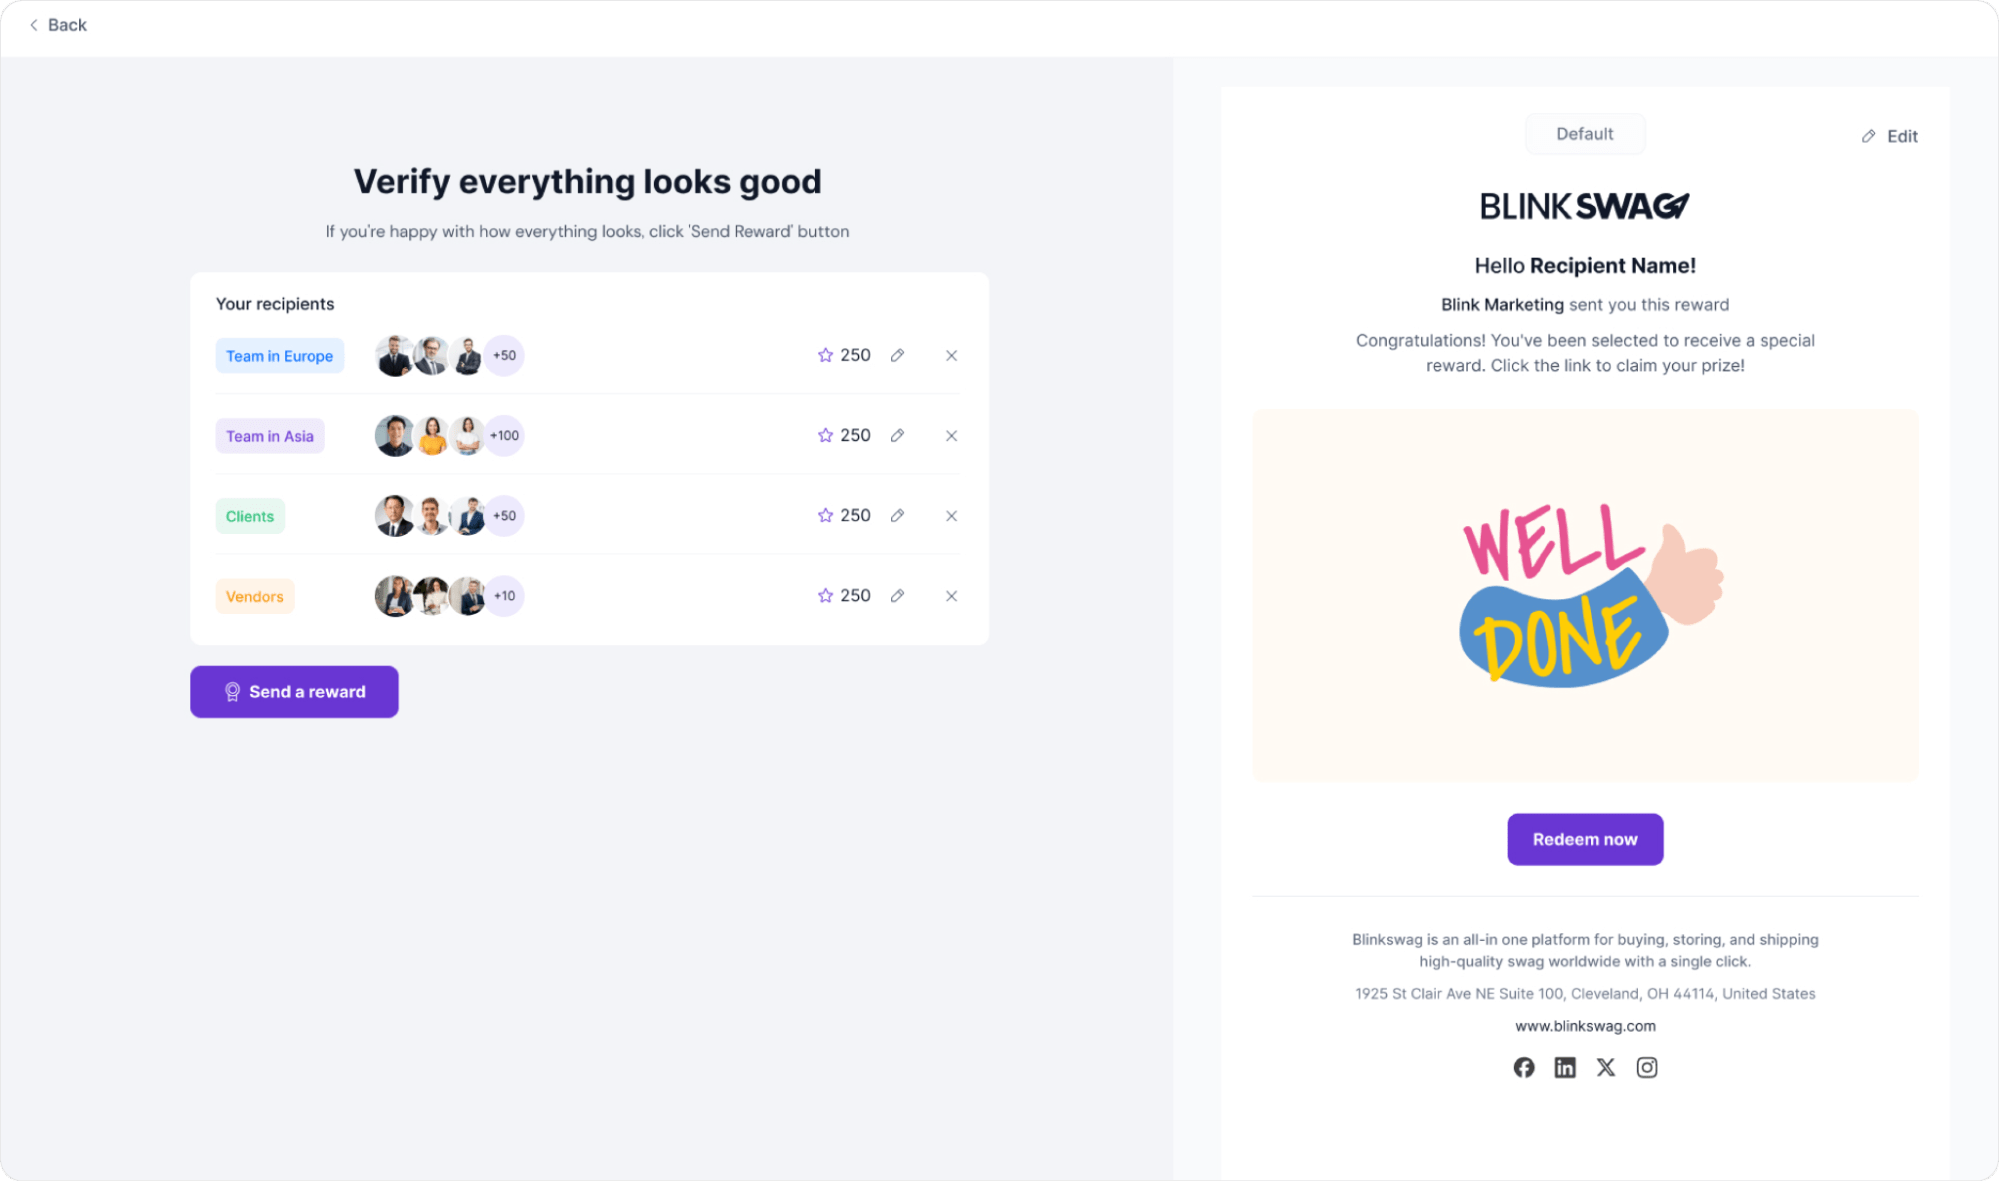
This completes the reward distribution process for multiple groups, ensuring each member receives the specified reward points and a personalized notification to redeem their reward.
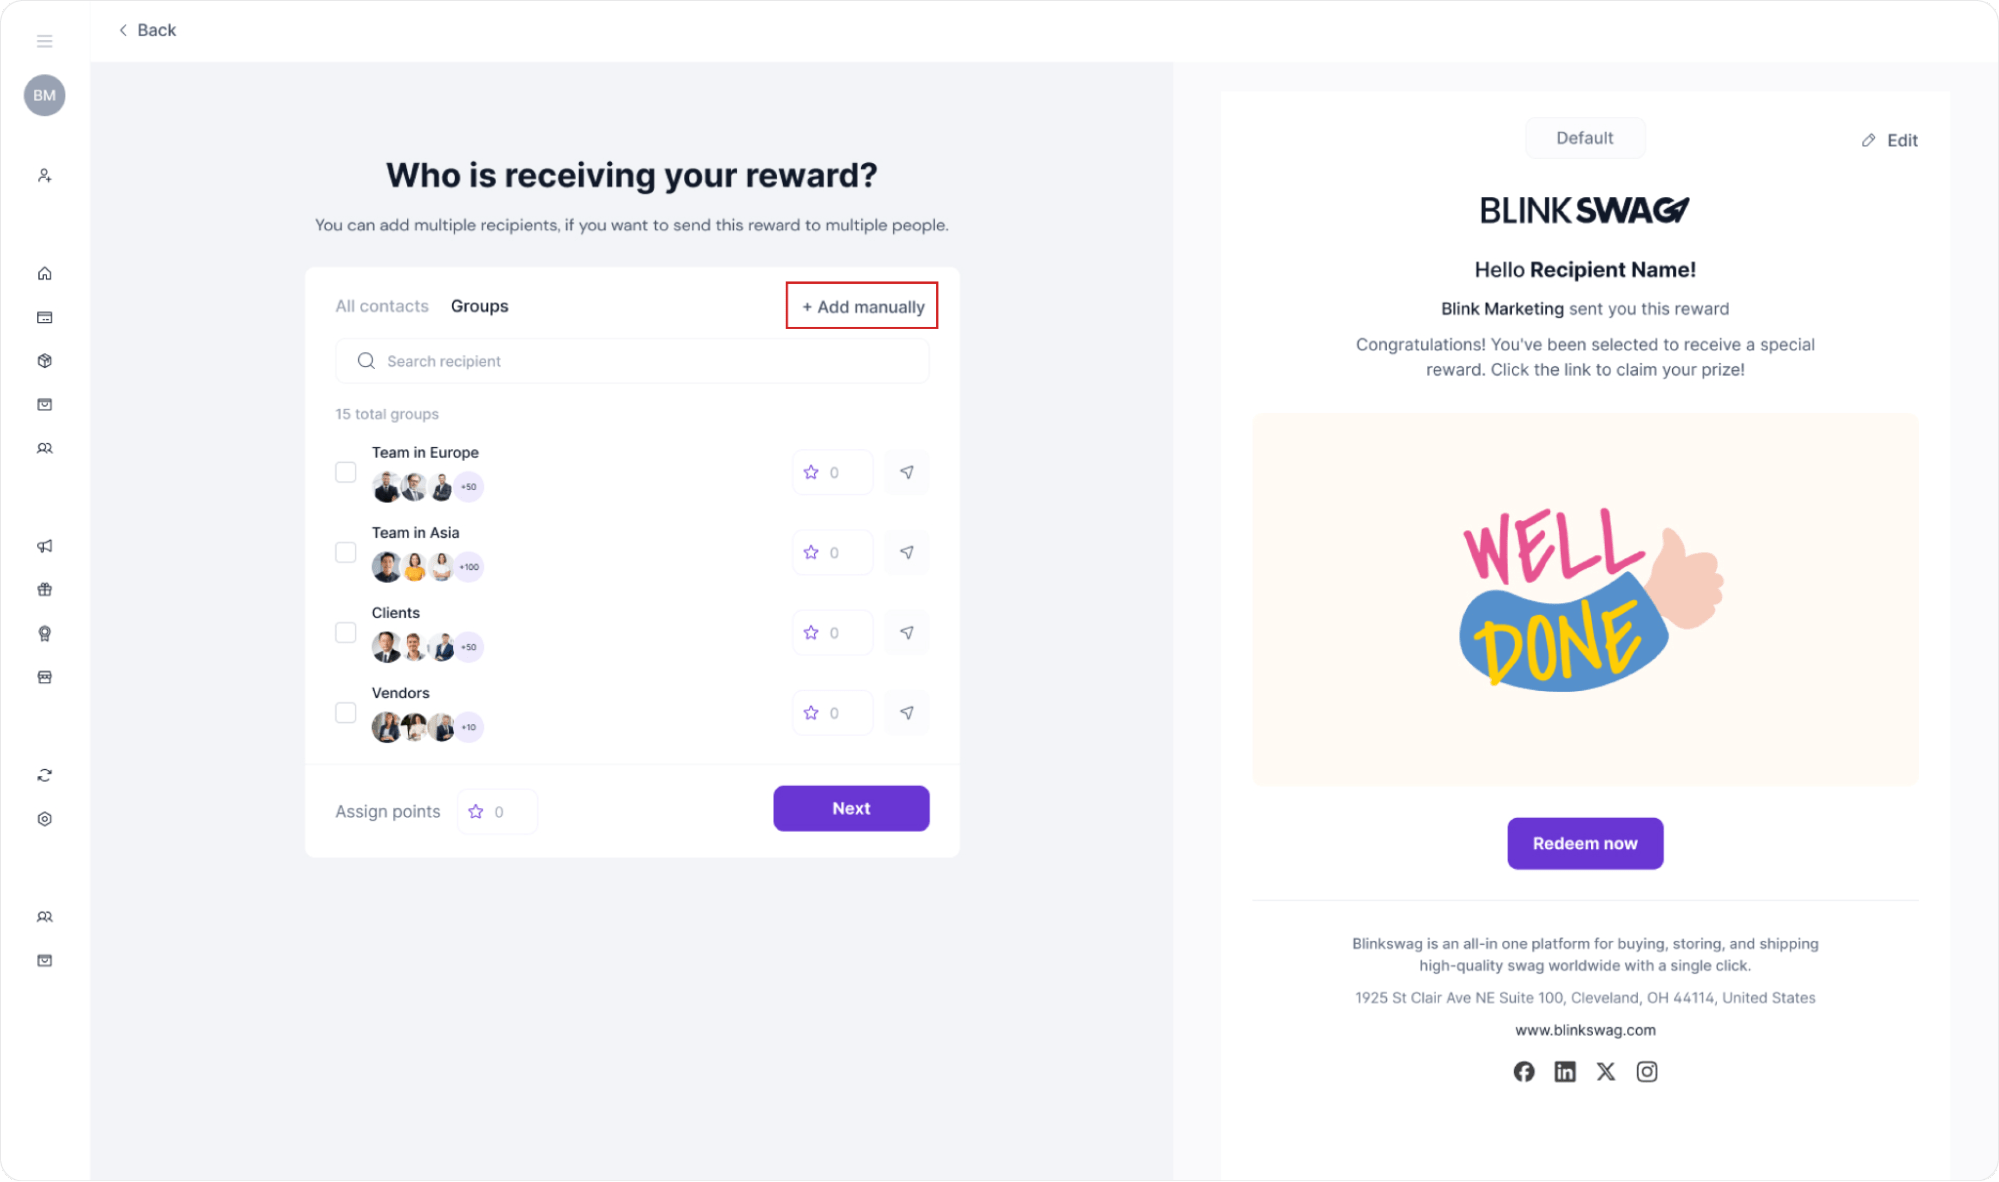
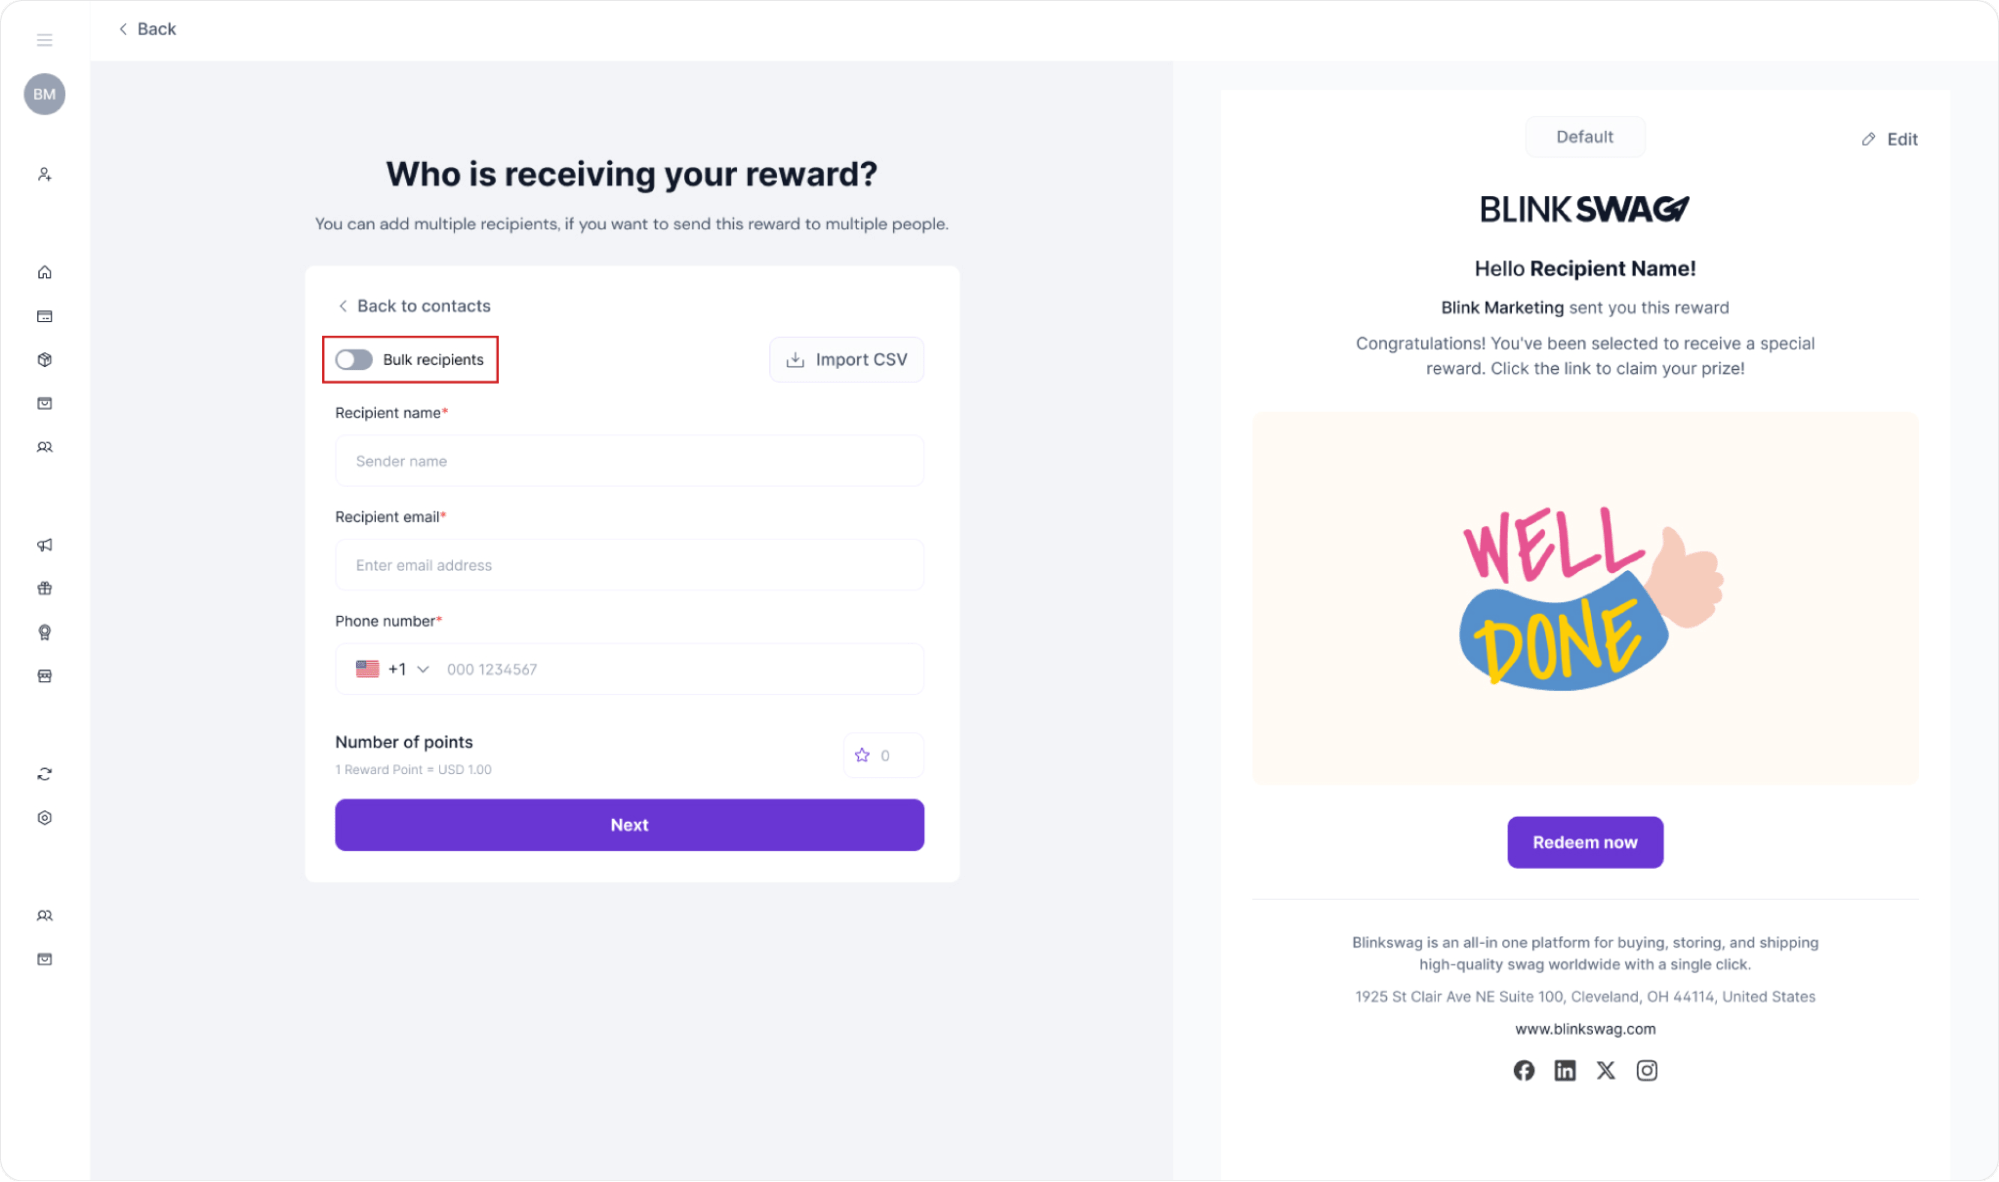
How to Send a Reward by Adding Manual Recipients
Follow these steps to add recipients manually and send them rewards if they are not already part of your existing contact list.
- Click “Add Manually”: In the Who is receiving your reward? Click the Add manually button, as highlighted in the red box. This will allow you to add new recipient information directly.
If you wish to send rewards to multiple recipients manually, follow these steps:
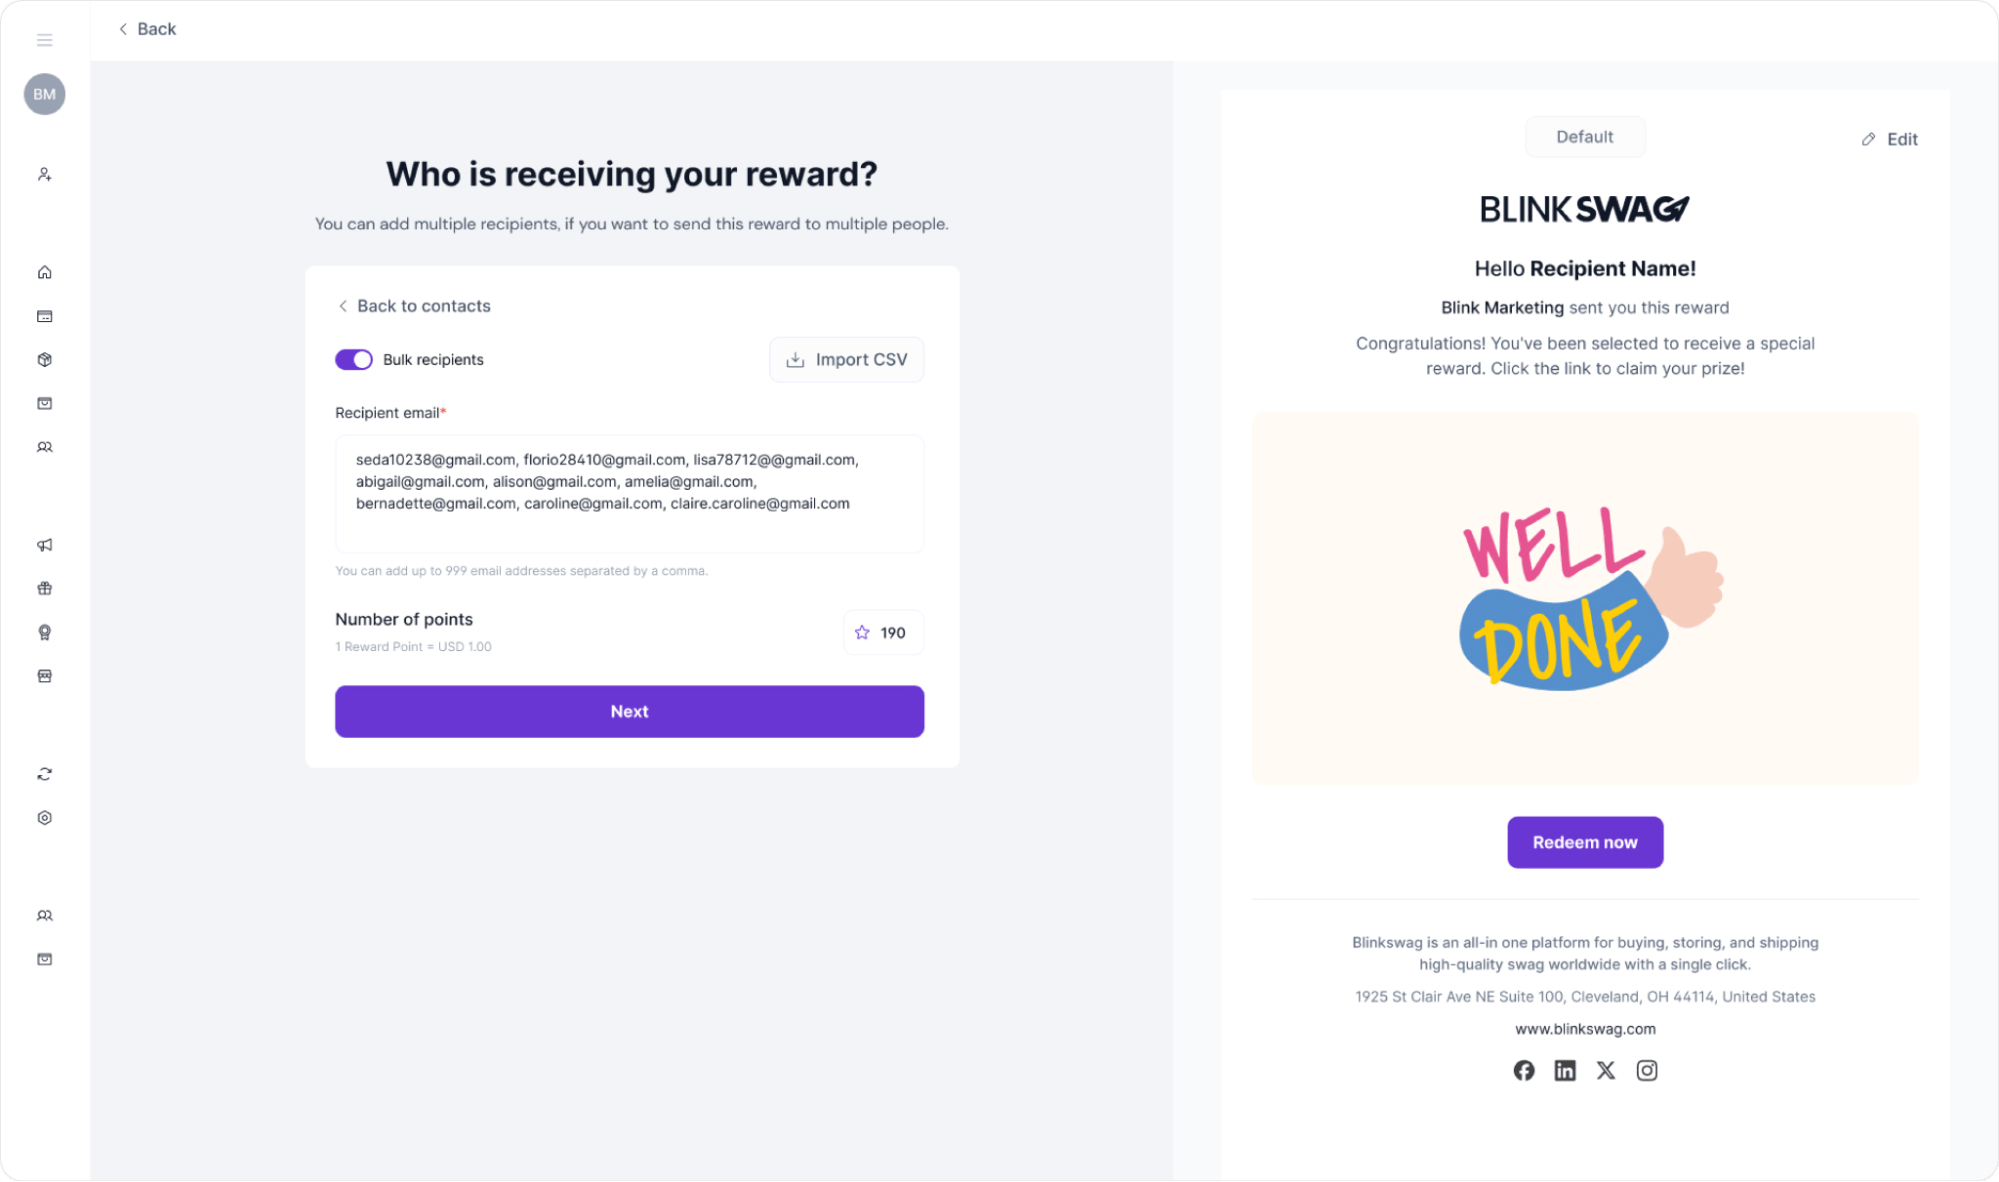
1. Enable Bulk Recipients: Who is receiving your reward? Section, toggle the Bulk recipients option, as highlighted in the red box. This will allow you to add multiple email addresses.
2. Enter Recipient Emails: In the Recipient email field, enter the email addresses of each recipient, separated by commas. You can add up to 999 email addresses in this field for bulk sending.
3. Set Number of Points: Enter the points you wish to assign to each recipient in the Number of Points field.
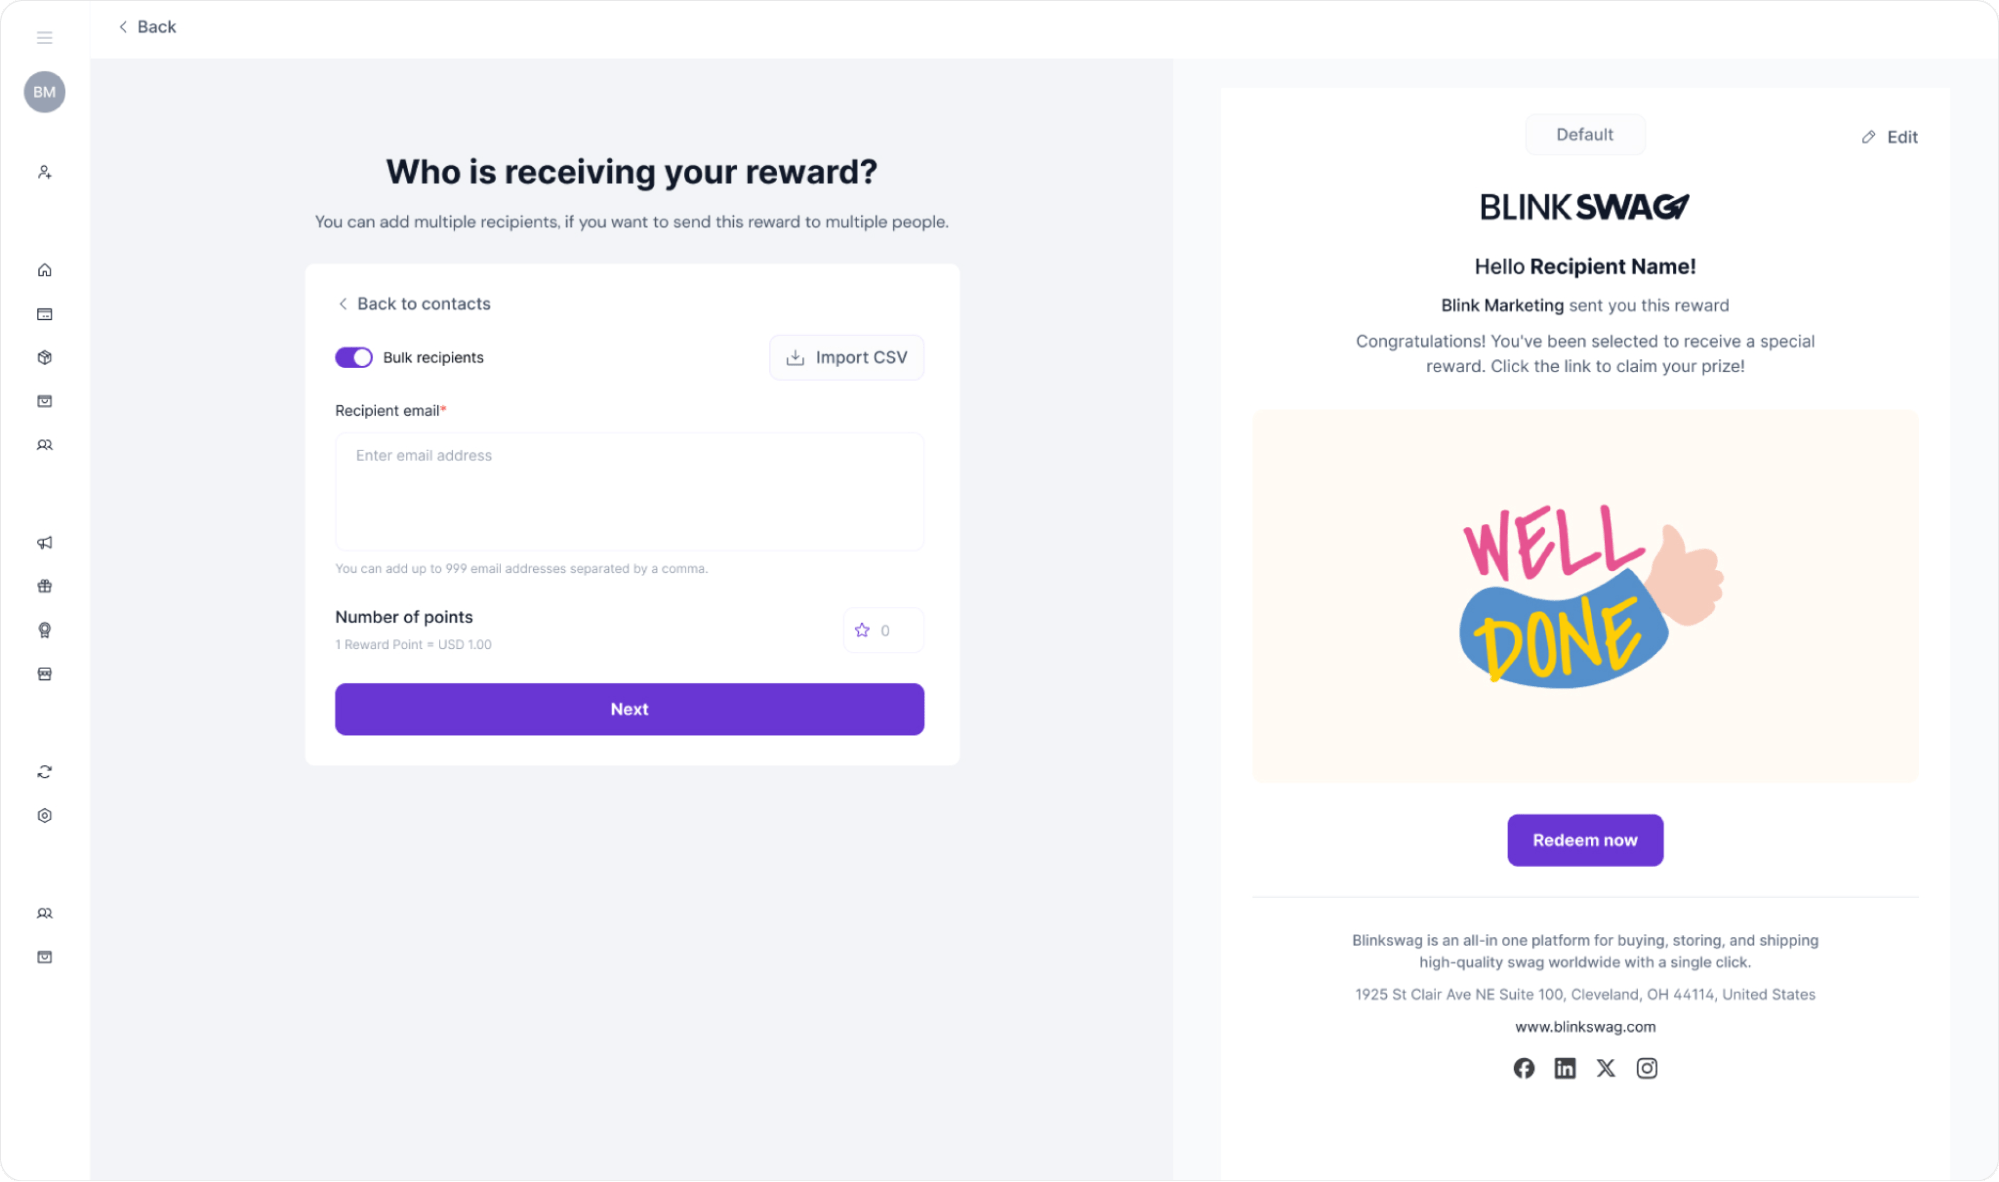
This approach is ideal for quickly sending rewards to many recipients without needing to pre-add them to your contact list.
Final Step: Confirm and Send Reward to Manually Added Recipients
1. Review Recipient Details: Ensure all manually added email addresses are correct on the verification page. You can see a list of all recipients, totalling 9.
2. Verify Assigned Points: Double-check the number of points assigned to each recipient, which is displayed as a single total. Here, 190 points are being sent to each recipient.
3. Preview the Notification: The email preview shows what recipients will see, including the reward message and a “Redeem now” button.
4. Send the Reward: Once you are sure everything is correct, click Send a reward to finalize the process. Each recipient will receive an email with their reward and instructions on redeeming it.
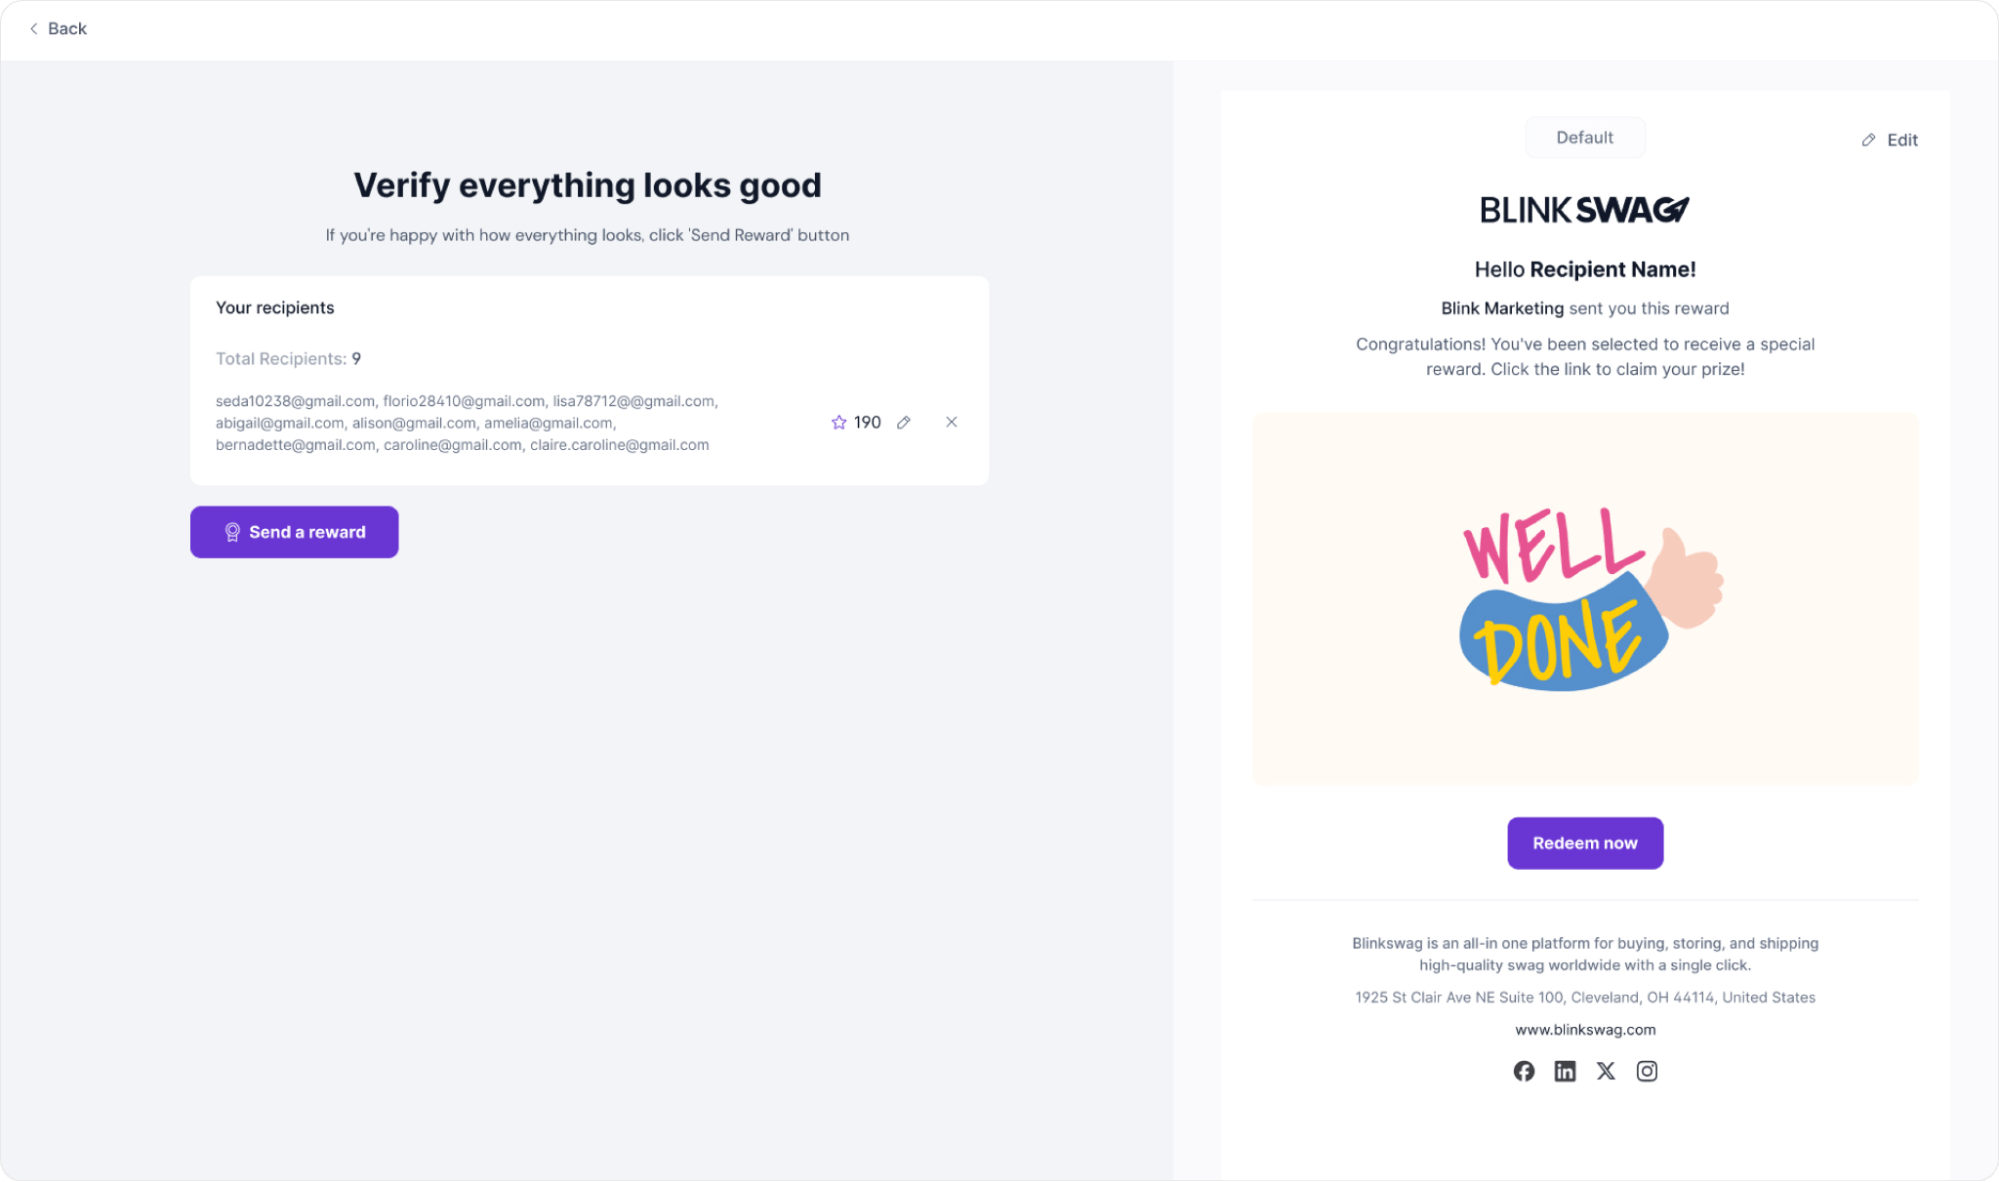
This completes the process for sending rewards to manually added recipients in bulk.
Steps to Send a Reward by Manually Adding a Single Recipient
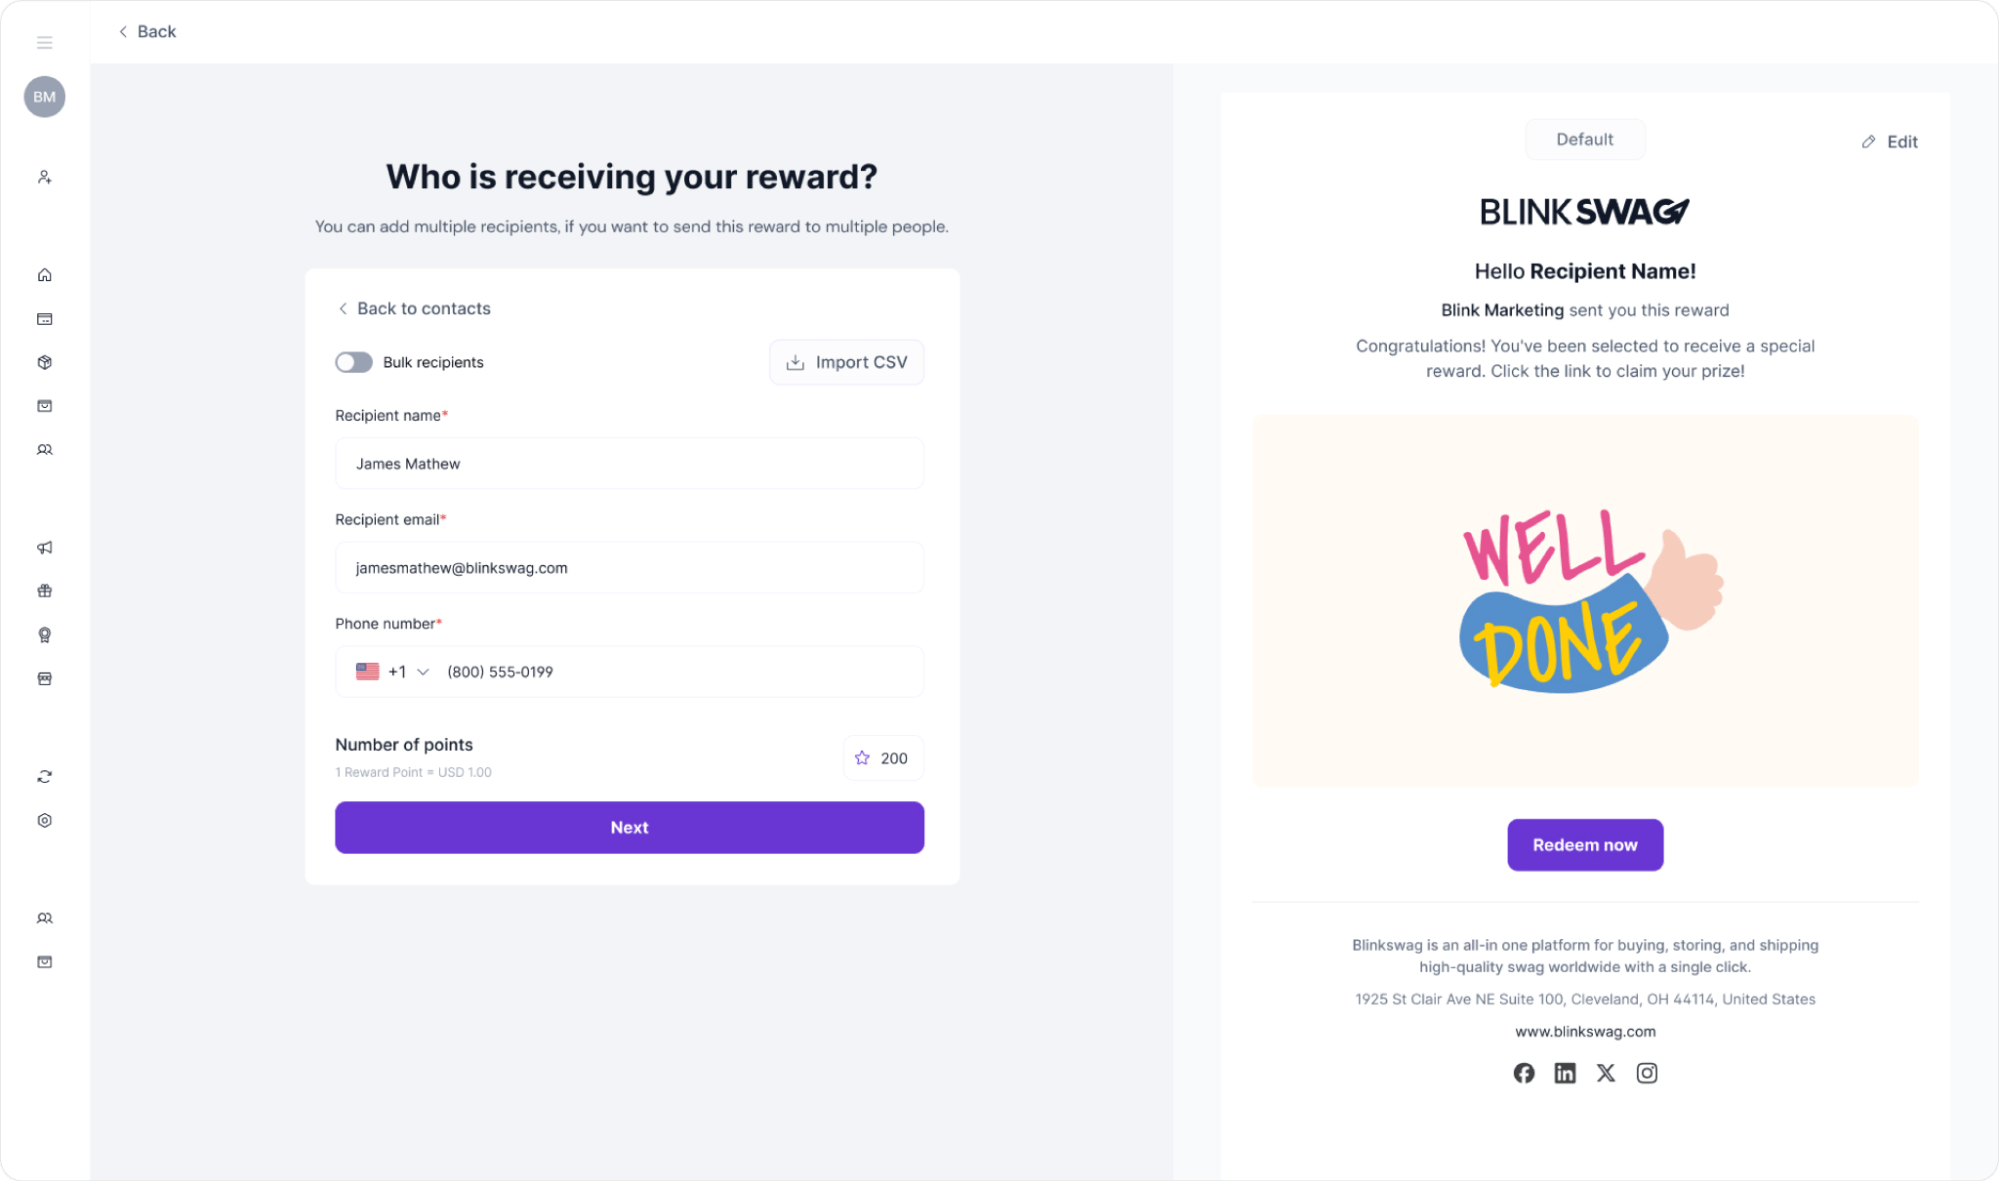
1. Select Manual Entry for Recipient: In the “Who is receiving your reward?” section, click Add manually to open the manual entry form. Ensure the Bulk recipients toggle is off to indicate that you’re sending to a single recipient.
2. Enter Recipient Information:
- Recipient Name: Type the full name of the recipient.
- Recipient Email: Input the recipient’s email address accurately to ensure they receive the reward.
- Phone Number: Add the recipient’s phone number, including the correct country code, as some rewards might send a confirmation or notification to this number.
3. Assign Points: At the bottom, specify the number of reward points you wish to allocate to this recipient. You can adjust the points to match the reward’s value.
4. Review and Continue: Click Next to proceed, where you can verify the information before sending the reward.
5. Confirmation and Send: On the next page, review the recipient’s details and the reward message on the preview screen. If everything is correct, click Send a reward to complete the process.
Final Step for Sending a Reward to a Single Manually Added Recipient
1. Verify Details:
- Confirm the recipient’s details in the “Verify everything looks good” screen.
- Ensure the recipient’s name, email, and phone number are accurate.
- Ensure that the points assigned (in this example, 200 points) match your intended reward amount.
2. Preview the Message: The preview pane on the right shows the reward email that will be sent to the recipient. Confirm that the message and branding look correct.
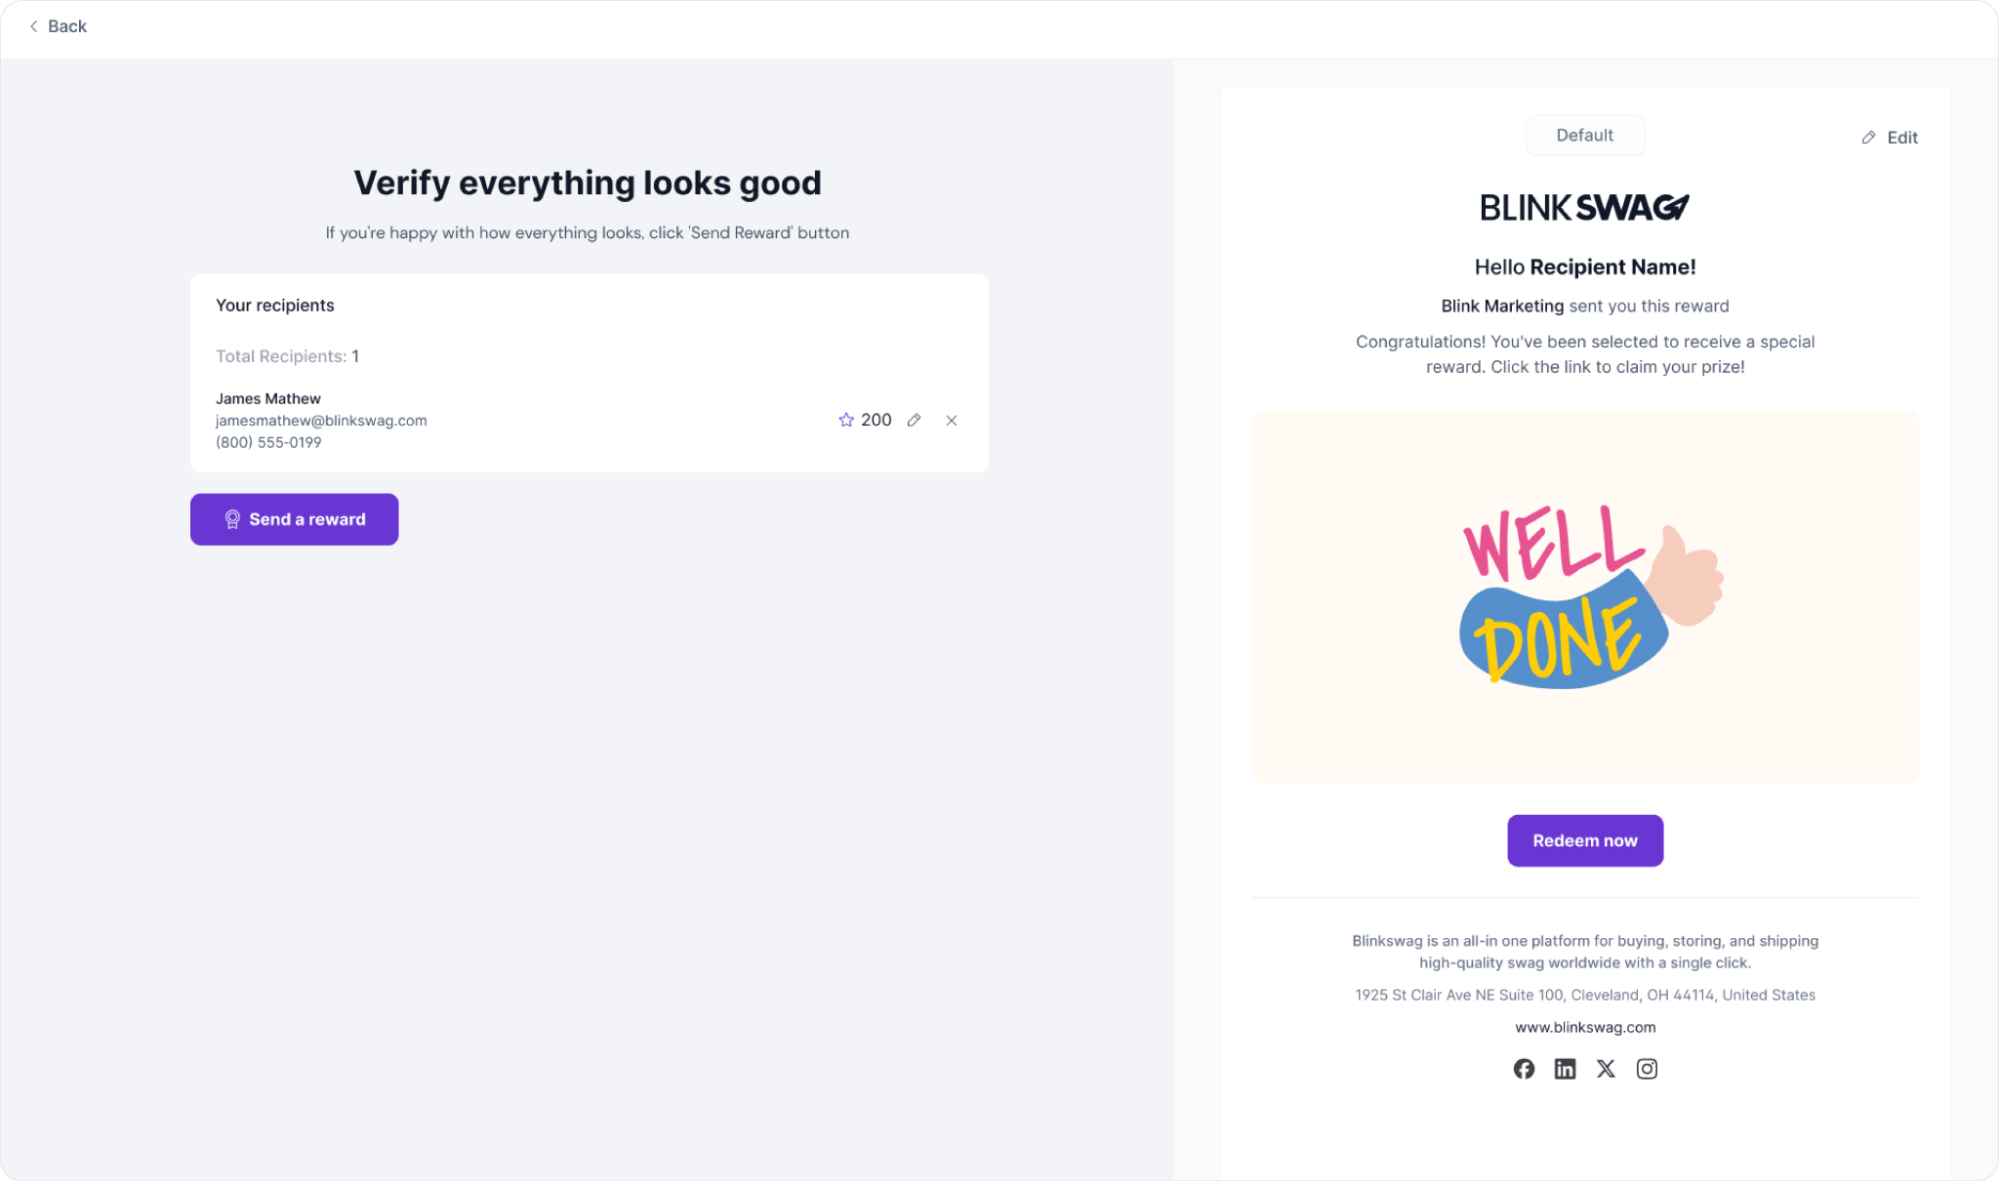
3. Send the Reward: Once all information is verified, click Send a Reward to dispatch the reward to the recipient.
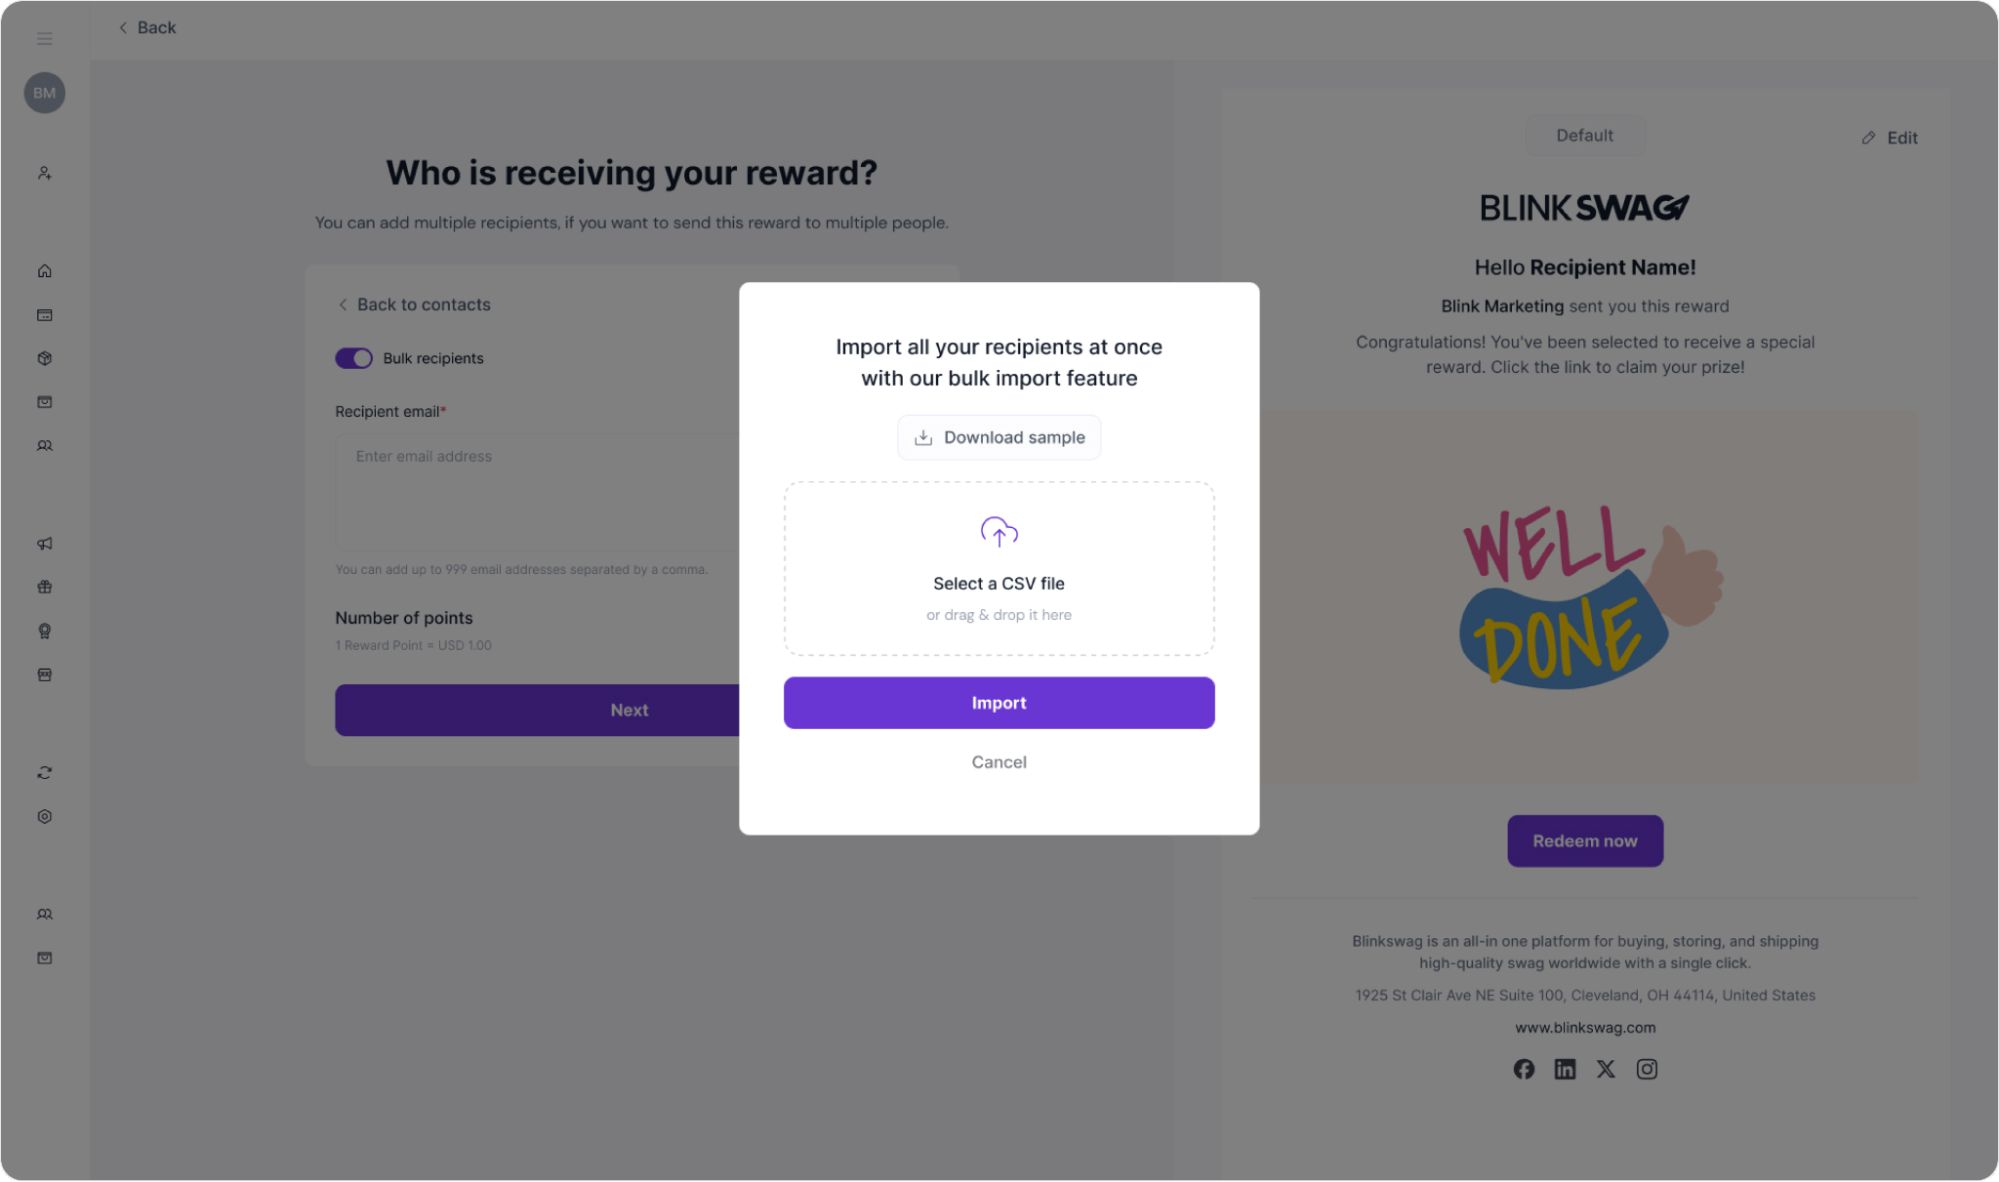
Steps to Send a Reward by Importing Recipients from a CSV
1. Navigate to the Reward Sending Section: Go to the “Who is receiving your reward?” screen.
2. Enable Bulk Recipients: If the Bulk recipients option is not already enabled, toggle it. This allows you to add multiple recipients at once.
3. Import the CSV File:
- Click on Import CSV (as shown in the screenshot).

4. Download a Sample CSV (Optional): To ensure your CSV file is formatted correctly, click on Download sample. This file will provide the required structure for recipient information, such as:
- Recipient Name
- Email Address
- Phone Number (if applicable)
5. Select or Drag & Drop Your CSV File: Use the Select a CSV file option to browse your computer for the file, or simply drag and drop it into the designated area.
6. Import the File: Once your file is selected, click Import. The platform will process the file and import all recipients listed in the CSV.
Final Review and Confirmation
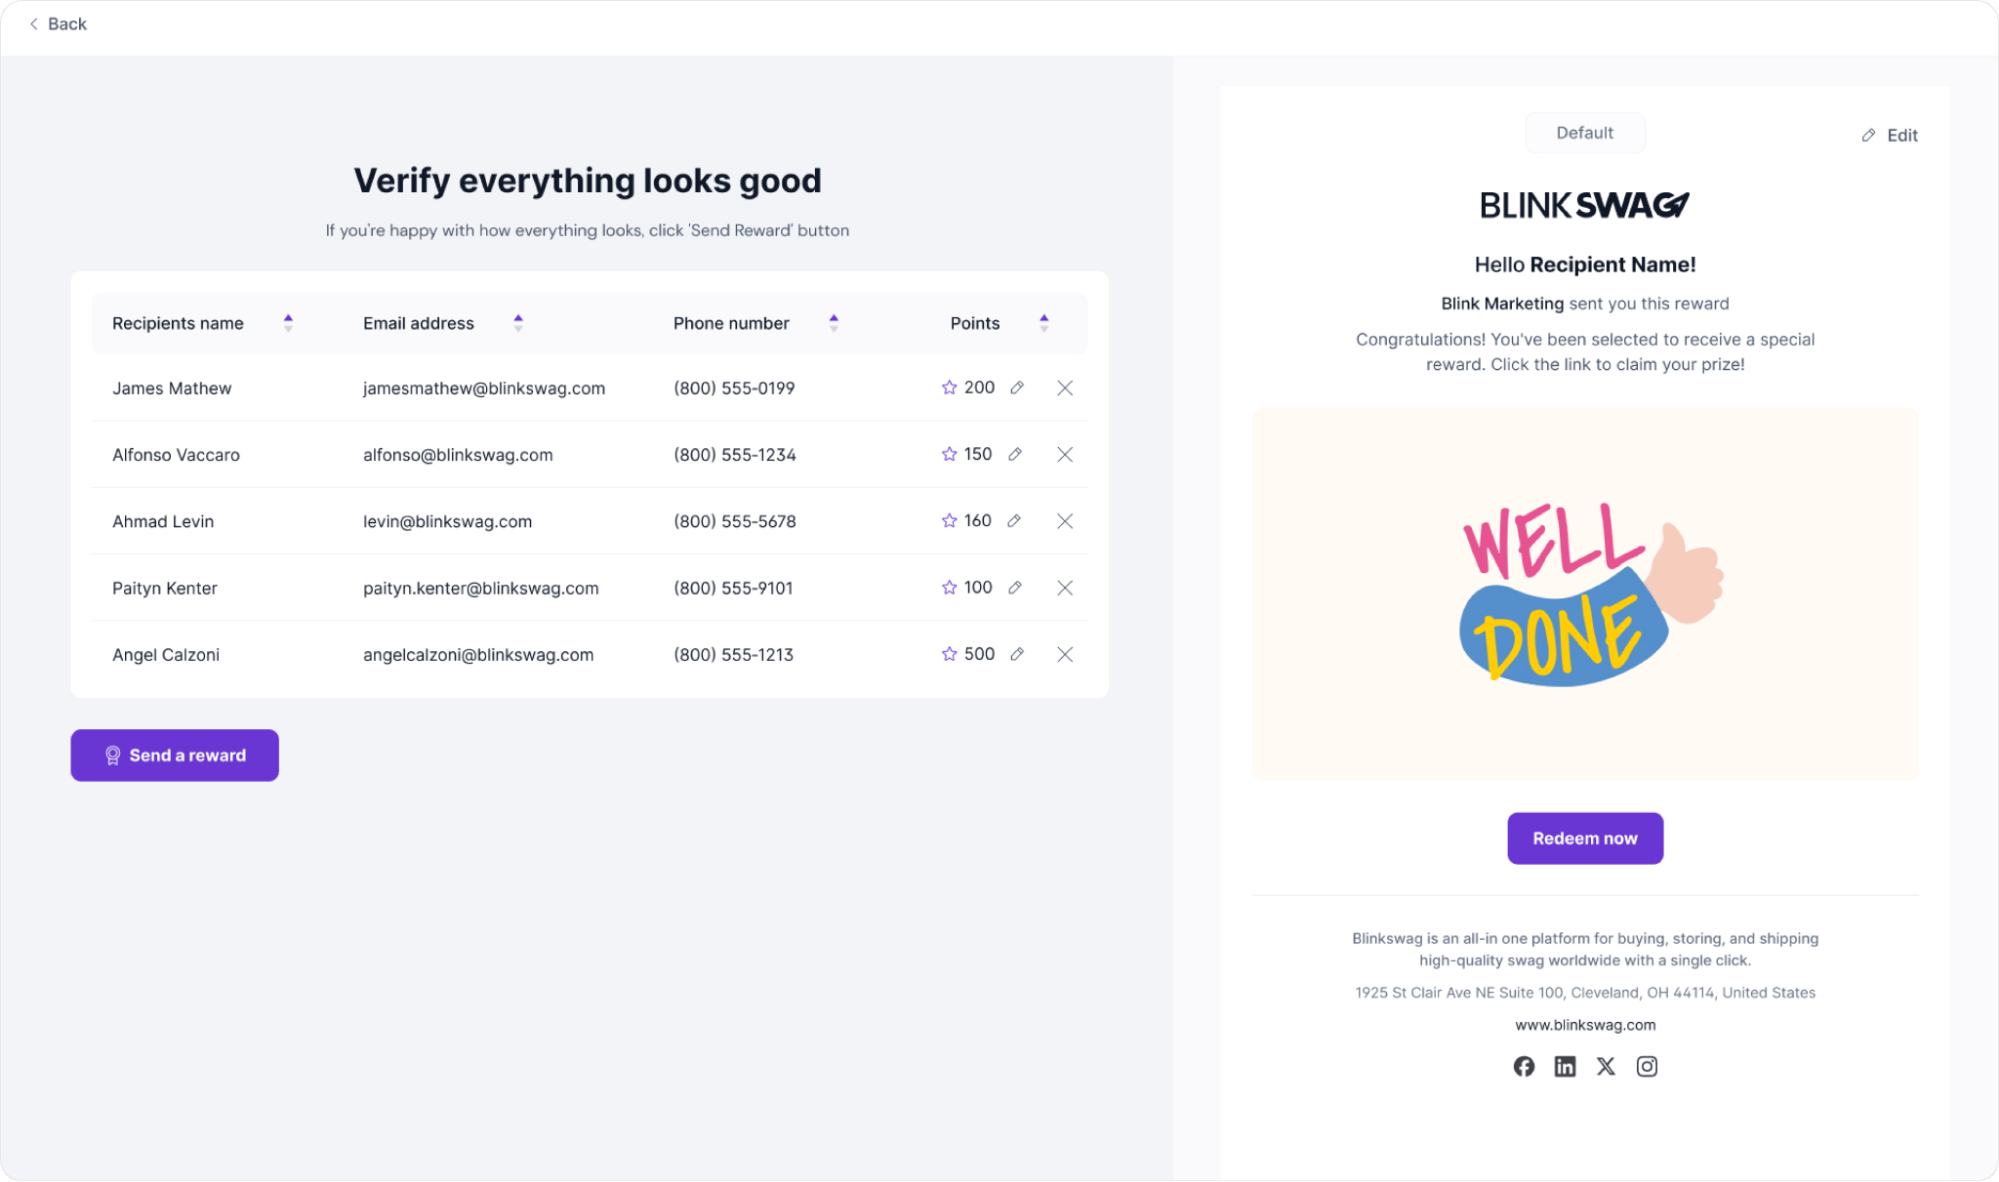
1. Verify All Details: Check the recipient details such as:
- Recipient’s Name
- Email Address
- Phone Number
- Assigned Points
Make necessary edits by clicking the edit icon next to each point value if necessary adjustments are needed.
2. Review the Reward Email Preview: On the right side, confirm the email content sent to recipients, ensuring it conveys the intended message and design.
3. Confirm and Send: Once all details are verified and look good, click the Send a Reward button to complete the process.