Accessing the Campaigns Module
1. Navigate to Campaigns
In the sidebar on the left, locate the Products section.
2. Click on “Campaigns”
Click on the “Campaigns” tab (highlighted in a red box in the image). This will open the Campaigns dashboard to view all current, active, and inactive campaigns.
3. Campaign Overview
The Campaigns dashboard displays a visual grid of existing campaigns with details such as campaign name, status (Active, Inactive, or Draft), and a preview image.
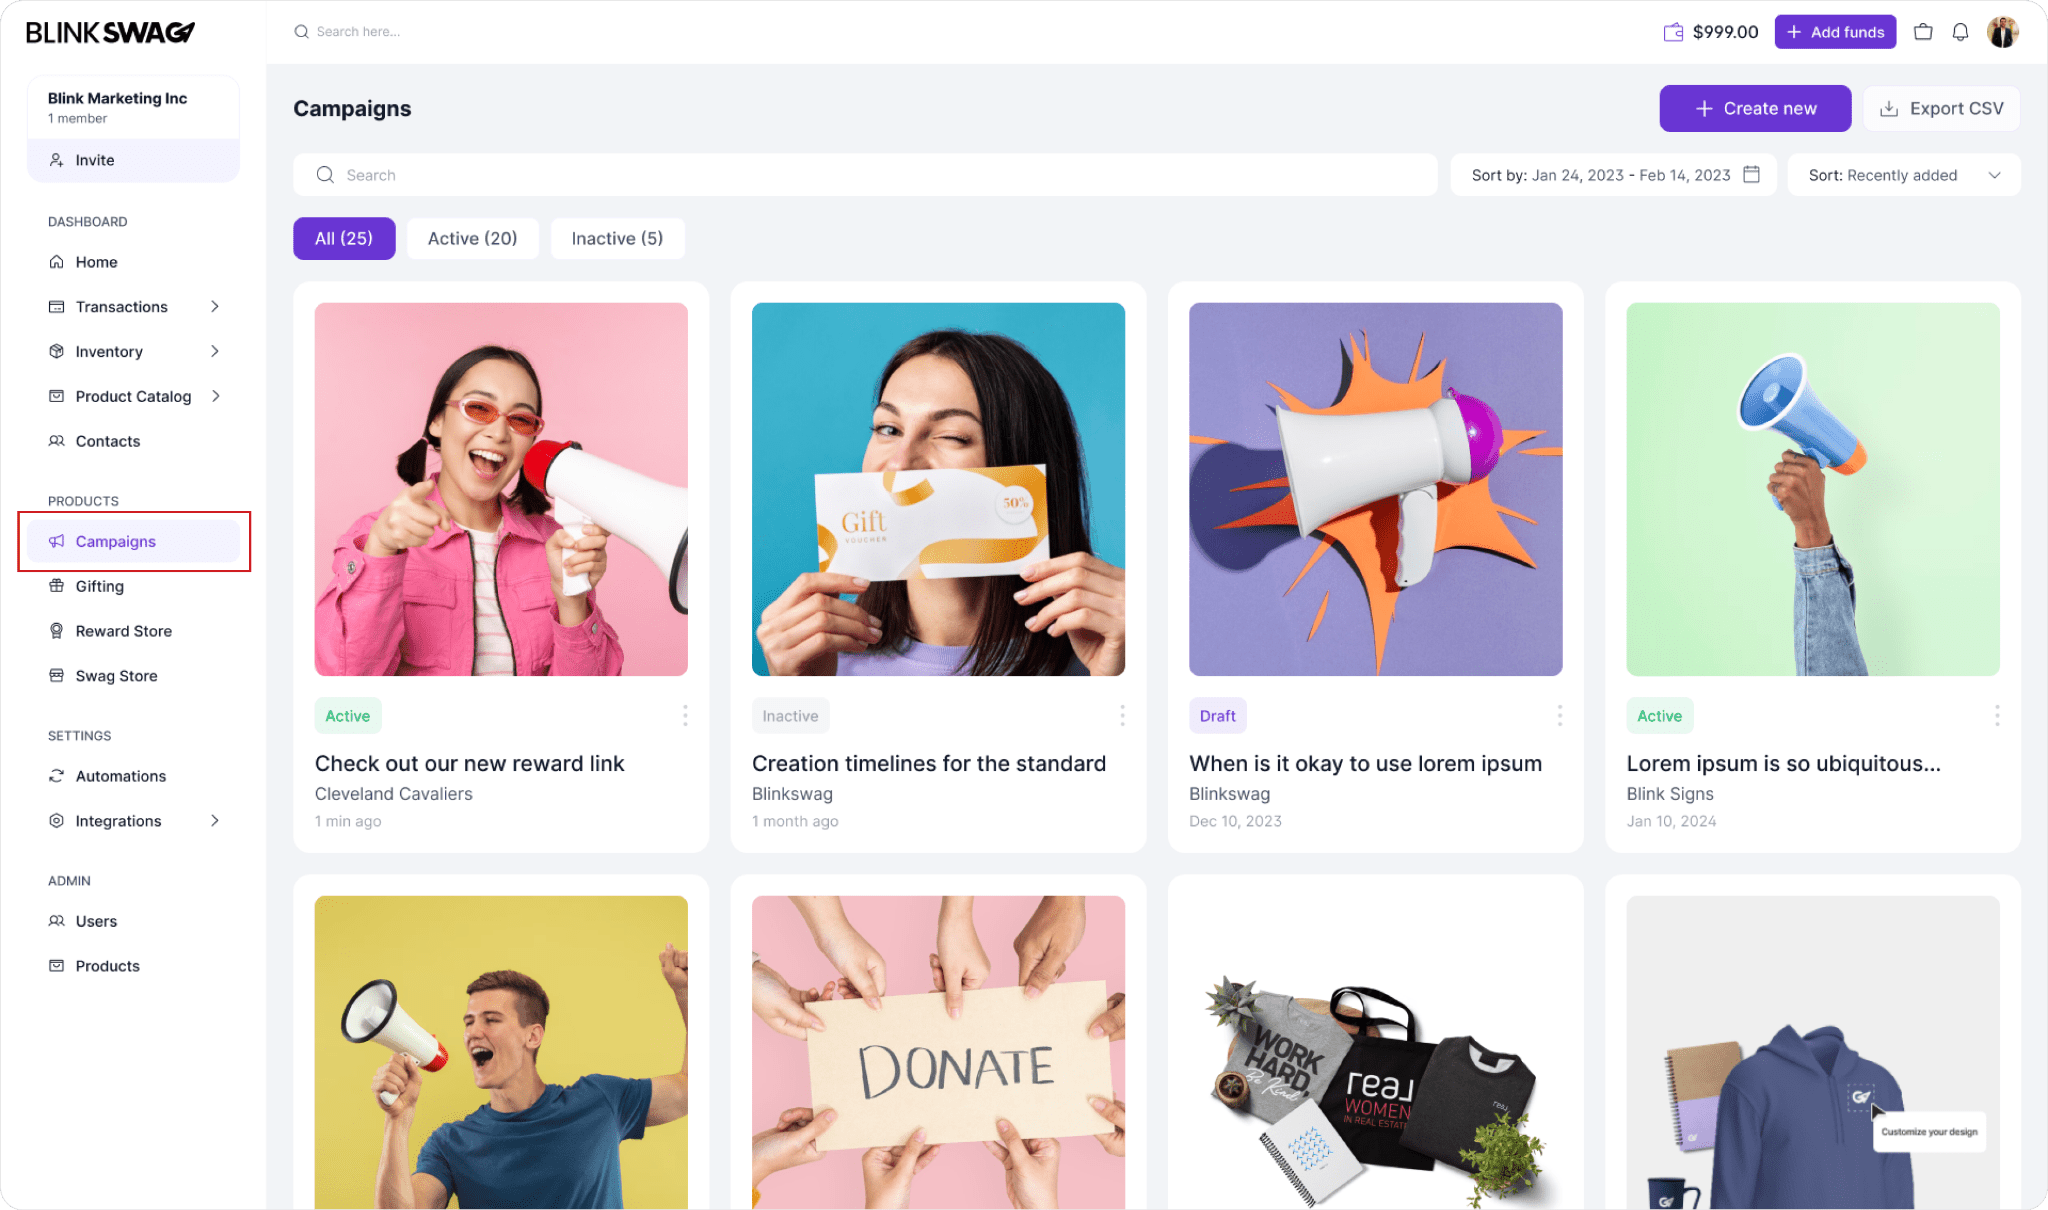
You’re now in the Campaigns module, where you can manage and create marketing campaigns.
Exporting Campaign Data
1. Locate the Export CSV Button
At the top right corner of the Campaigns dashboard, you’ll see an “Export CSV” button highlighted in the red box in the image.
2. Click on “Export CSV”
Click this button to download a CSV file containing data on all campaigns. This file can be useful for reporting, tracking campaign performance, or sharing data with other team members.
3. Save or Open the CSV File
Once downloaded, you can open the file in spreadsheet software, such as Excel or Google Sheets, to view and analyze your campaign data in detail.
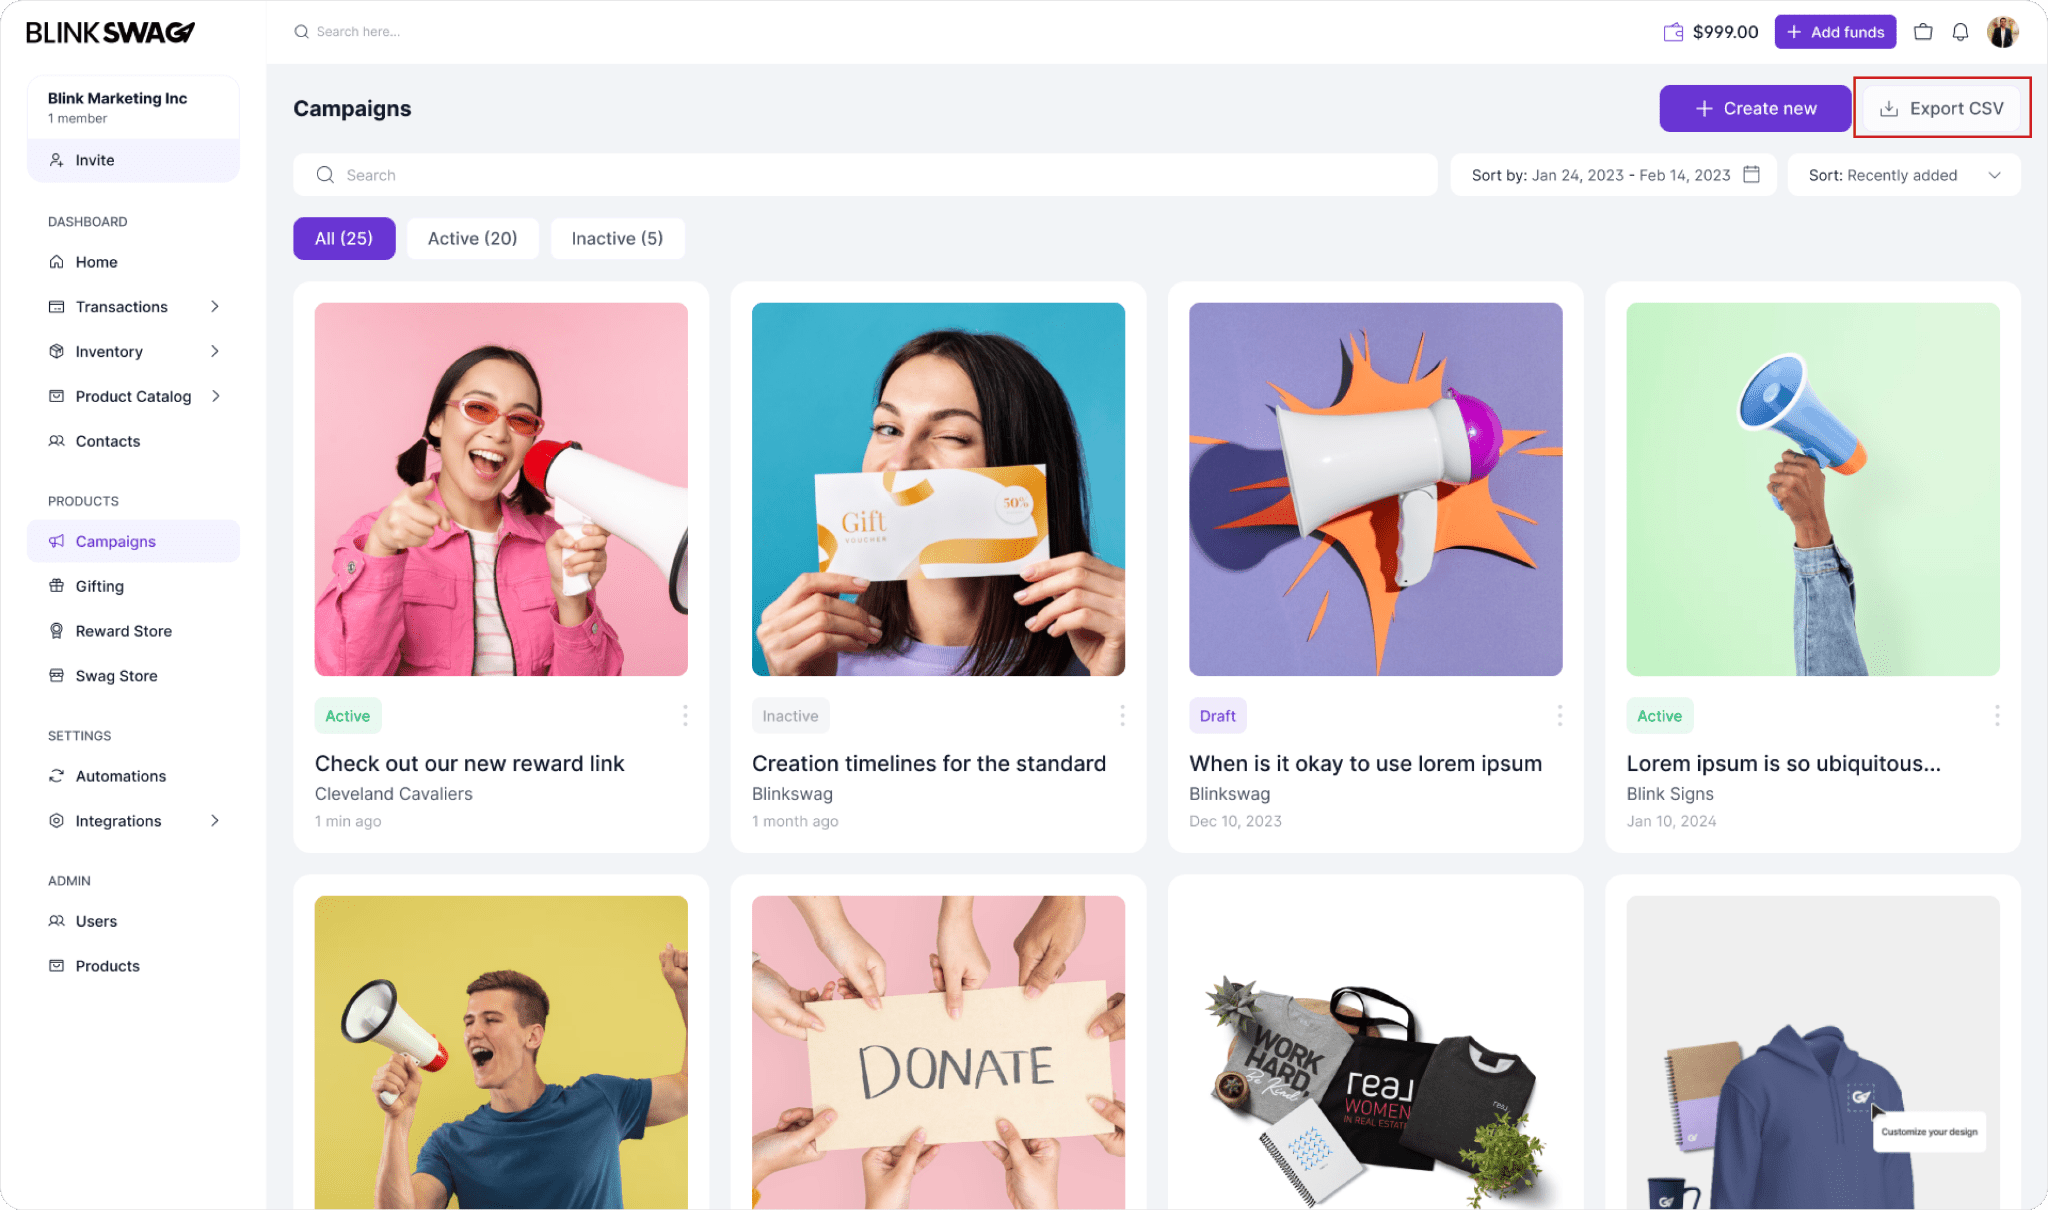
The CSV export provides a quick and accessible way to review or manage campaign information outside of the platform.
Step-by-Step Guide to Creating a Campaign
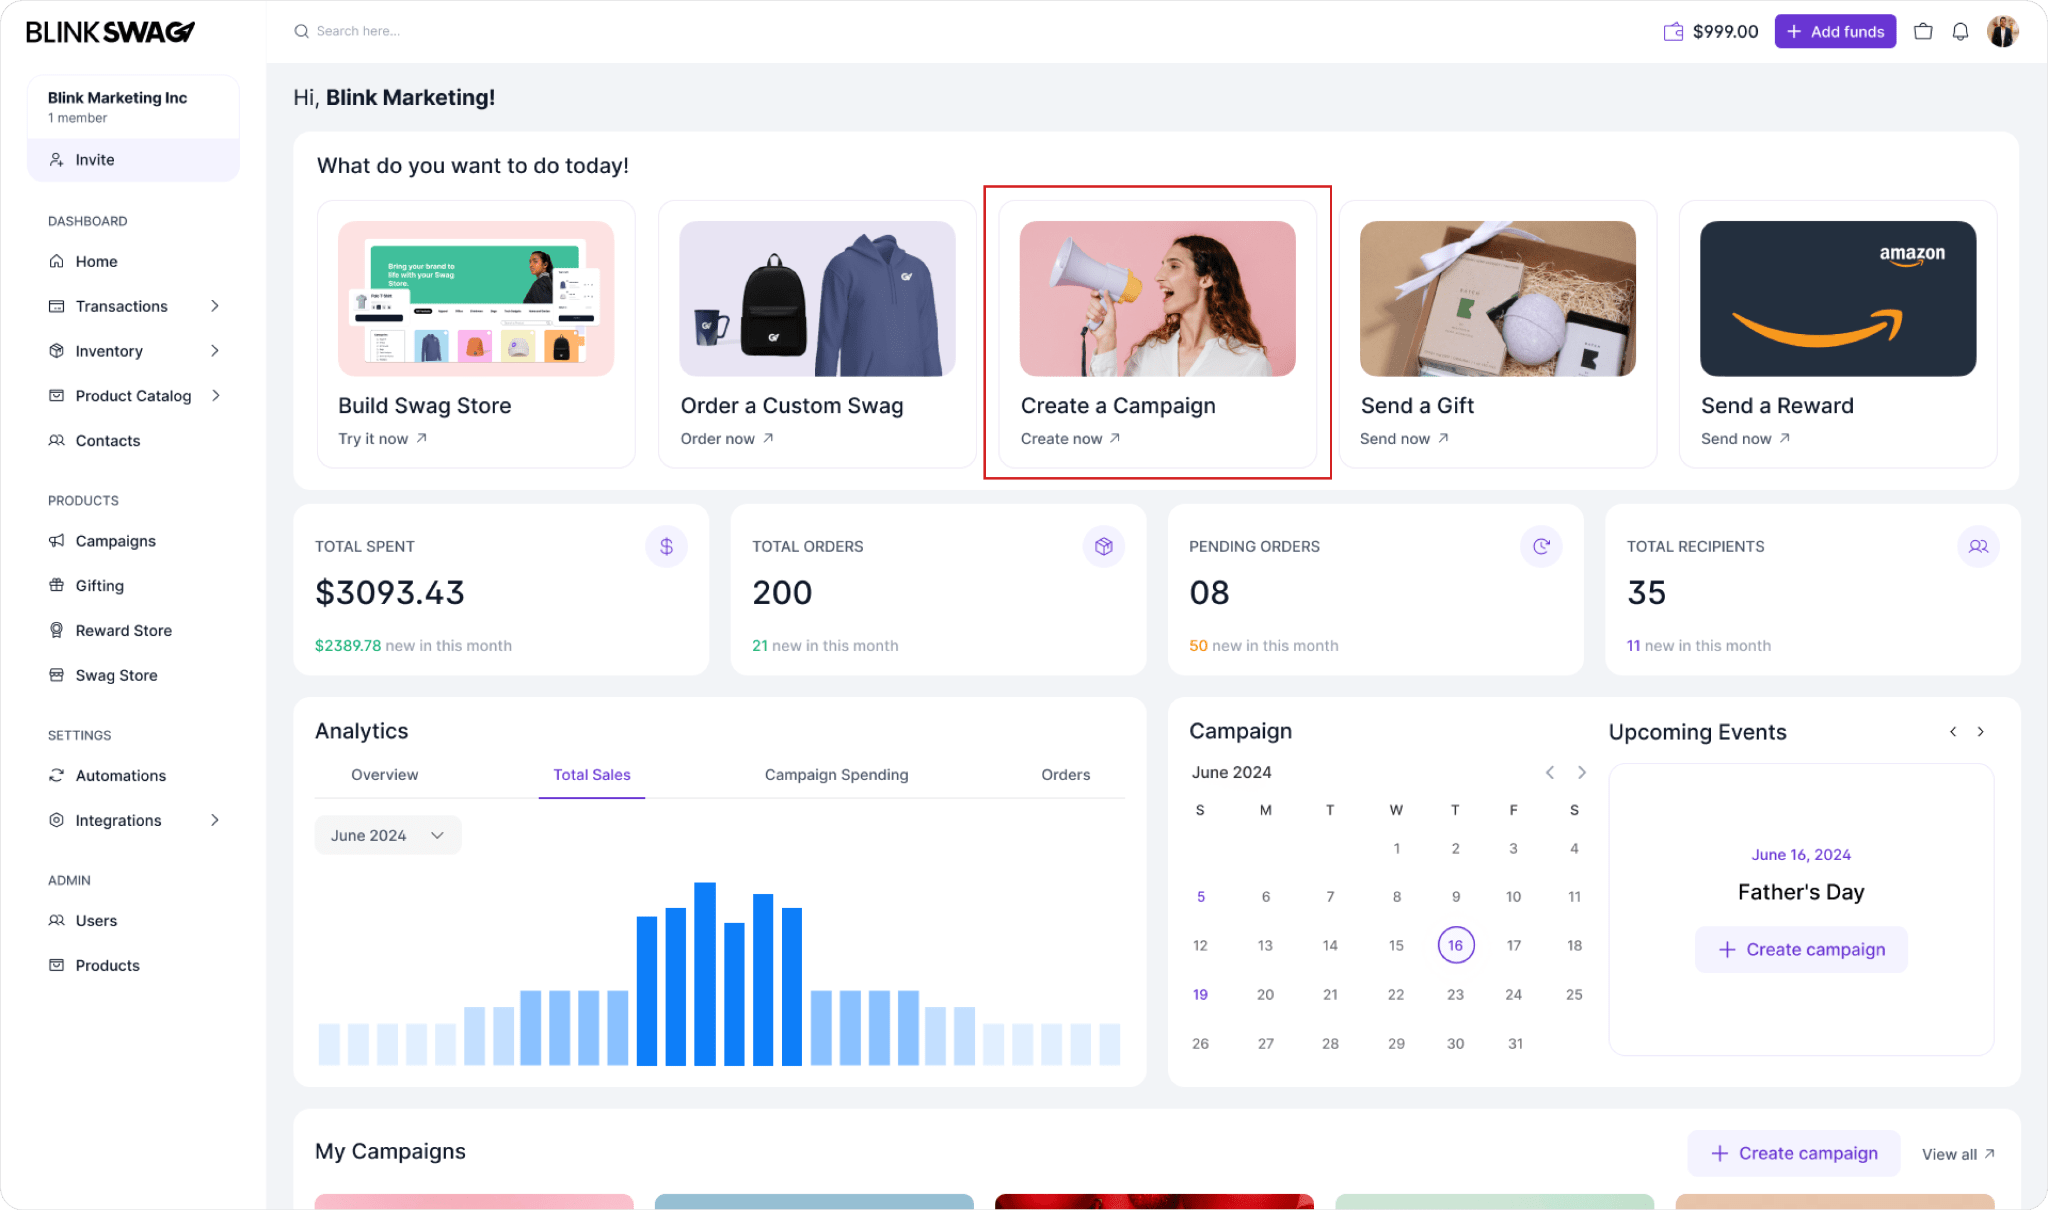
Step 1: Access the Campaign Creation Tool
- Navigate to the Dashboard
- From the main BlinkSwag dashboard, locate the “What do you want to do today?” section.
- Select “Create a Campaign”
- Click on the Create a Campaign tile highlighted in red. This will open the campaign creation module where you can begin setting up your new campaign.
Enter Campaign Details
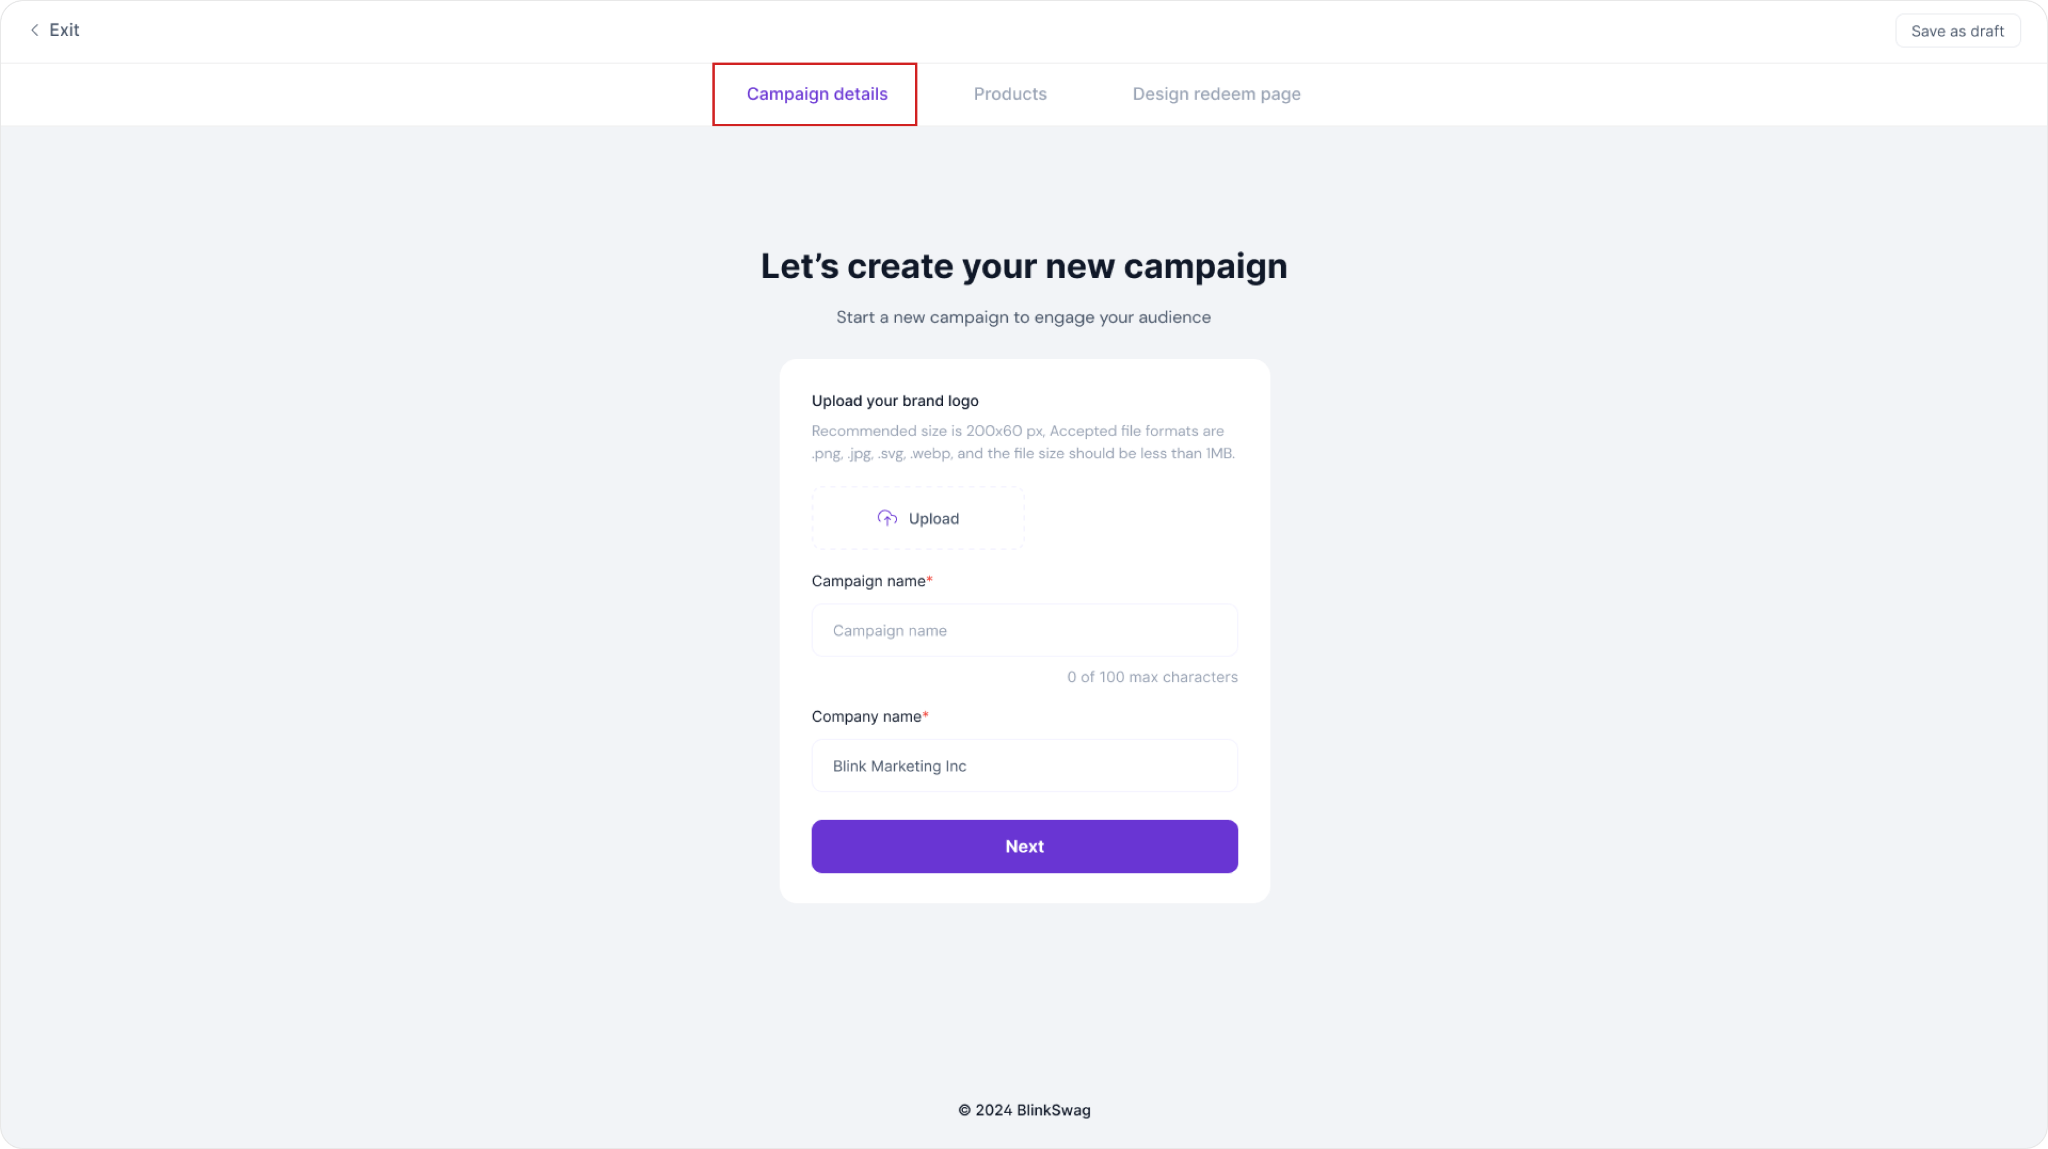
- Upload Brand Logo: In the Campaign details tab, click on the Upload button to add your brand logo. Ensure your logo file is under 1MB and in a supported format (.png, .jpg, .svg, .webp).
- Name Your Campaign: Enter a unique and descriptive name in the Campaign name field to easily identify it later.
- Verify Company Name: Ensure the Company name field is correct. This is pre-filled but can be updated if necessary.
- Proceed to the Next Step: Click the Next button to save these details and continue to the product selection phase of your campaign setup.
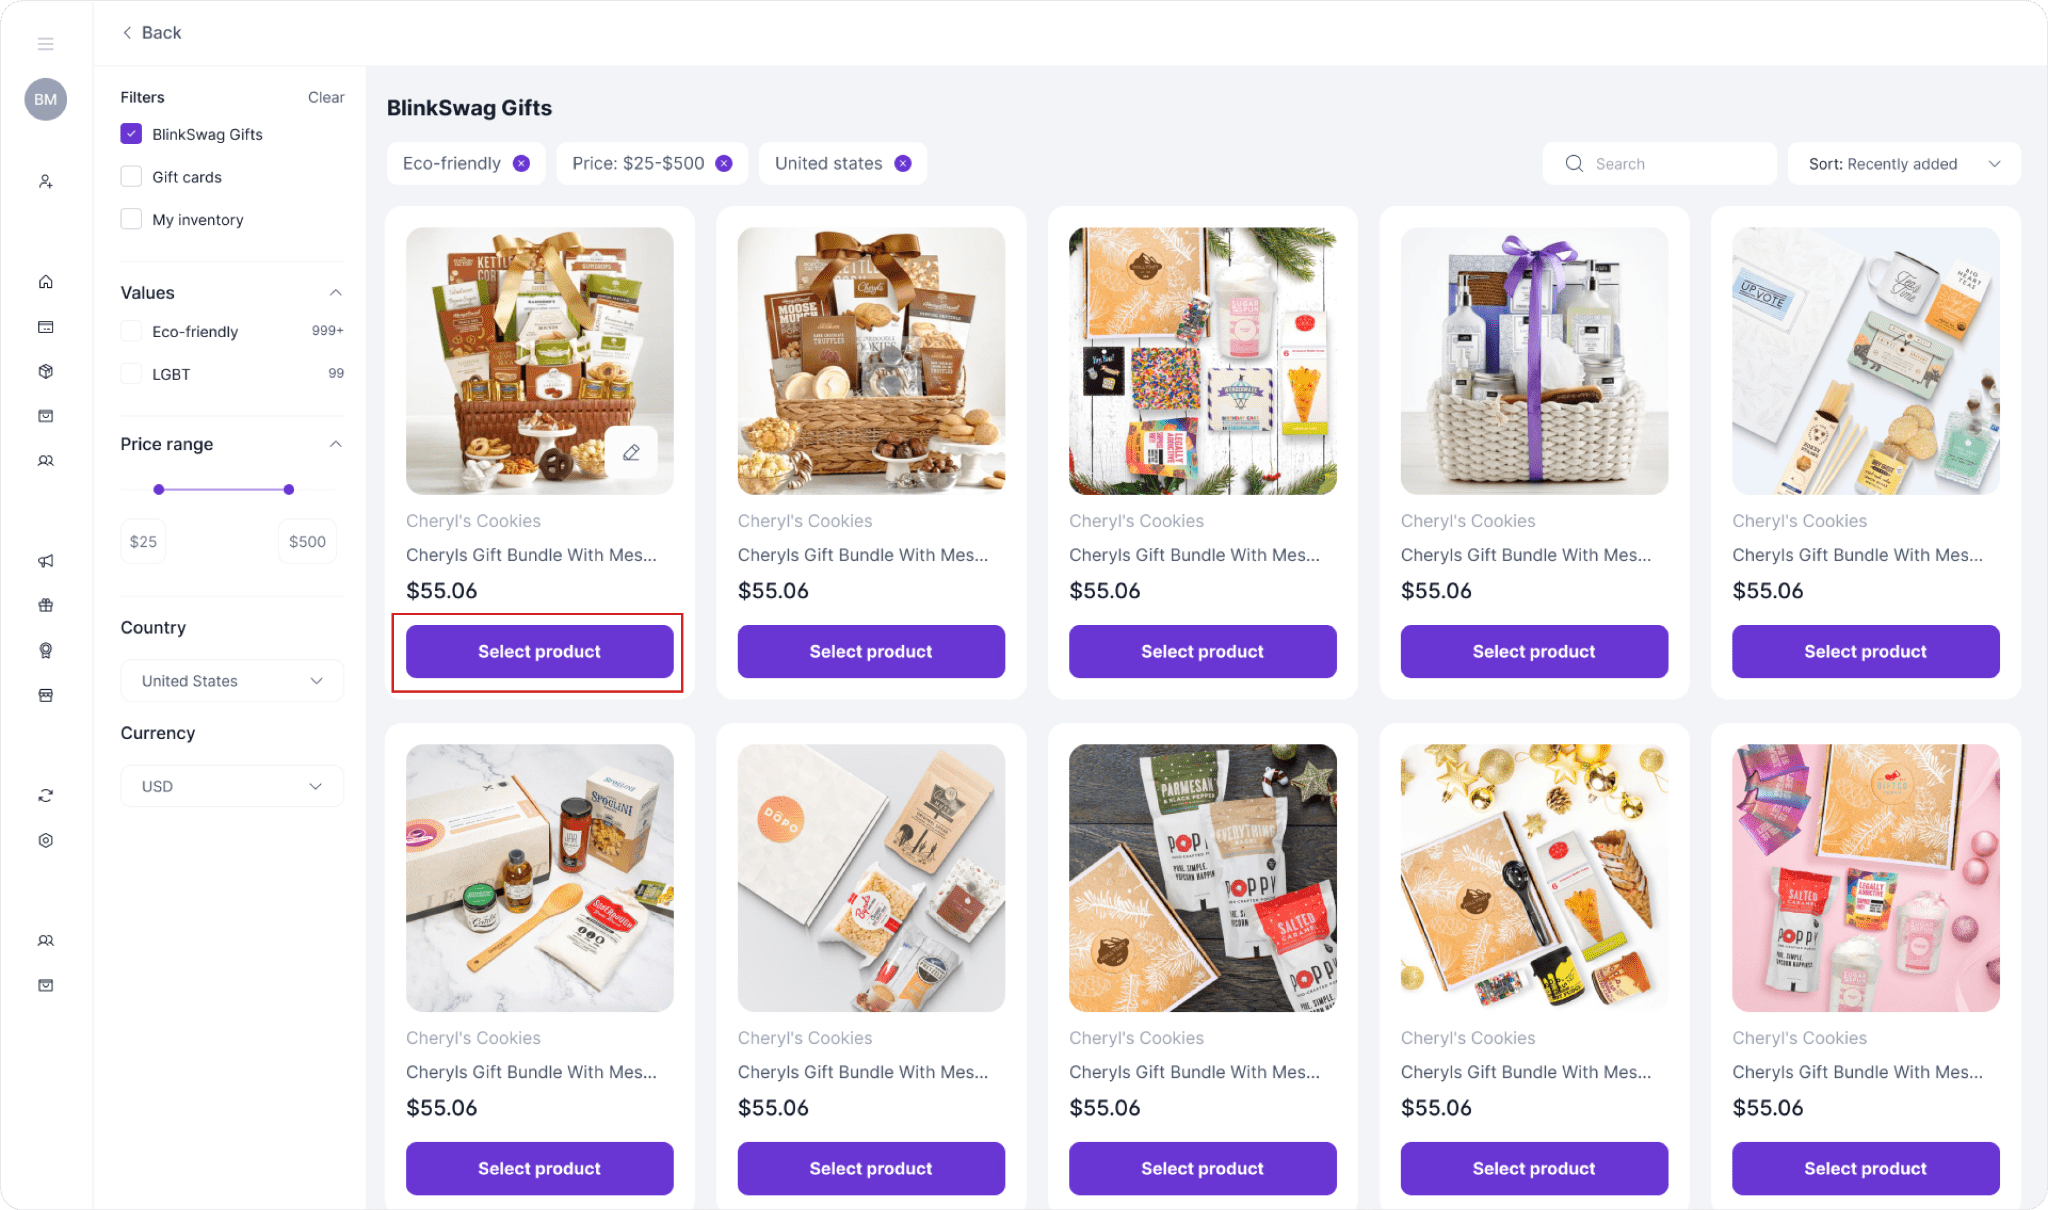
Select Products for Your Campaign
- Filter Products (Optional)
- Use the filters on the left panel to refine the product selection based on category, values (e.g., eco-friendly), price range, country, and currency. This will help narrow down your options to match your campaign’s theme or budget.
- Browse Products
- Scroll through the available products under “BlinkSwag Gifts” (or other selected categories). Each product displays a preview image, title, and price to assist in selection.
- Choose a Product
- Click Select product on any item you want to include in your campaign. This will add the item to your campaign’s product list.
Finalize Product Selection and Proceed
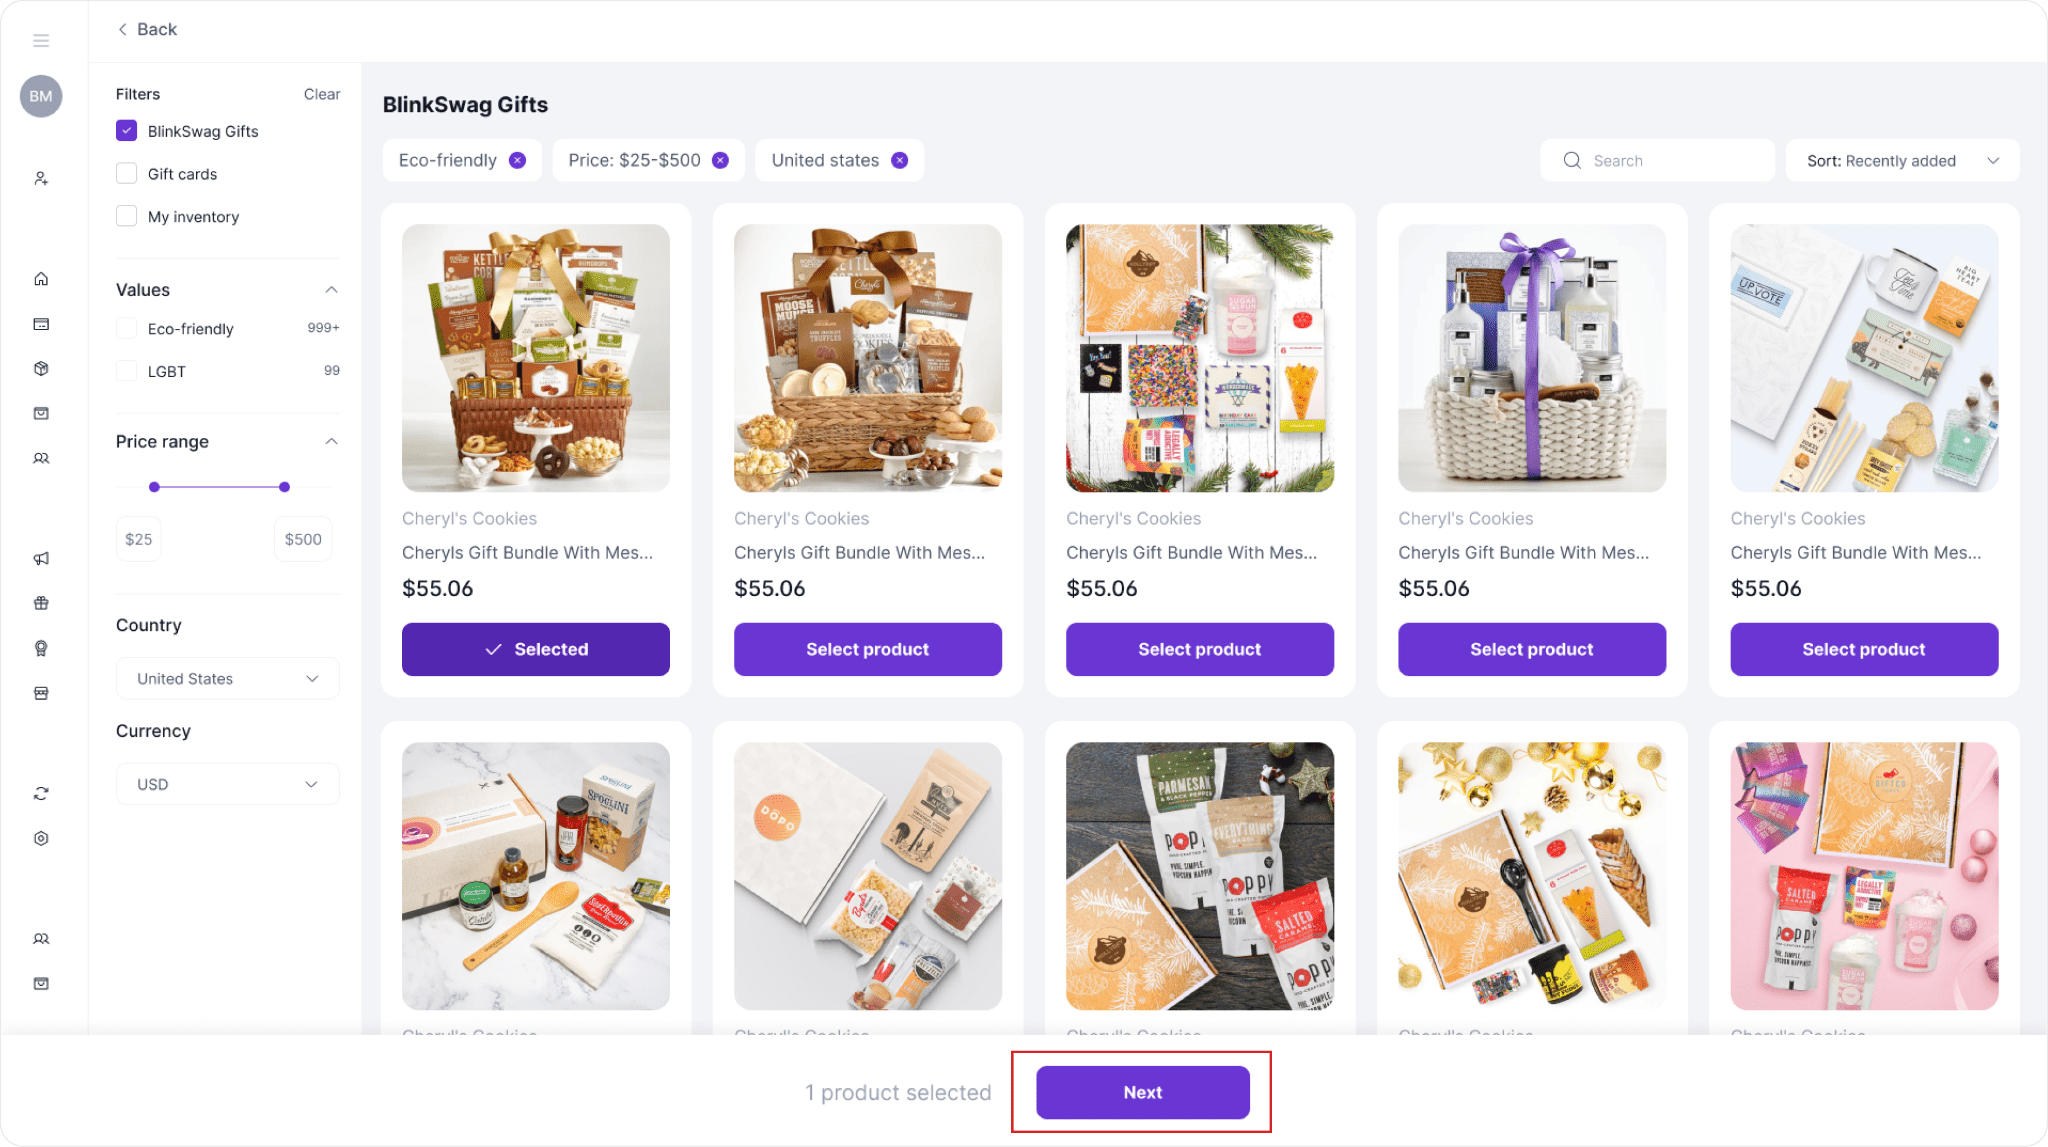
- Confirm Product Selection: After choosing your desired products, each selected item will display as “Selected.” You can review all selected products before continuing.
- Proceed to Next Step: Once you’ve finalized your choices, click the Next button at the bottom of the screen to move forward in creating your campaign.
Remove a Selected Product
- Locate the Product to Remove: In the “Products” list, find the item you want to remove from your campaign.
- Click the Remove Icon: On the right side of the product row, click the X icon in the “Action” column. This will instantly remove the product from your campaign selection.
- Confirm Removal: The product will no longer appear in your selected items list. You can add it back later if needed by clicking Add products and re-selecting it.
Customizing Redeem Page for Your Campaign
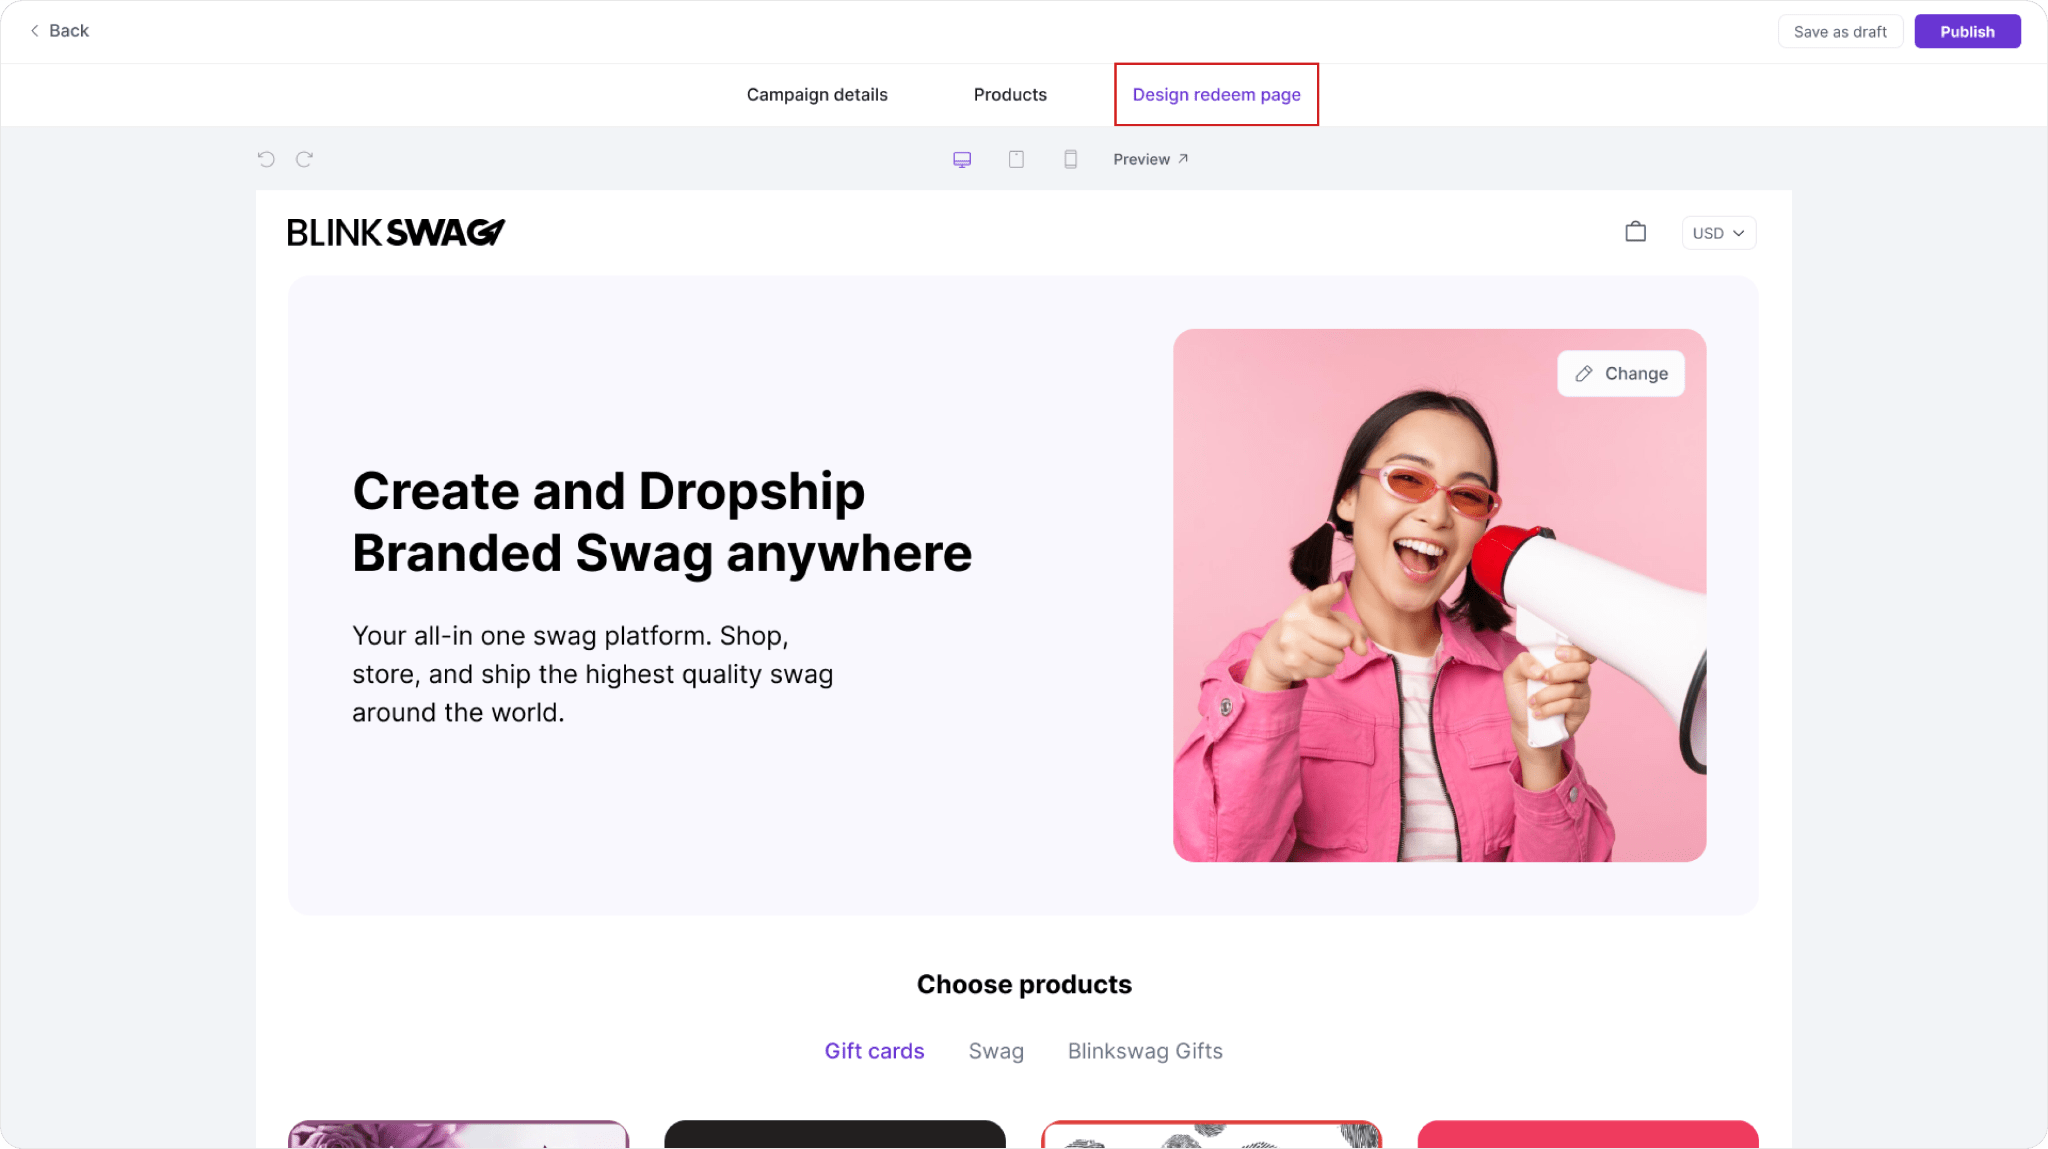
- Navigate to the Design Redeem Page Tab: After selecting your products, click on the Design Redeem Page tab at the top to start customizing the campaign’s redemption page.
- Customize the Page Layout and Content
Here, you can tailor the look and feel of the page where users will redeem their rewards:- Headline and Text: Edit the main title and description to align with your campaign’s branding and message.
- Image: Click on the Change button over the main image to upload or choose an image that represents your campaign.
- Preview Your Design
To ensure your design looks good across all devices, use the preview icons at the top to view how the page will appear on desktop, tablet, and mobile. - Save and Proceed
Once satisfied with your design:- Click Save as draft if you want to continue editing later.
- Click Publish if you’re ready to make the campaign live.
Quick Edit Campaign Redeem Page Content
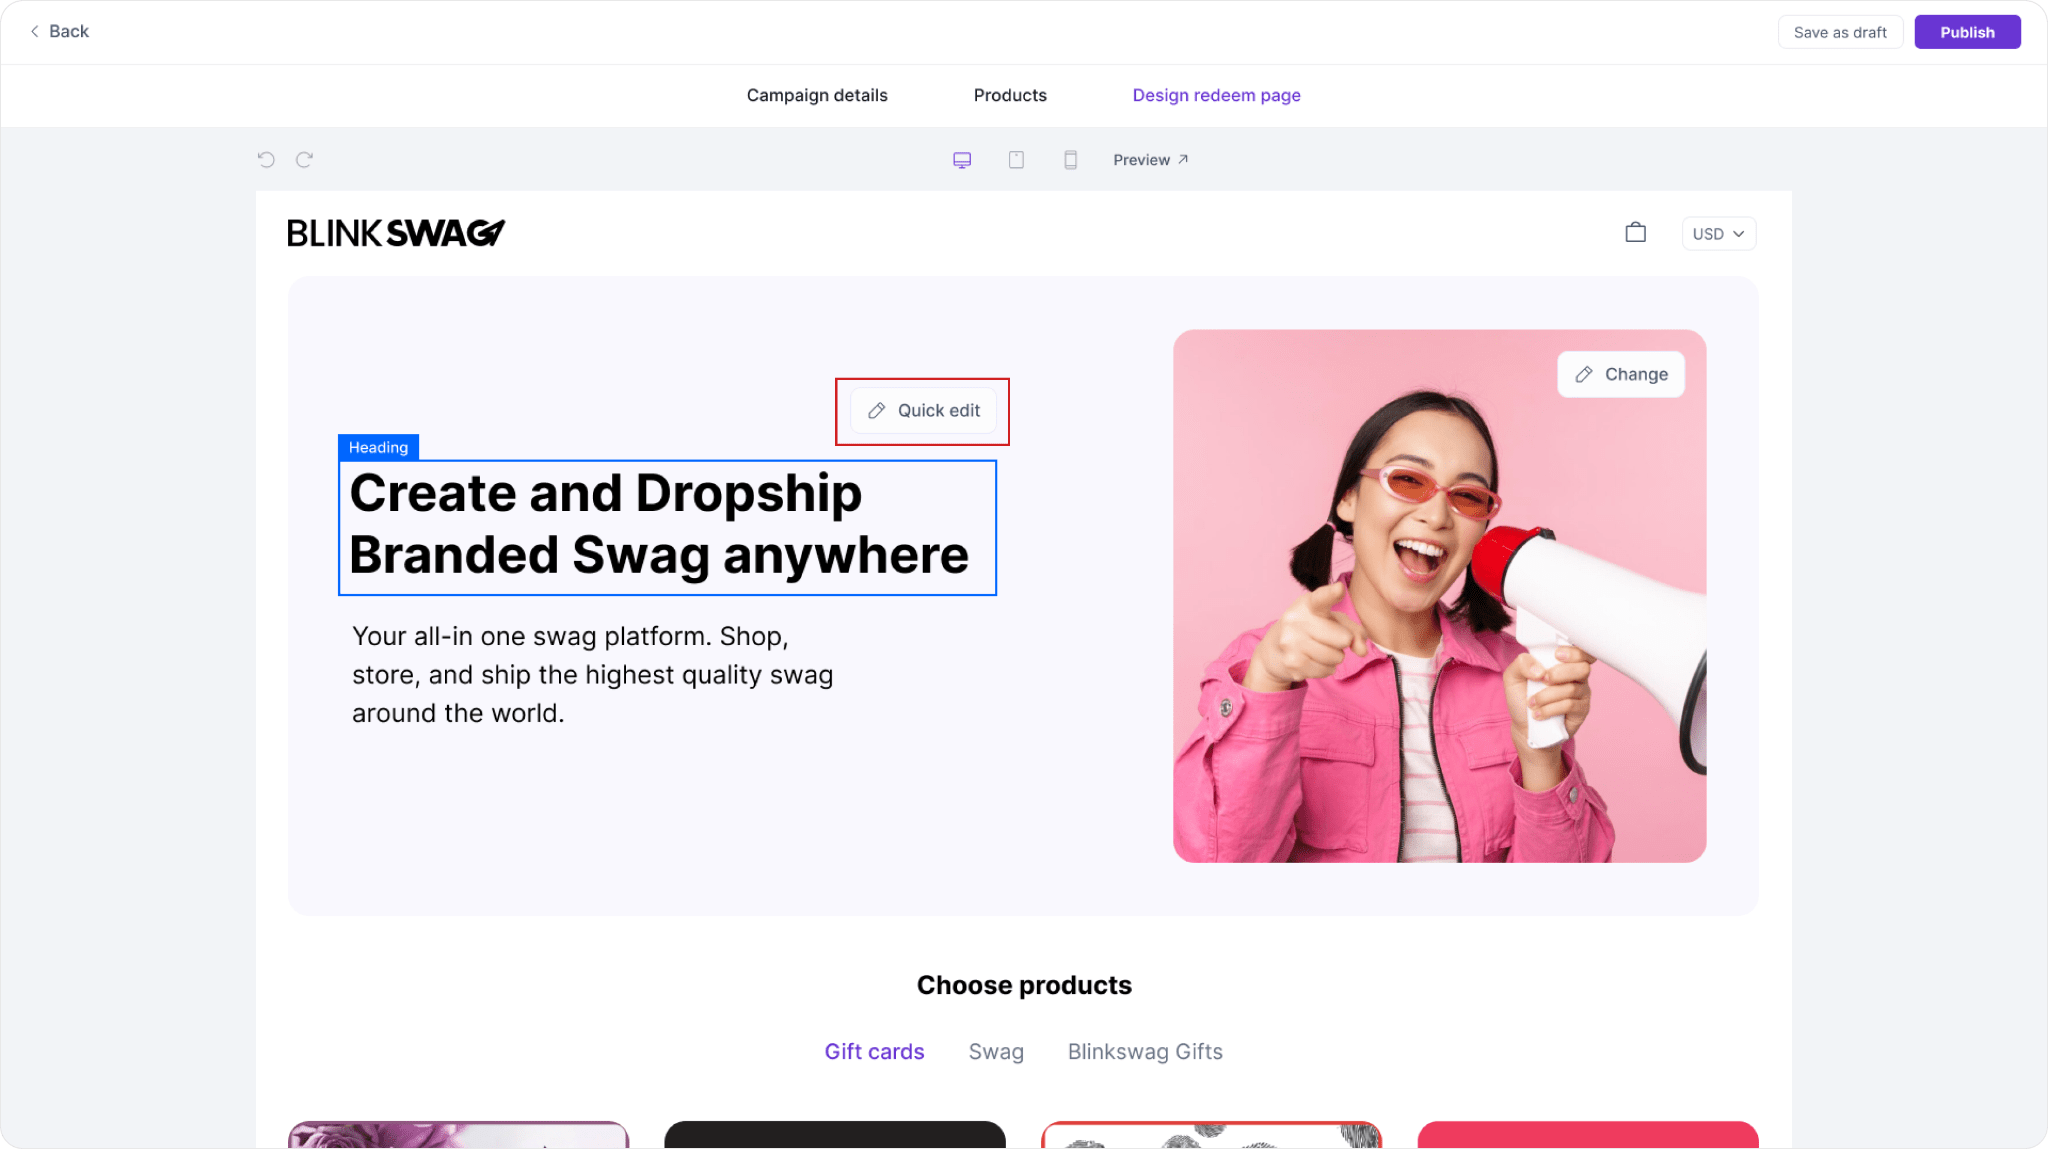
1. Access Quick Edit for Heading
- On the Design Redeem Page tab, locate the Quick Edit button next to the main heading section. This allows you to easily modify the heading text to reflect your campaign’s unique message.
2. Edit Text
- Click Quick Edit to enter editing mode for the main heading.
- Update the text as needed to capture your campaign’s tone and branding.
Customise Heading Style and Color
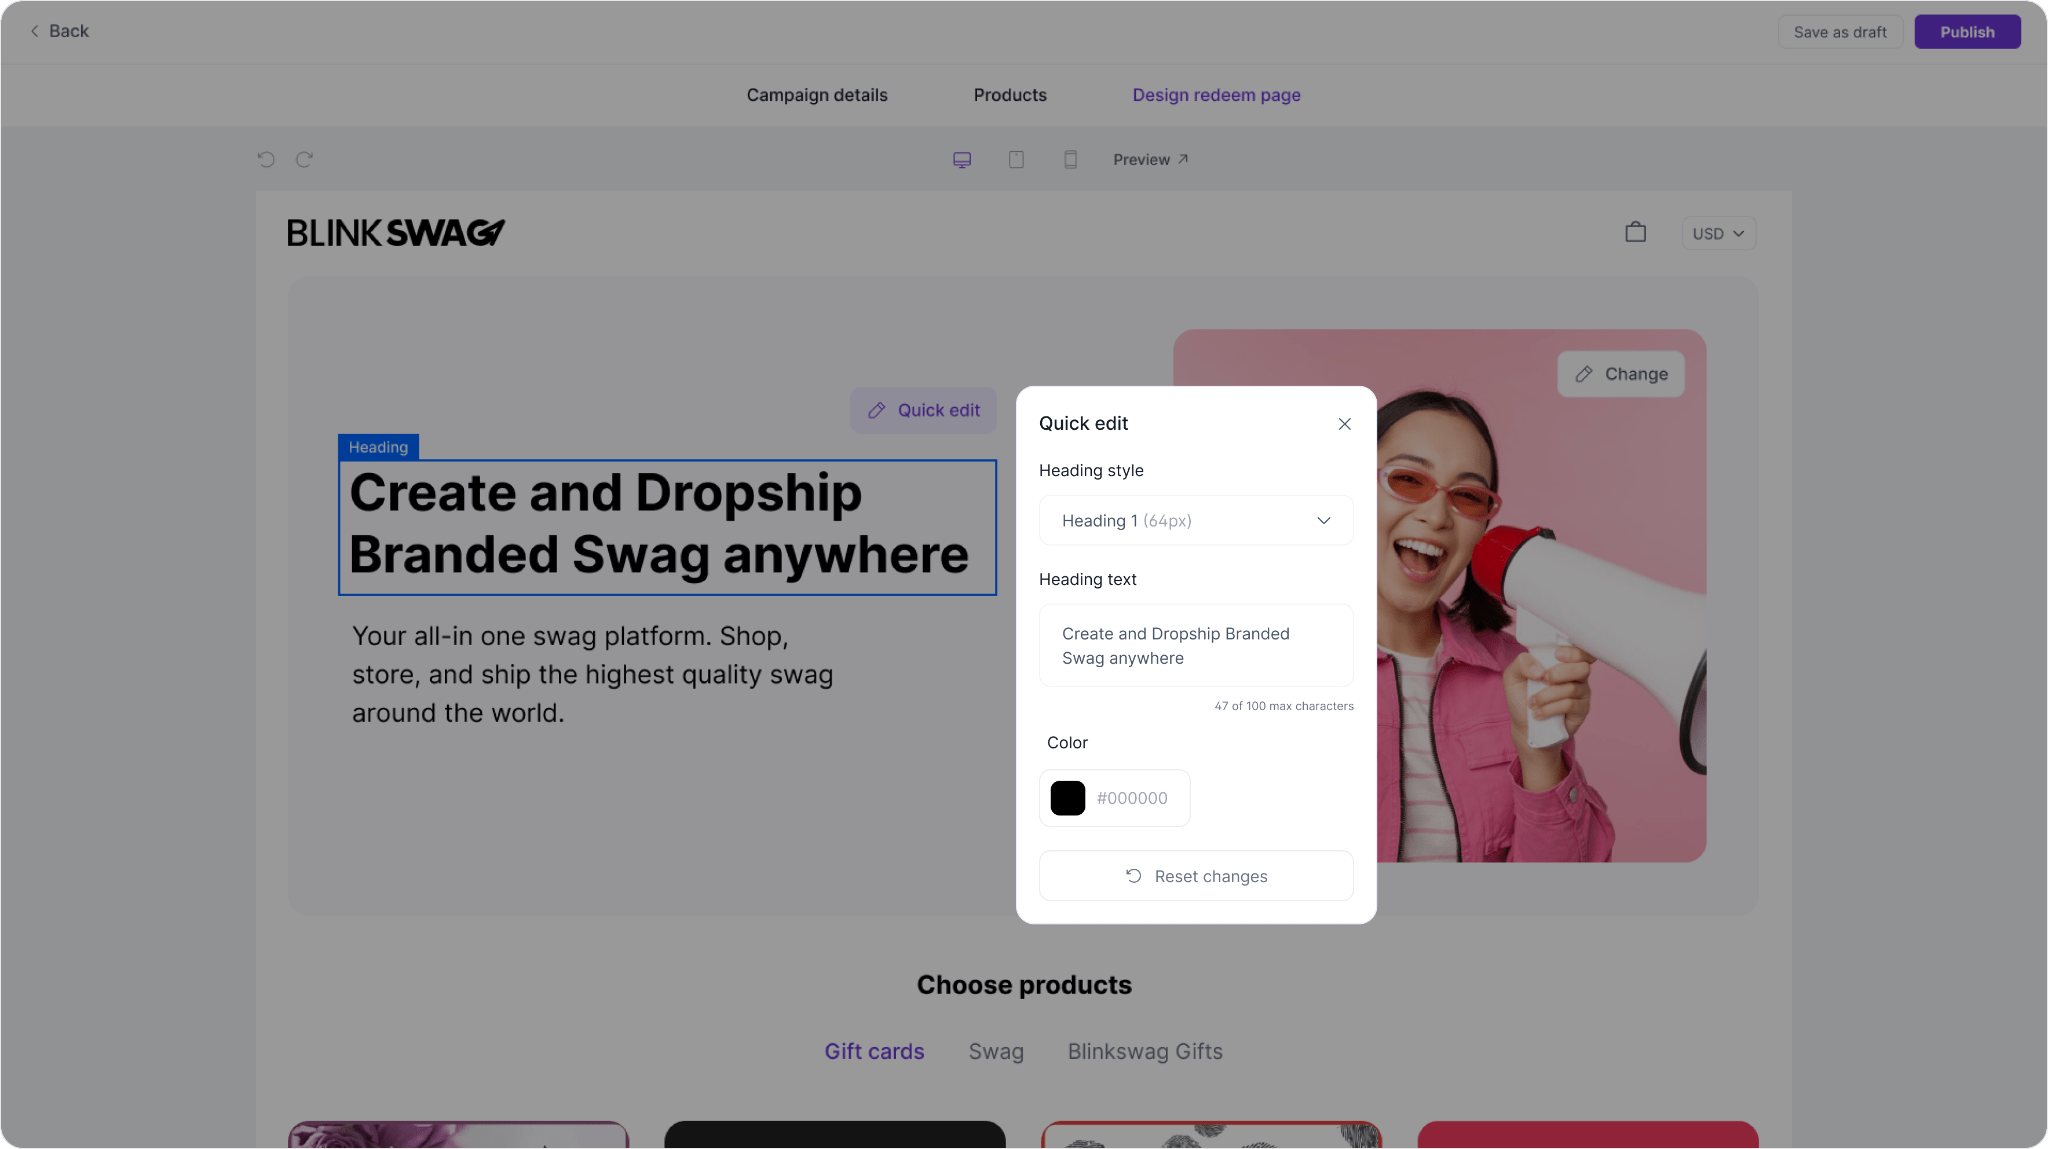
- Access Quick Edit Options: In the Design Redeem Page, under the heading section, click on Quick Edit to open customization options for the heading.
- Adjust Heading Style: Use the Heading Style dropdown to select the preferred size and weight for the heading text. For example, choose Heading 1 (64px) for a bold and large heading or other sizes for different emphasis.
- Edit Heading Text: Update the Heading Text field as needed. This can be used to better align the message with the campaign’s theme and brand tone.
- Change Color: Use the Color option to select a color for the heading text. You can enter a specific hex code or select from a color palette to ensure consistency with your brand colors.
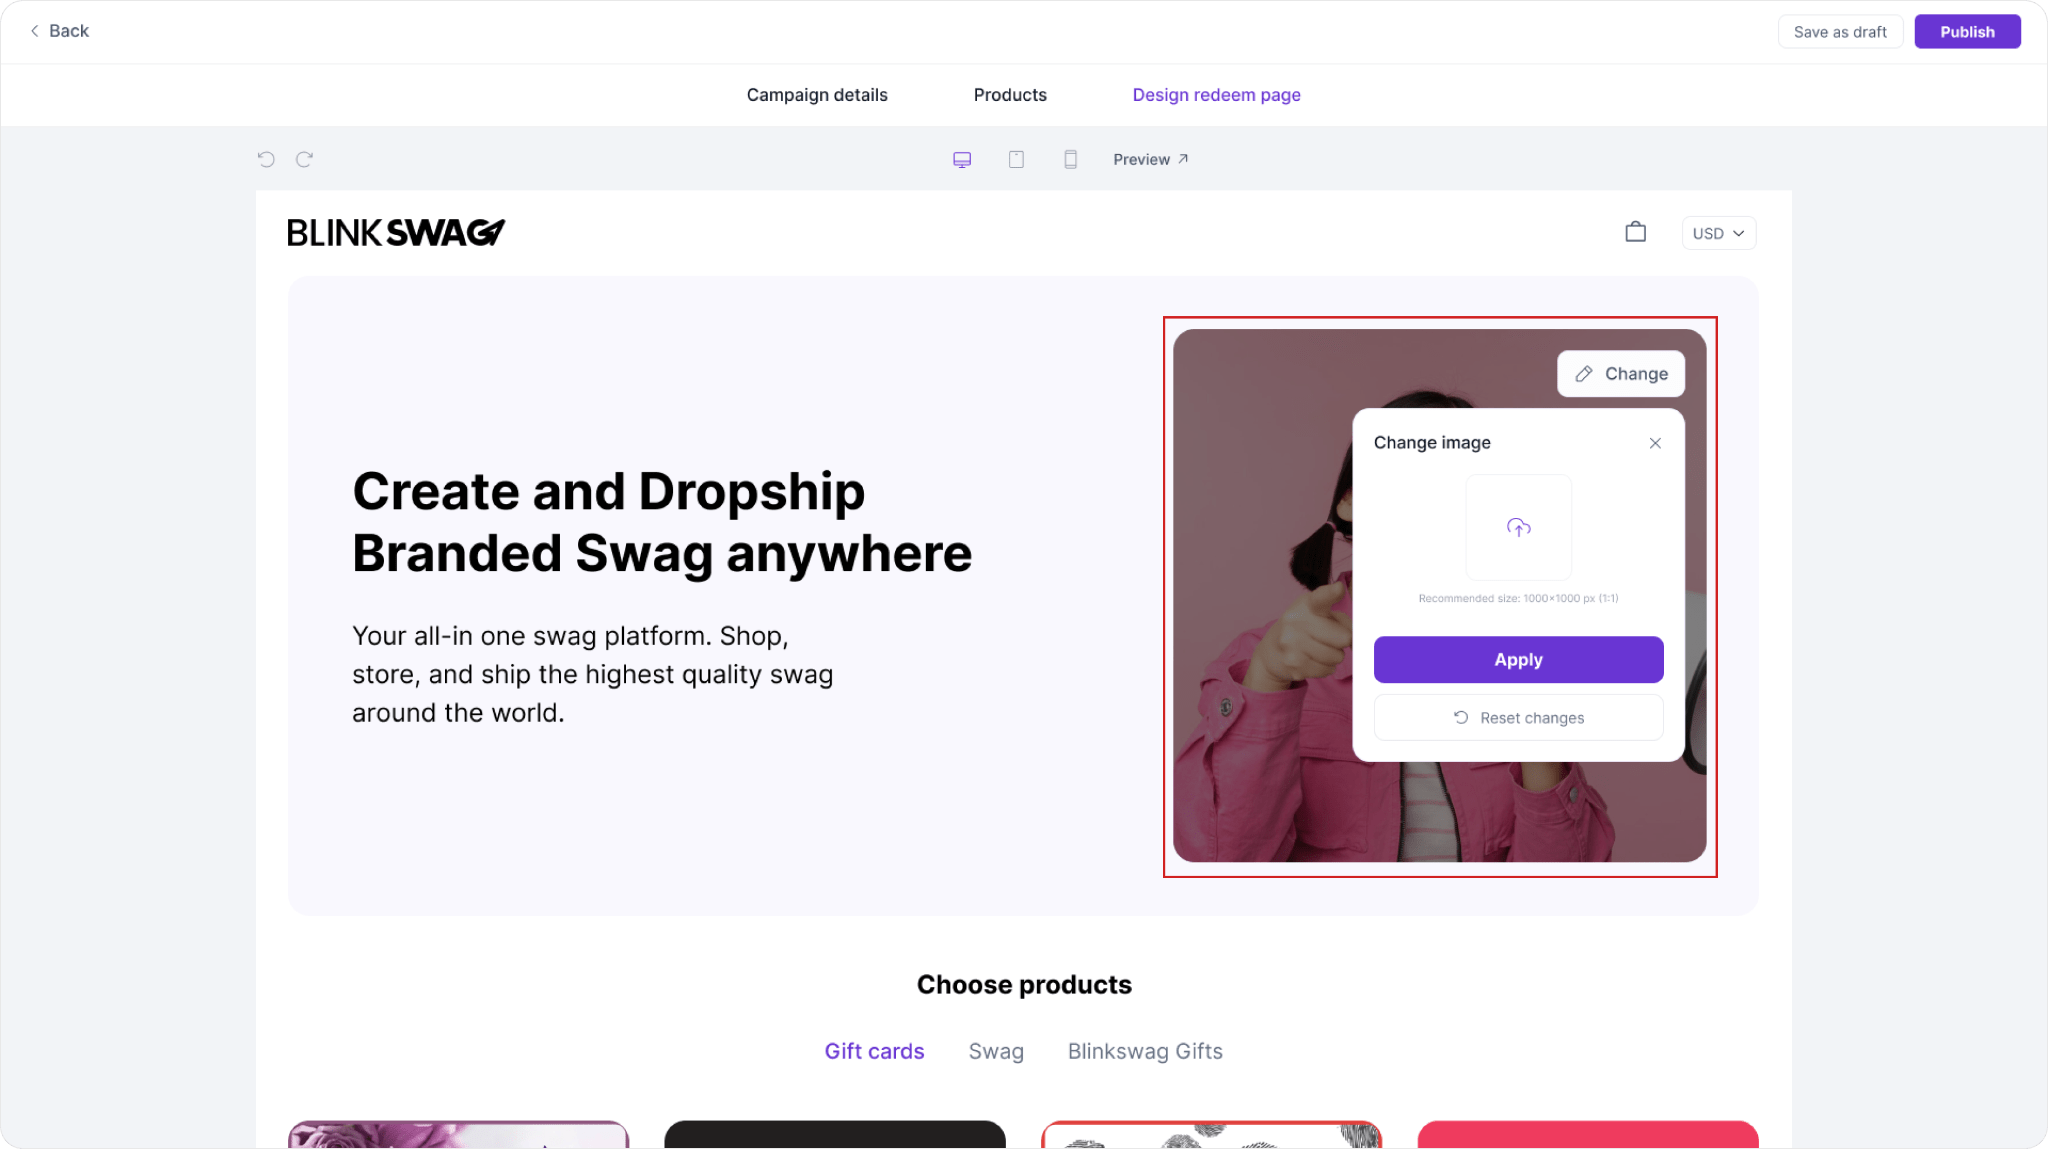
Change the Campaign Image
- Initiate Image Change: In the Design Redeem Page section, locate the image area on the right side of the heading. Click on the Change button overlaid on the image to open the image upload options.
- Upload a New Image: In the Change Image panel, click on the upload area to select an image from your computer. Make sure the image follows the recommended size of 1000×1000 px (1:1 aspect ratio) for optimal display.
- Apply the New Image: Once uploaded, click Apply to replace the existing image. You may also use Reset changes if you decide to keep the previous image.
Remove a Product from the Campaign
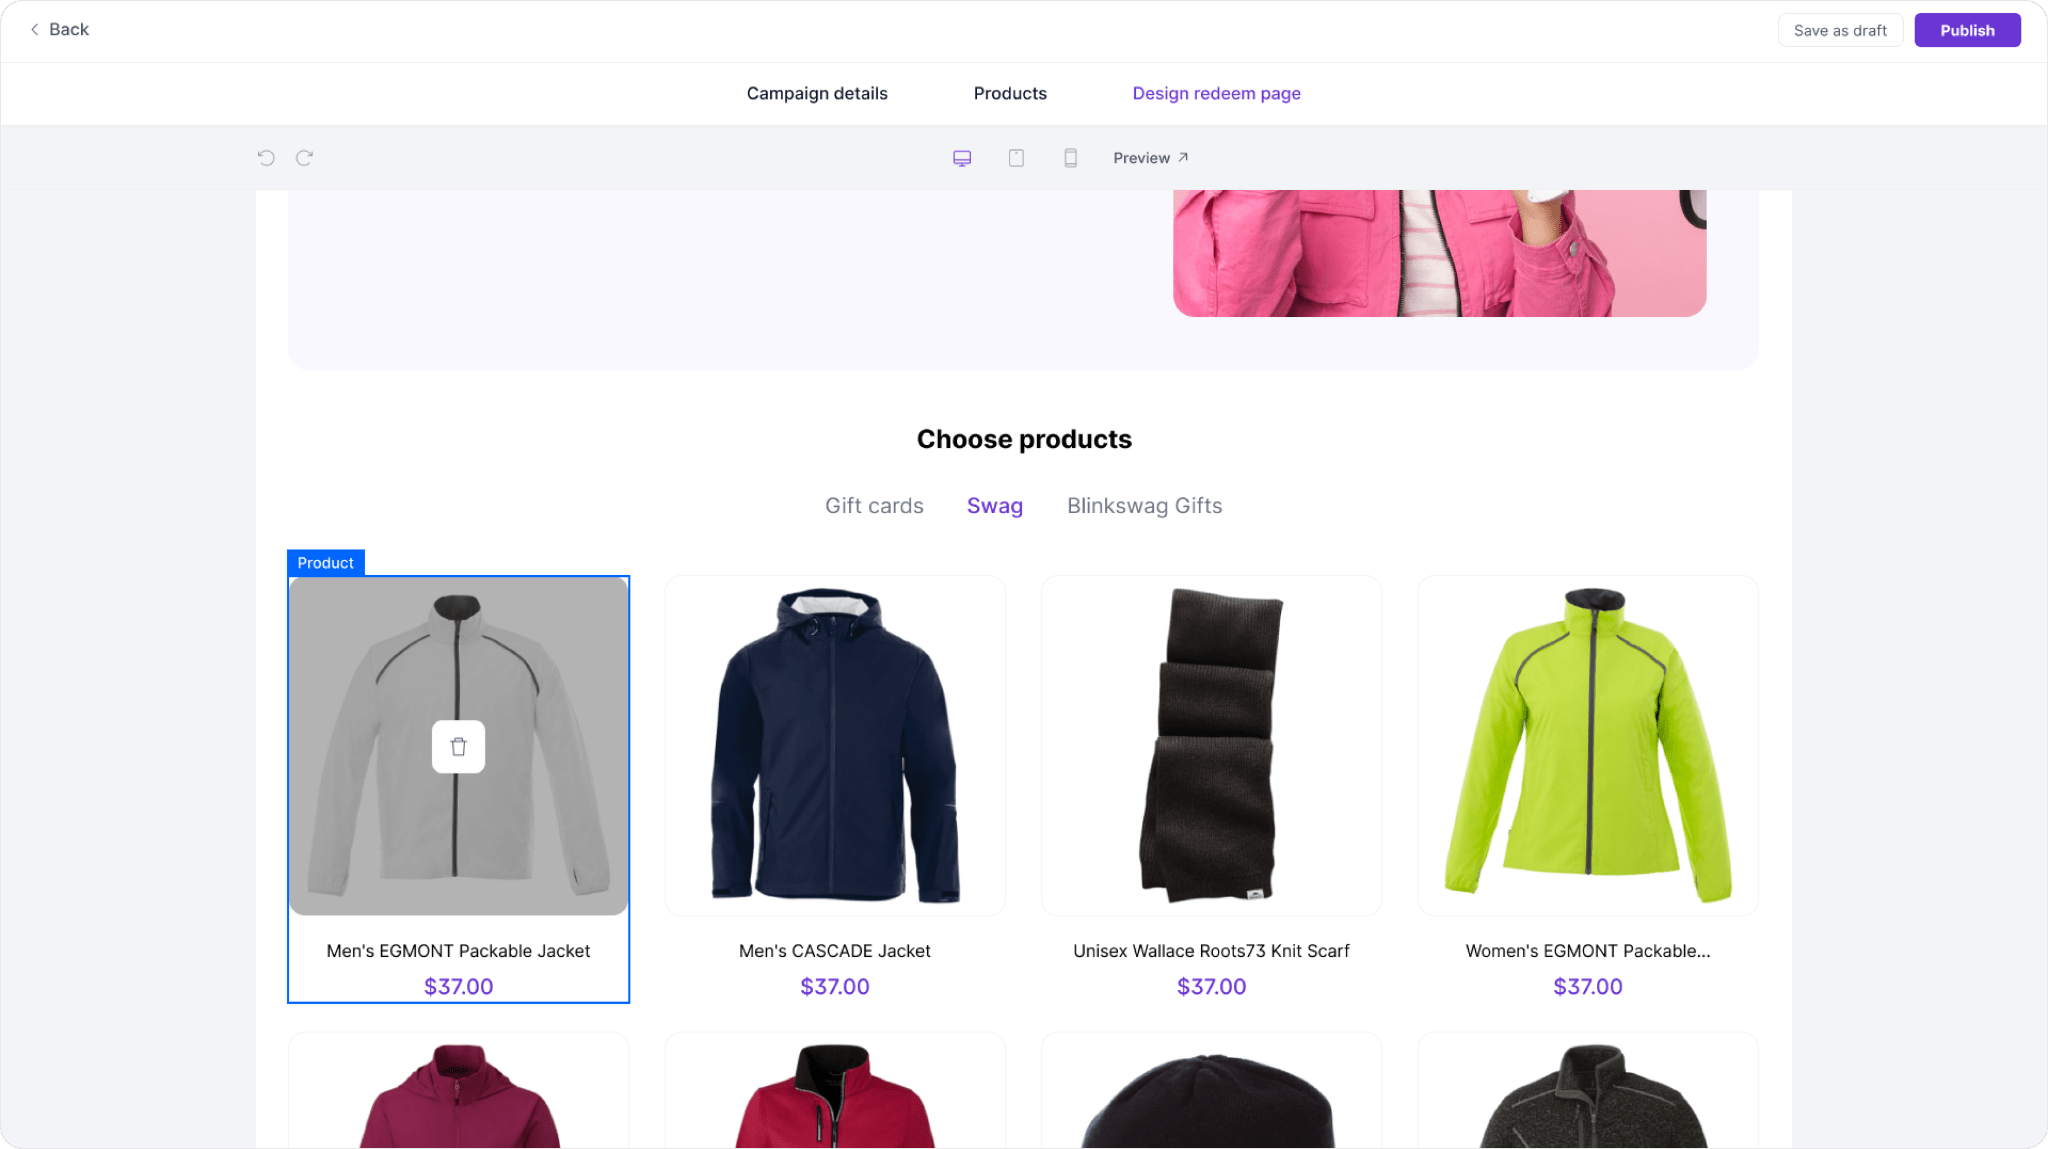
1. Locate the Product to Remove: In the Design Redeem Page, under the Choose Products section, find the product you want to remove. Each product is displayed with its image, name, and price.
2. Select the Delete Icon:
- Hover over the product card until you see a trash bin icon in the center.
- Click the trash bin icon to initiate the removal of this product from the campaign.
3. Confirm the Removal
- The product will be removed from the displayed list.
- You can continue editing other items or save your changes by clicking Save as draft or Publish to finalize.

4. Save Changes: Click Save as draft to save the updated image for review, or Publish if you’re ready to make it live.

Publish Campaign
After completing the setup for your campaign’s redemption page, you will see a confirmation screen.
1. Redeem Page Confirmation
This screen confirms that the redeem page has been created successfully, indicating that your campaign is now live.
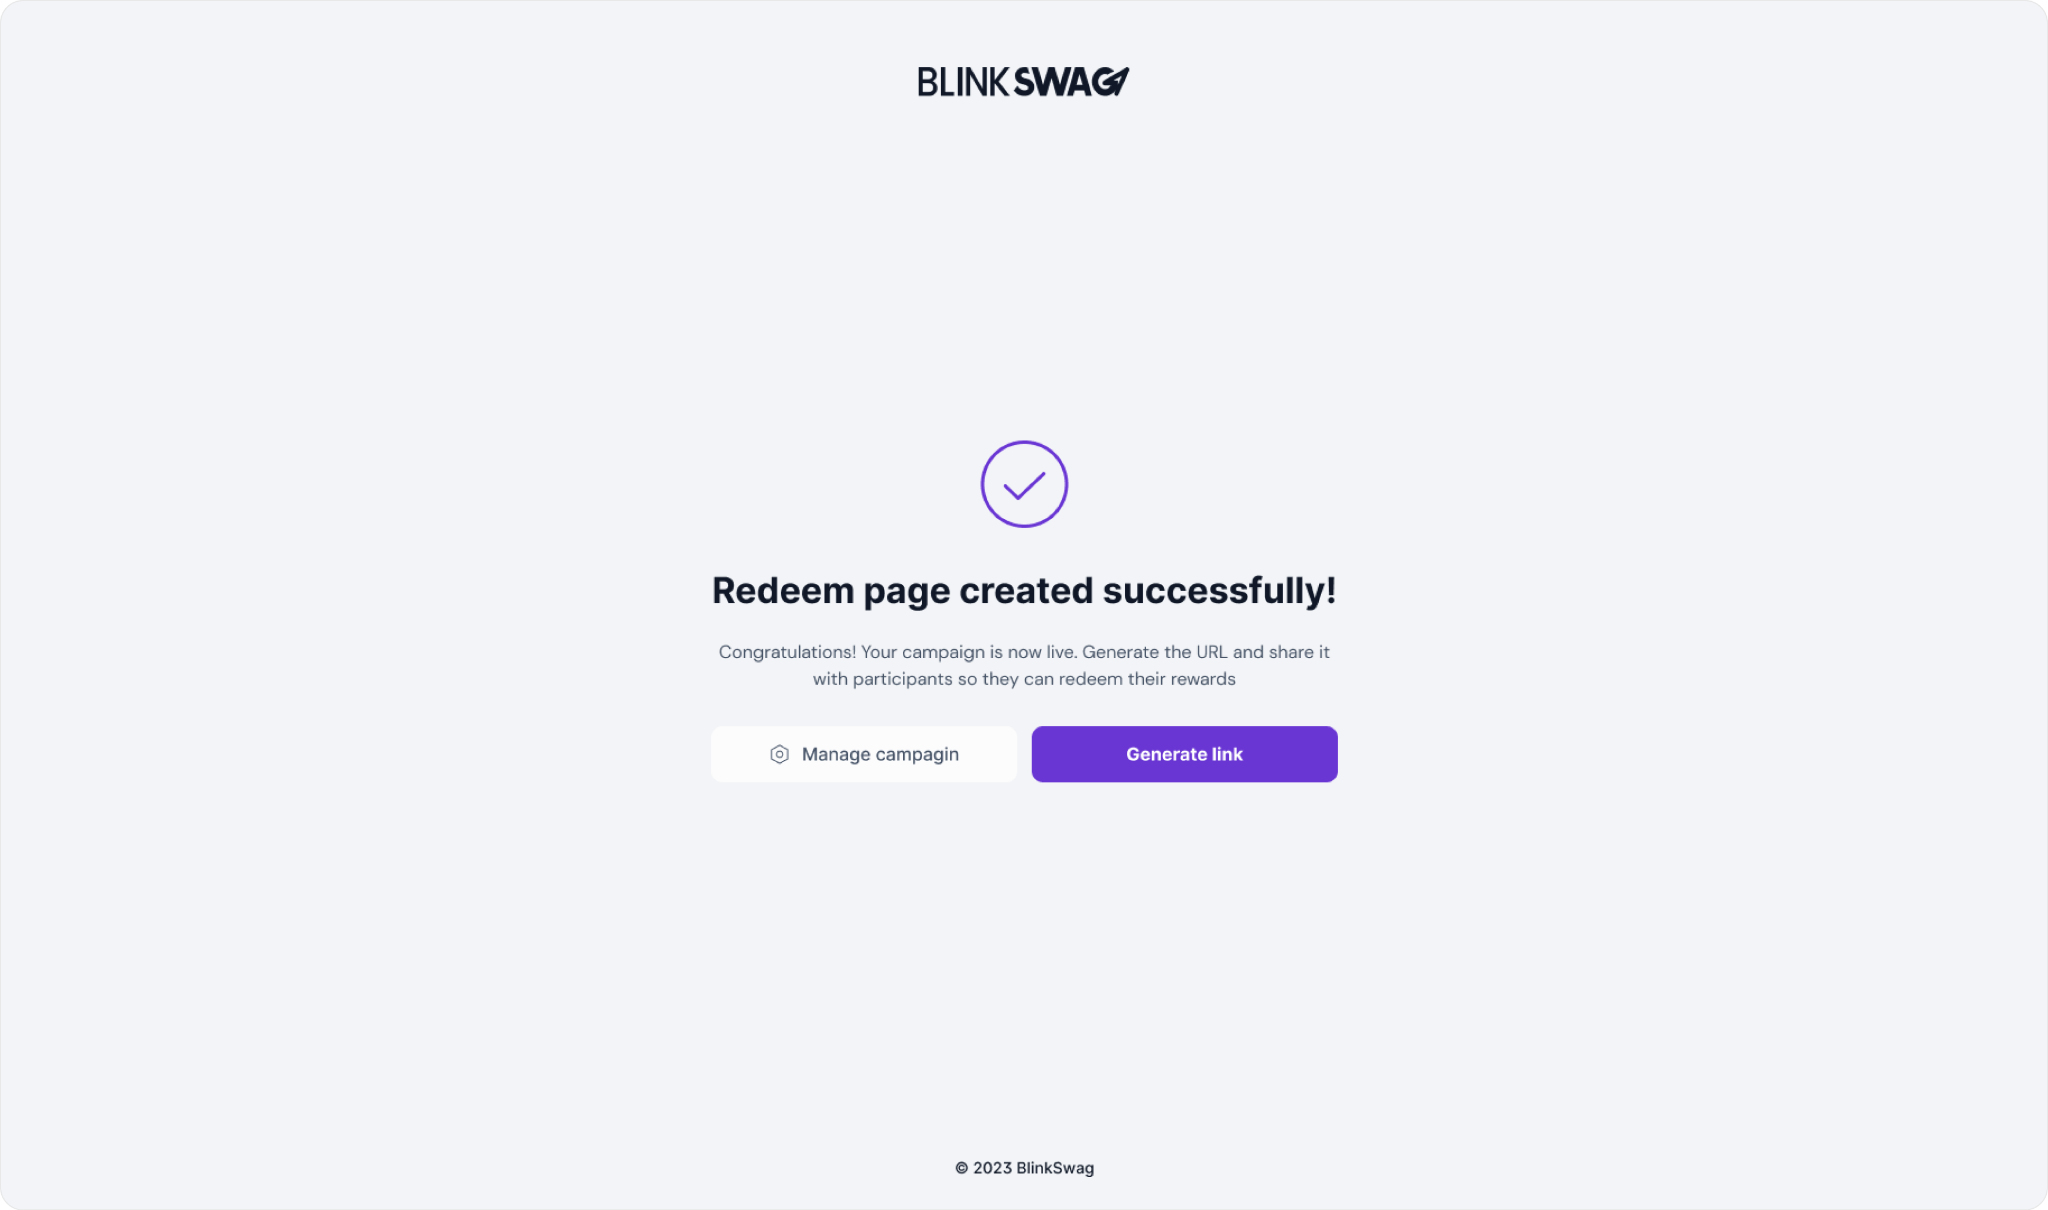
2. Next Actions
- Manage Campaign: Click this button to return to the campaign dashboard, where you can further manage or edit your campaign settings.
- Generate Link: Select this option to create a shareable link for your campaign. This link can be distributed to participants, allowing them to access the redemption page and claim their rewards.
? Launch Like a Boss! Watch the video and create a killer campaign in just a few clicks! ??
Generate a Reward Link
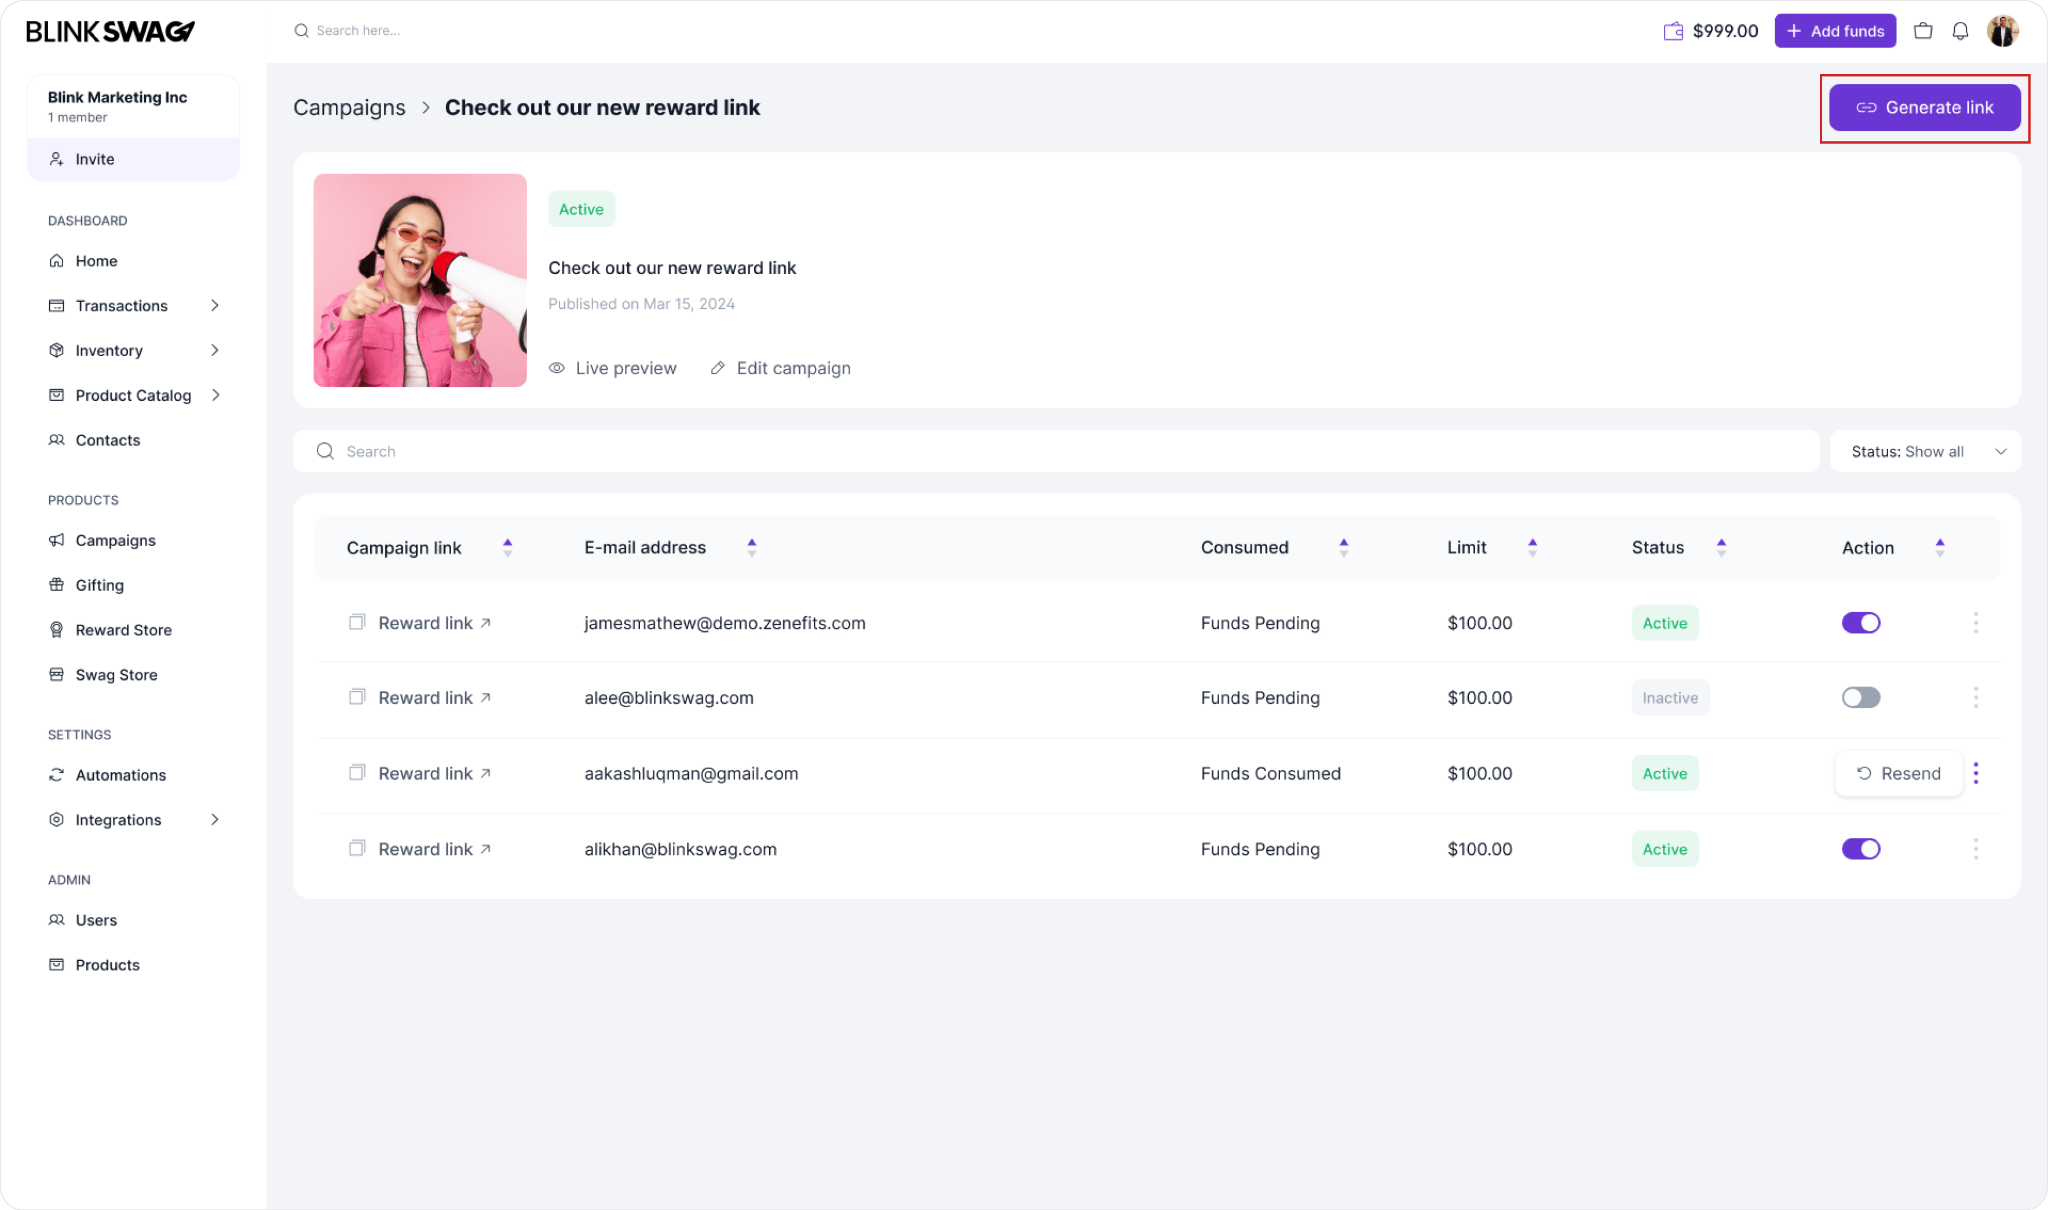
- Generate Link Button
In the campaign dashboard, locate and click on the Generate link button, highlighted in the upper-right corner. This action initiates the process for creating a unique reward link. - Purpose of the Reward Link
By generating a reward link, you provide recipients with direct access to a specific reward campaign, making it easy for them to redeem rewards within the specified budget limit. - Additional Settings
Once you click this button, you may have options to customize the reward link settings, such as setting the expiration date, budget, and restrictions for the campaign.
Reward Link Details
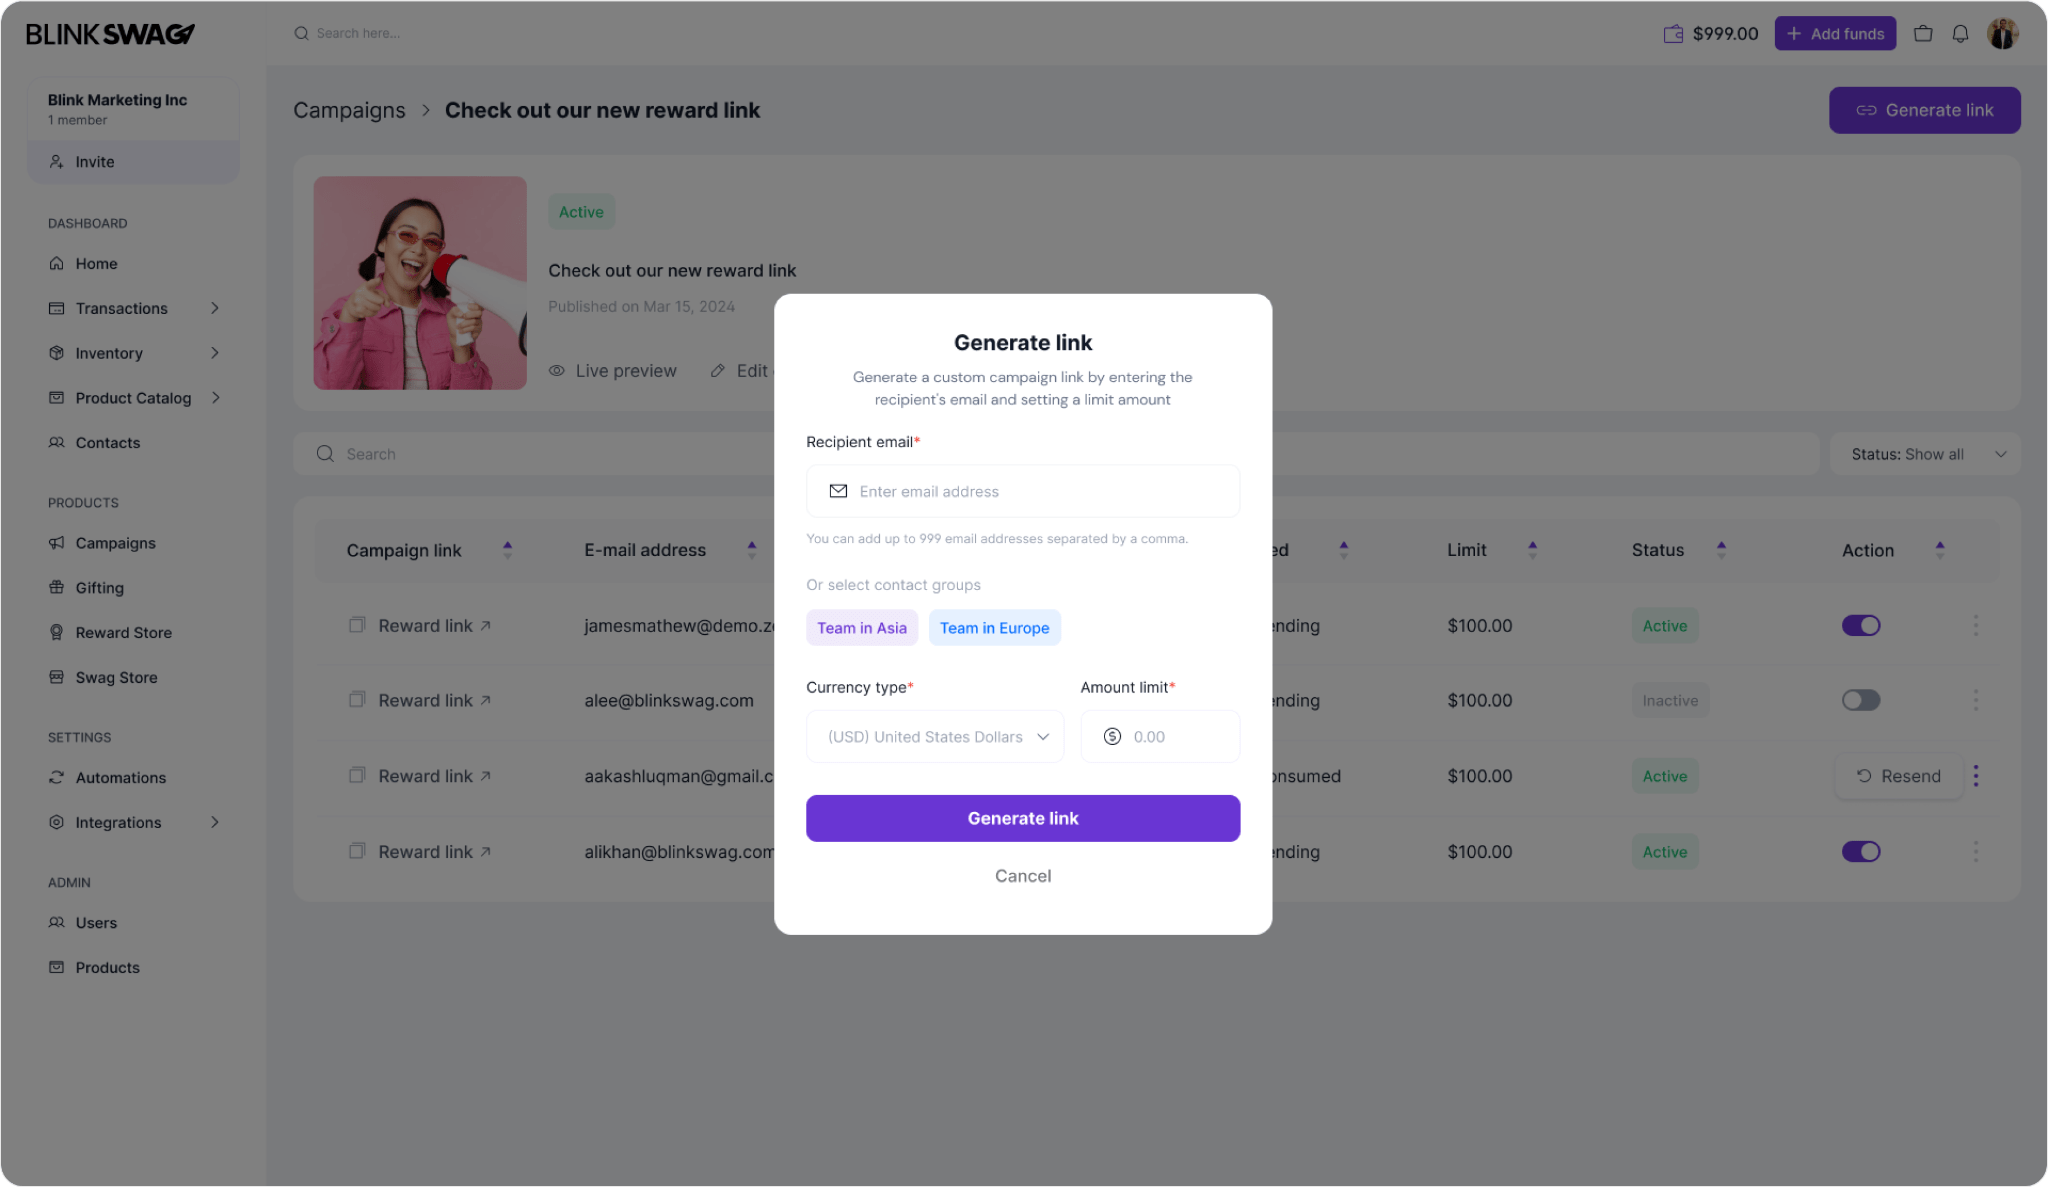
- Enter Recipient Email(s)
In the “Generate link” pop-up, add the email address of the recipient in the Recipient email field. If needed, you can add up to 999 email addresses separated by commas, allowing you to create multiple reward links at once. - Select Contact Groups (Optional)
Alternatively, select a pre-existing contact group like “Team in Asia” or “Team in Europe” to simplify the process if you already have groups created. This helps quickly assign reward links to specific teams or departments. - Set Currency Type
Choose the currency for the reward in the Currency type dropdown. This ensures the reward amount reflects the recipient’s currency preference or regional requirement. - Set Amount Limit
In the Amount limit field, enter the maximum budget for this reward link. This amount controls how much the recipient can redeem within the campaign. - Generate the Link
Once all fields are filled, click the Generate link button to finalize and create the reward link.
? Ready to Reward Like a Pro? Watch this quick video to generate a reward link in seconds! ?✨