Access the Build Swag Store Feature
1. Log into Your BlinkSwag Account: Begin by logging into your BlinkSwag account. If you do not have an account, you must create one.
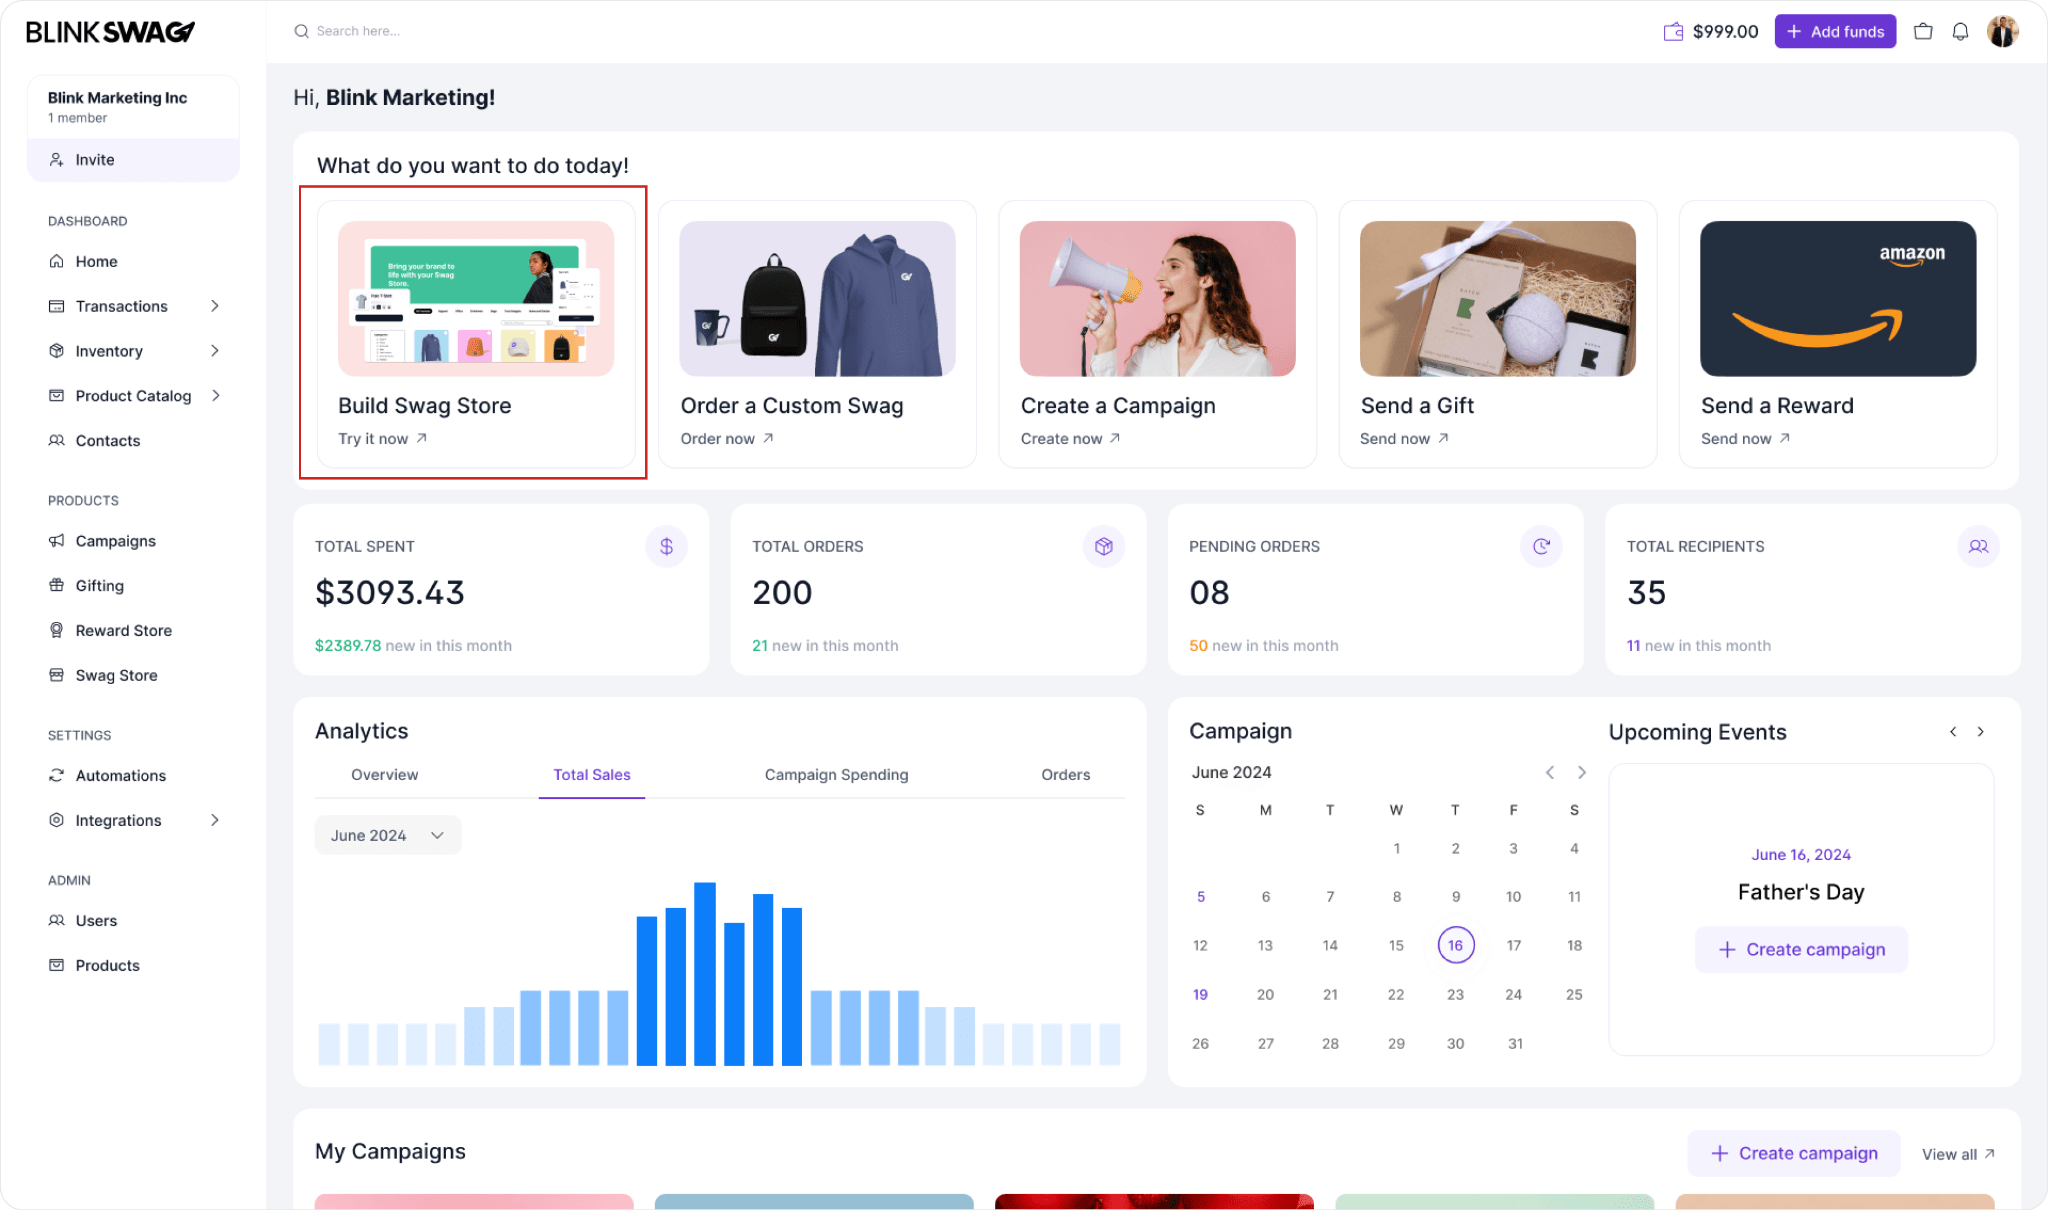
2. Navigate to the Dashboard: You’ll be taken to the main dashboard once logged in.
3. Find the ‘Build Swag Store’ Button: Look for the “Build Swag Store” section highlighted prominently on the dashboard. This section is designed to guide you through creating your custom swag store. Click on it to start the setup process.
Following this first step will set the foundation for customizing and managing your swag store effectively.
Name Your Swag Store
1. Enter Your Store Name: After clicking the “Build Swag Store” button, you will be prompted to enter the name of your store. This name will be visible to your customers, so choose something that reflects your brand.
2. Set Your Store Address (URL): Below the store name field, you will need to specify the URL for your store. This should be a unique identifier that will help customers easily find your store online.
- Store Name: Keep it within the character limit (25 characters).
- Store Address (URL): Format this as your-store-address, ensuring it is unique to avoid conflicts.
3. Proceed to the Next Step: Once you have entered the store name and URL, click the Next button to continue setting up your swag store.

This step establishes your store’s identity, making it more appealing and accessible to your customers.
Customize Your Store Logo and Identity
1. Navigate to Logo & Identity: On the left sidebar, click on the “Logo & identity” section to customize your store’s visual aspects.
2. Navigate to Favicon Section: After customizing your store logo, look for the Favicon section below the logo settings.
3. Upload Your Favicon: Click on the designated area to upload your favicon. A favicon is a small image in the browser tab next to your store name.
4. Recommended Size: Ensure that your favicon meets the recommended size of 512×512 pixels. This size is optimal for clarity and visibility across different devices and browsers.
5. Select Your Favicon File: Browse your files to select the favicon image (usually in .ico or .png format) you wish to upload.

Customize Your Site Design
1. Access Site Design Settings: After setting up your favicon, navigate to the Site Design section within the customization options for your Swag Store. This option is usually located in the left sidebar.

2. Select a Theme: Look for the Default theme option, which is usually pre-selected. You can stick with this theme or explore other options by clicking the Explore themes link.
3. Edit Theme: To customize the default theme further, click the Edit button. This will allow you to make specific changes to theme elements like colors and fonts that fit your brand identity.
4. Preview Your Theme: After selecting, use the Preview option to see how your store will appear to customers.

5. Navigate to Text Theme Settings: Within the Site Design section of your Swag Store setup, locate the Text Theme option. This allows you to select the font styles for your website.
6. Select Font Style: A list of font options will be displayed. Choose from styles like Inter, Playfair Display, Poppins, or Josefin Sans. Click on the font you want to apply to your site.

Change the Hero Image in Your Swag Store

1. Access the Site Design Section: Navigate to the Site Design area of your Swag Store setup. This section allows you to customize your store’s visual elements.
2. Locate the Hero Image: Find the existing hero image in the preview section. This is prominently displayed at the top of your store’s landing page.
3. Click on the Change Button: To change the hero image, look for the Change button near the hero image. Clicking this will prompt you to select a new image.
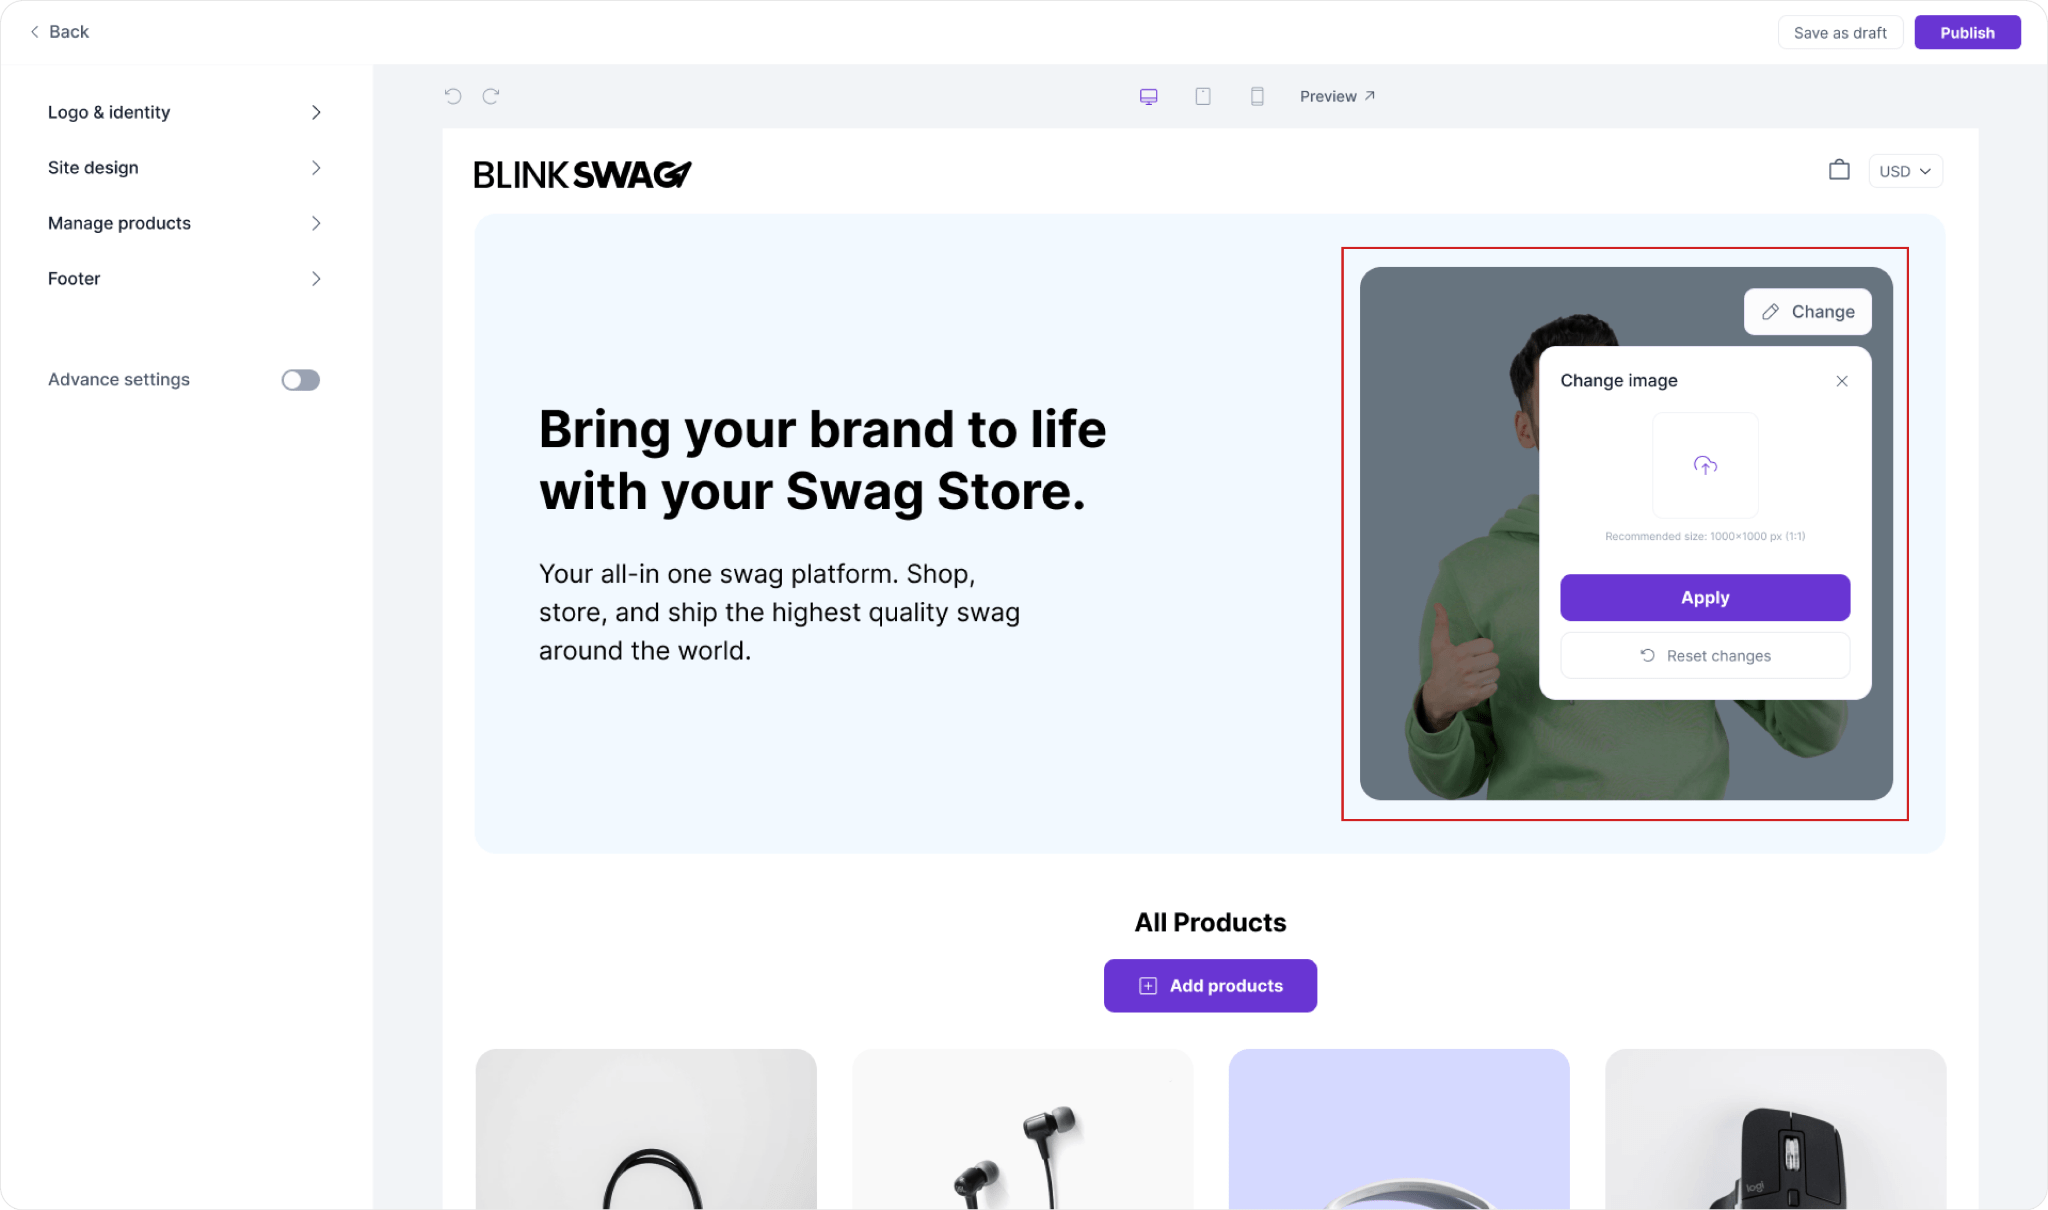
4. Upload Your New Image: In the dialogue box, click on the upload area (indicated by a cloud icon or similar) to select a new image from your device. Ensure that the image meets the recommended size of 1000×1000 pixels for optimal display.
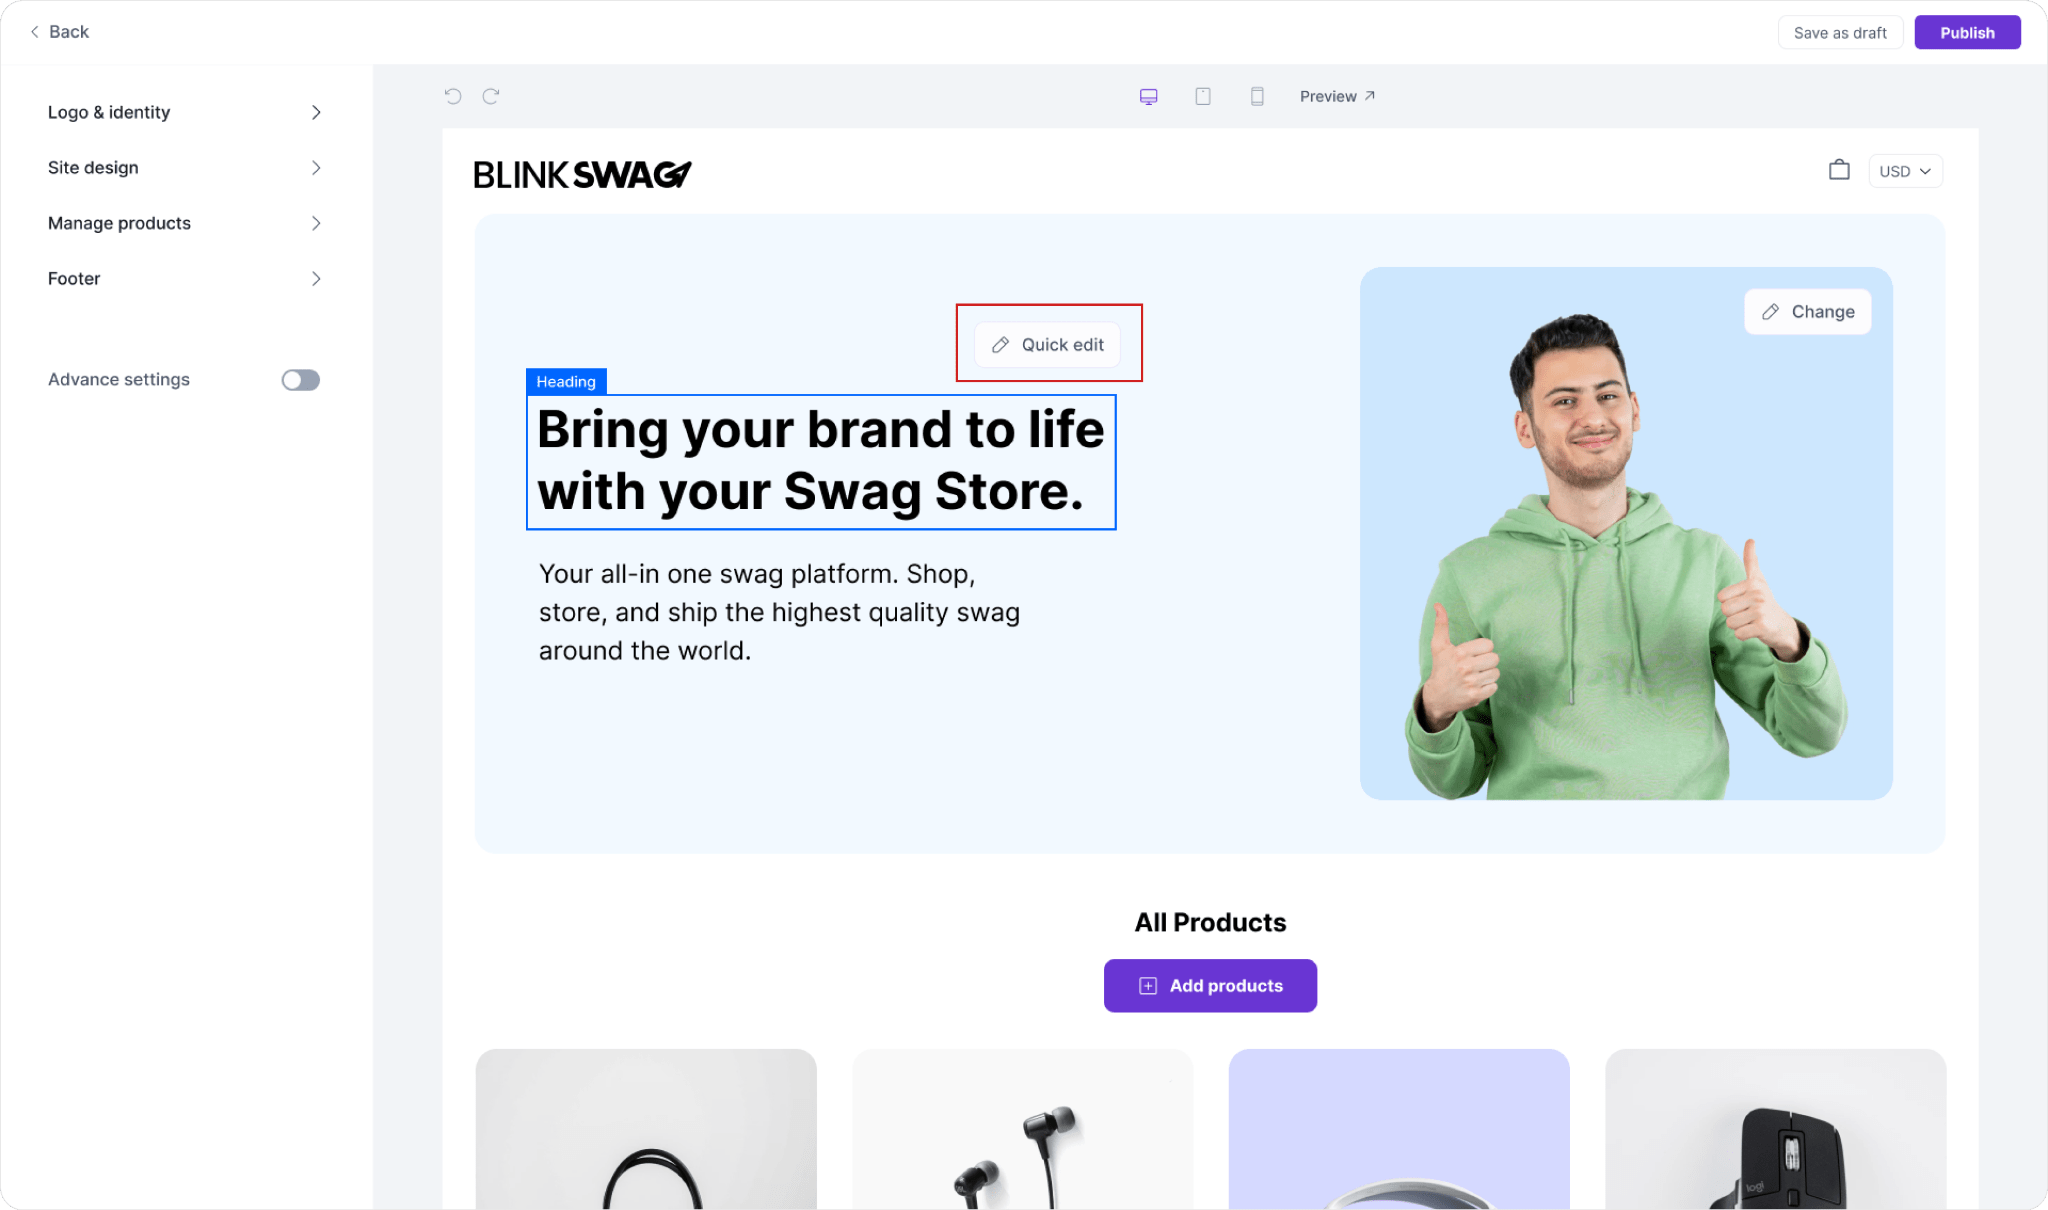
Edit the Hero Text in Your Swag Store
1. Locate the Hero Text: Navigate to your Swag Store dashboard, where your hero section is prominently displayed at the top of the page.
2. Click on Quick Edit: Next to the hero text, you will see a Quick Edit button (indicated by a pencil icon). Click on this button to enable text editing.
3. Modify the Heading Style: In the pop-up menu, select the desired Heading Style from the dropdown. Options like “Heading 1” or others can be used to customize the appearance of your hero text.
4. Update the Heading Text: In the Heading text field, input your new text. You can enter up to 100 characters. Ensure your text aligns with your brand message and is engaging for your customers.
5. Choose the Text Color: You can also adjust the color of your heading text by clicking on the Color box. A color picker will appear, allowing you to select your preferred color or enter a hex code.
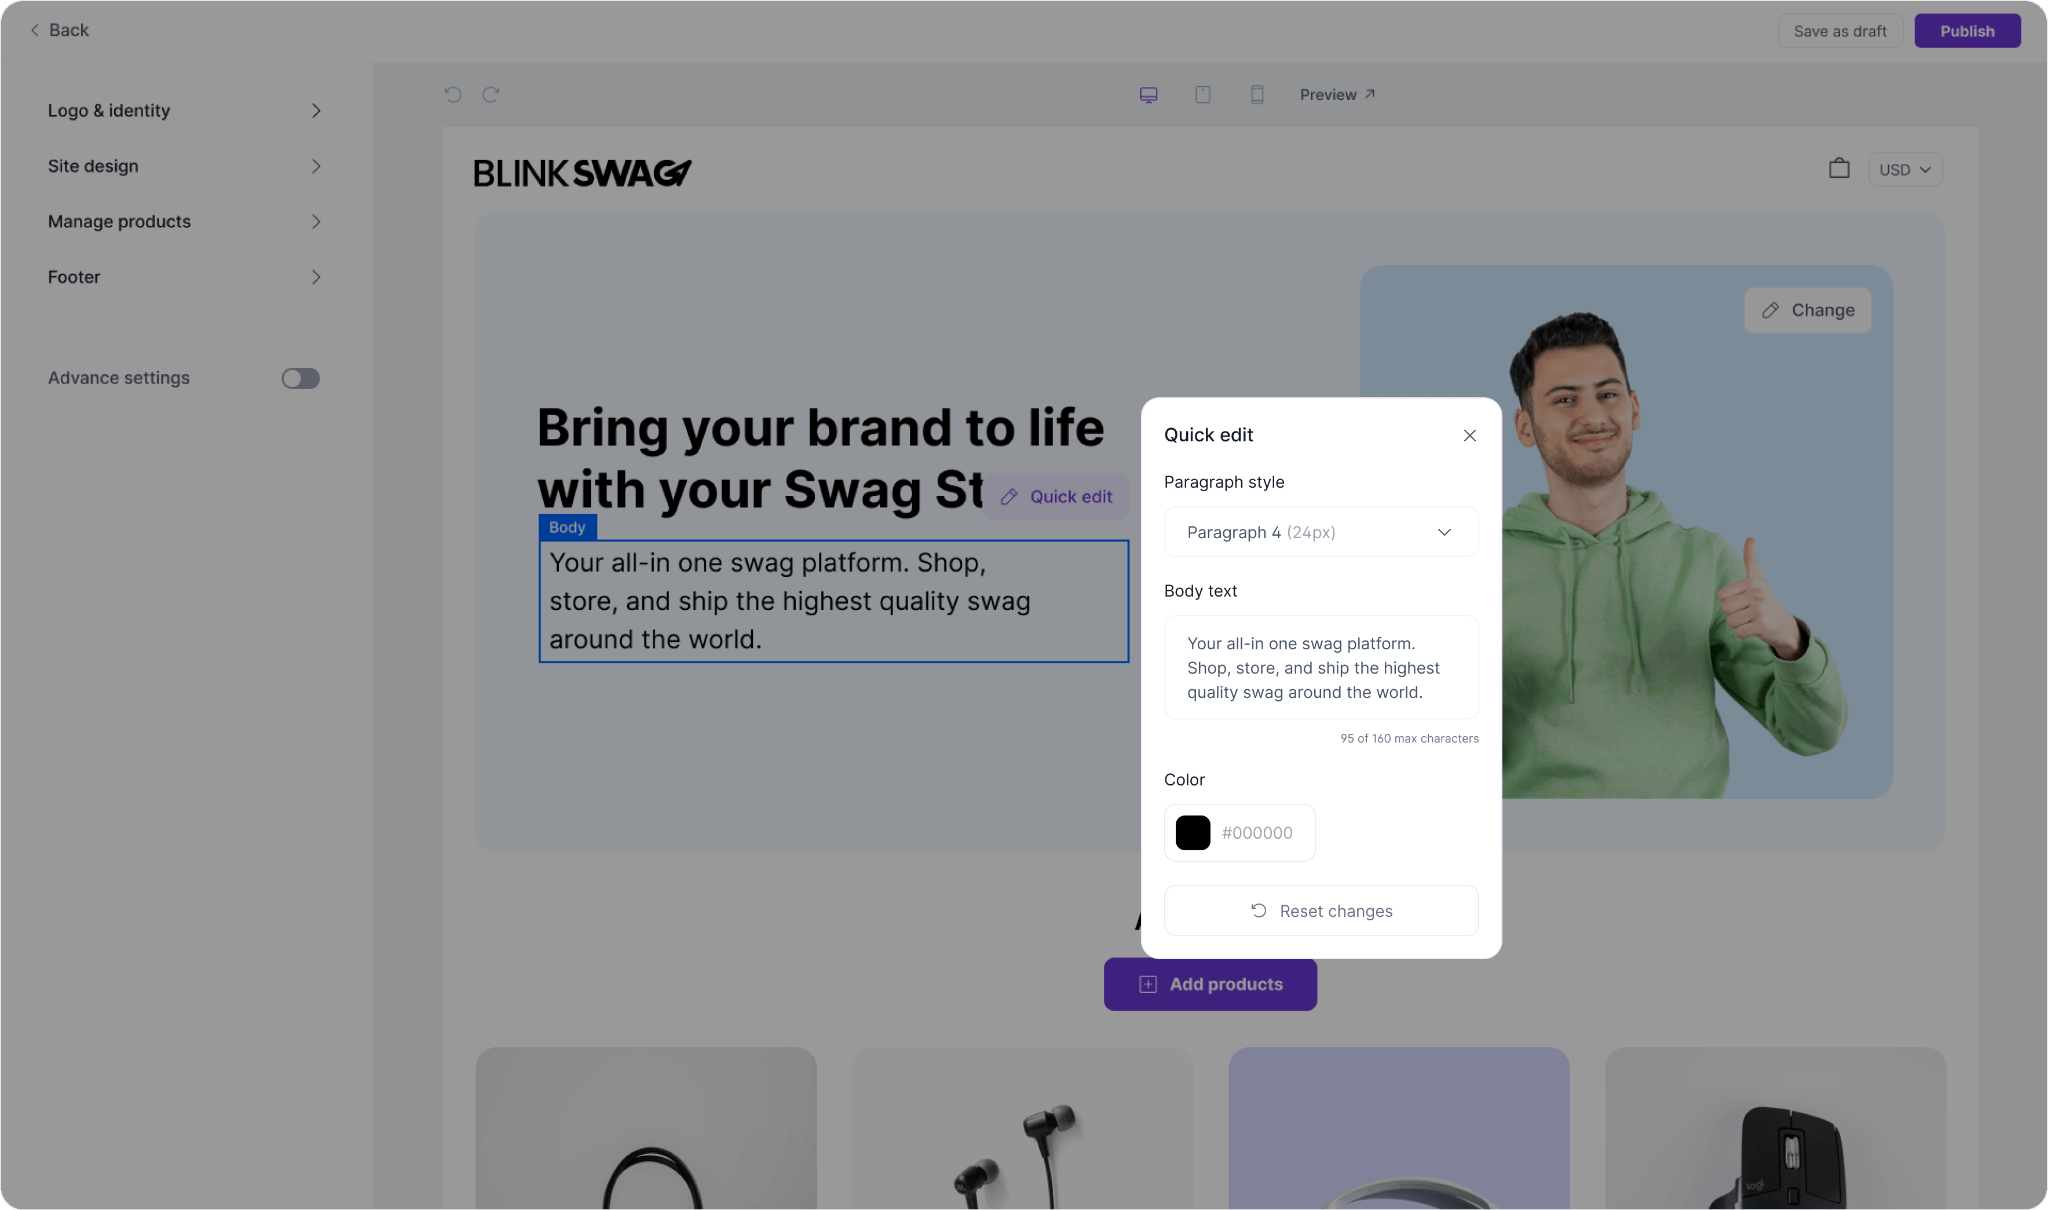
6. Preview Your Changes: As you make modifications, you can see a real-time preview of your Swag Store layout. This will help you assess how the changes look.
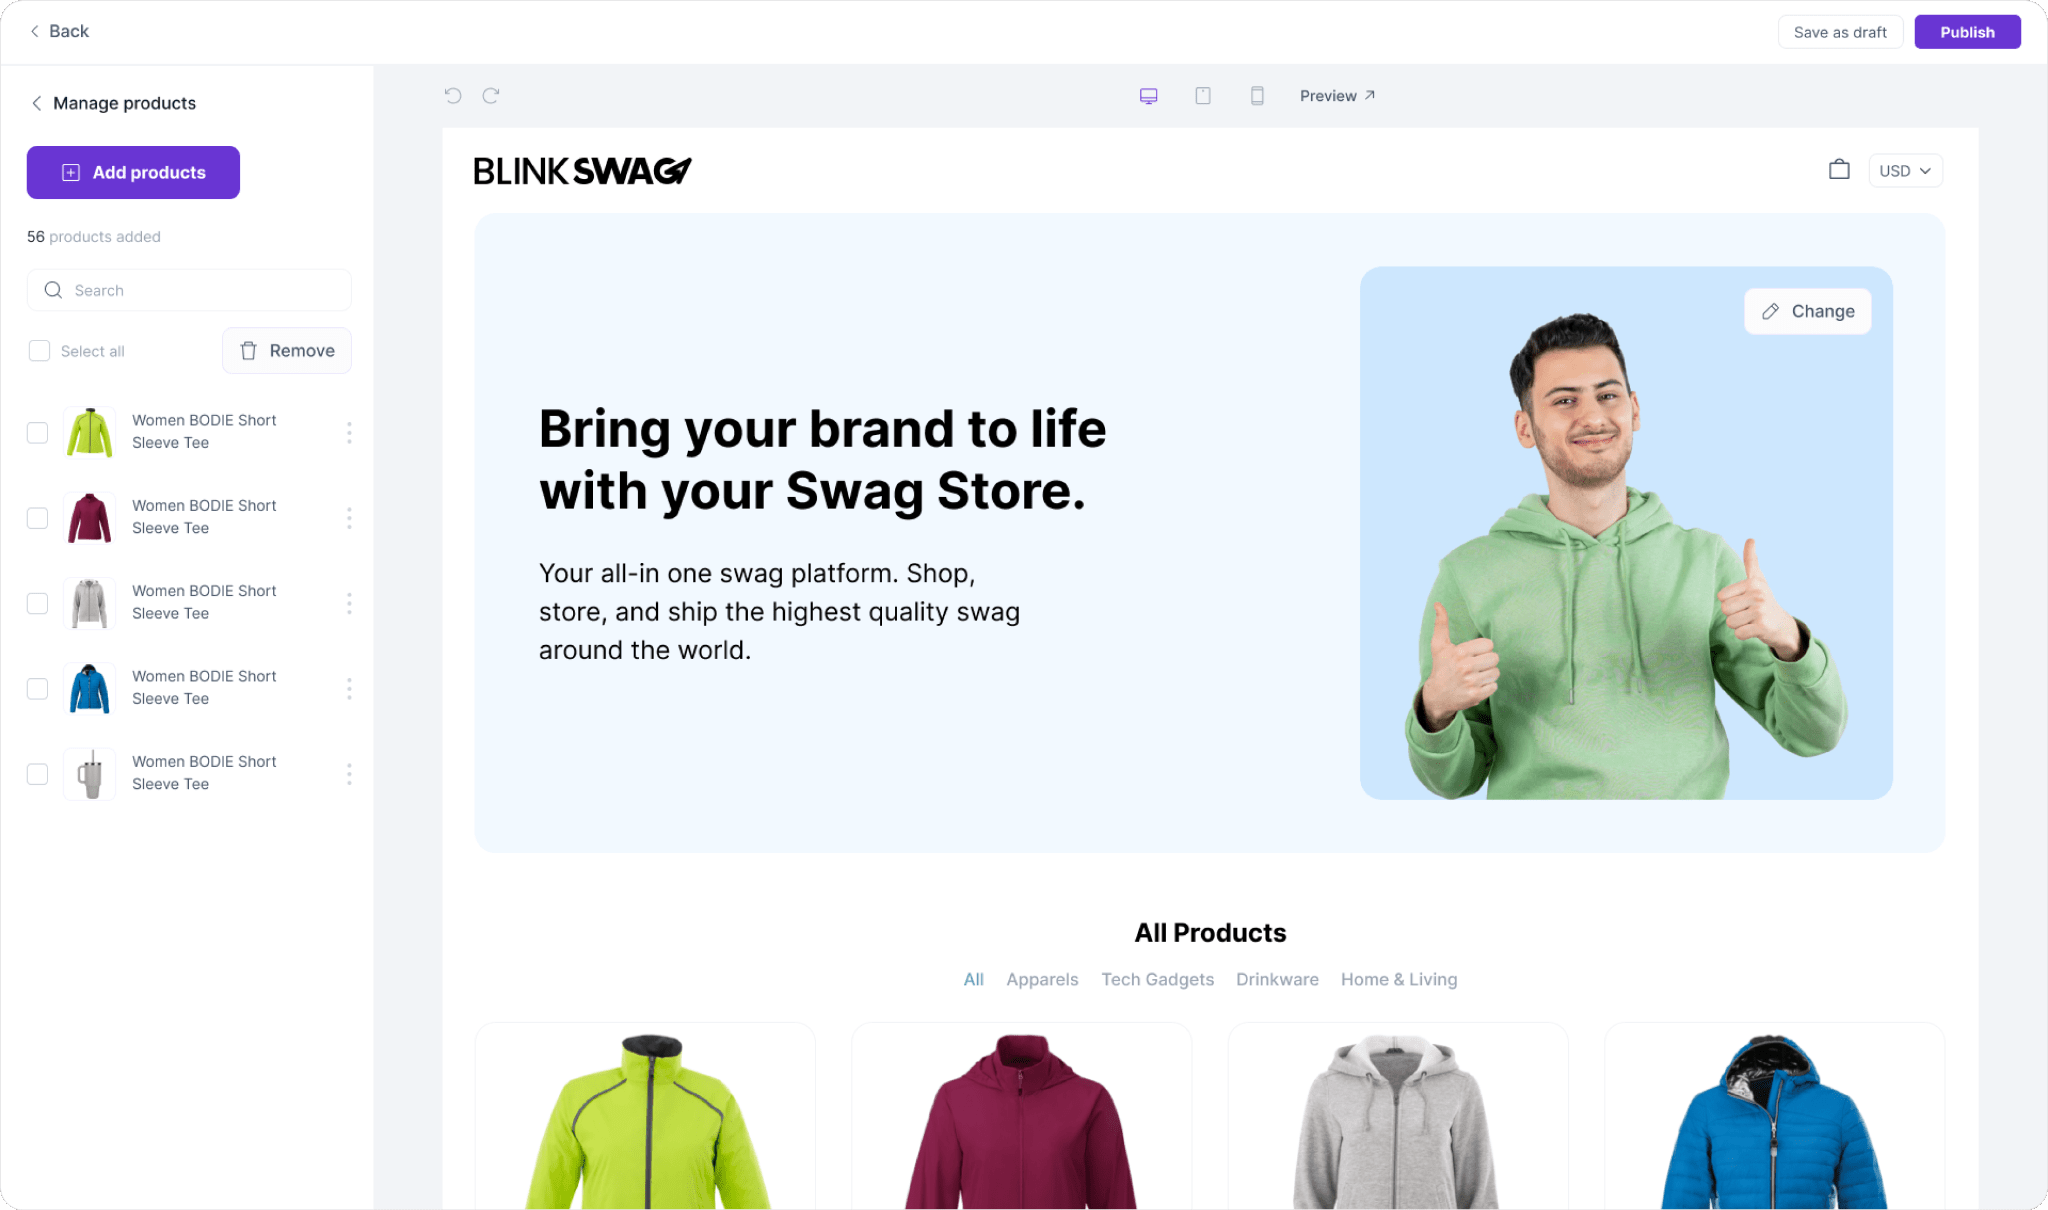
Add Products to Your Swag Store
1. Navigate to Manage Products: In your Swag Store dashboard, select the Manage Products option from the left sidebar.

2. Add a New Product: Click on the Add Products button. This will open a new window for product details.

3. Review: Once you have added the products, you can review them in the Manage Products section. Ensure everything looks correct.
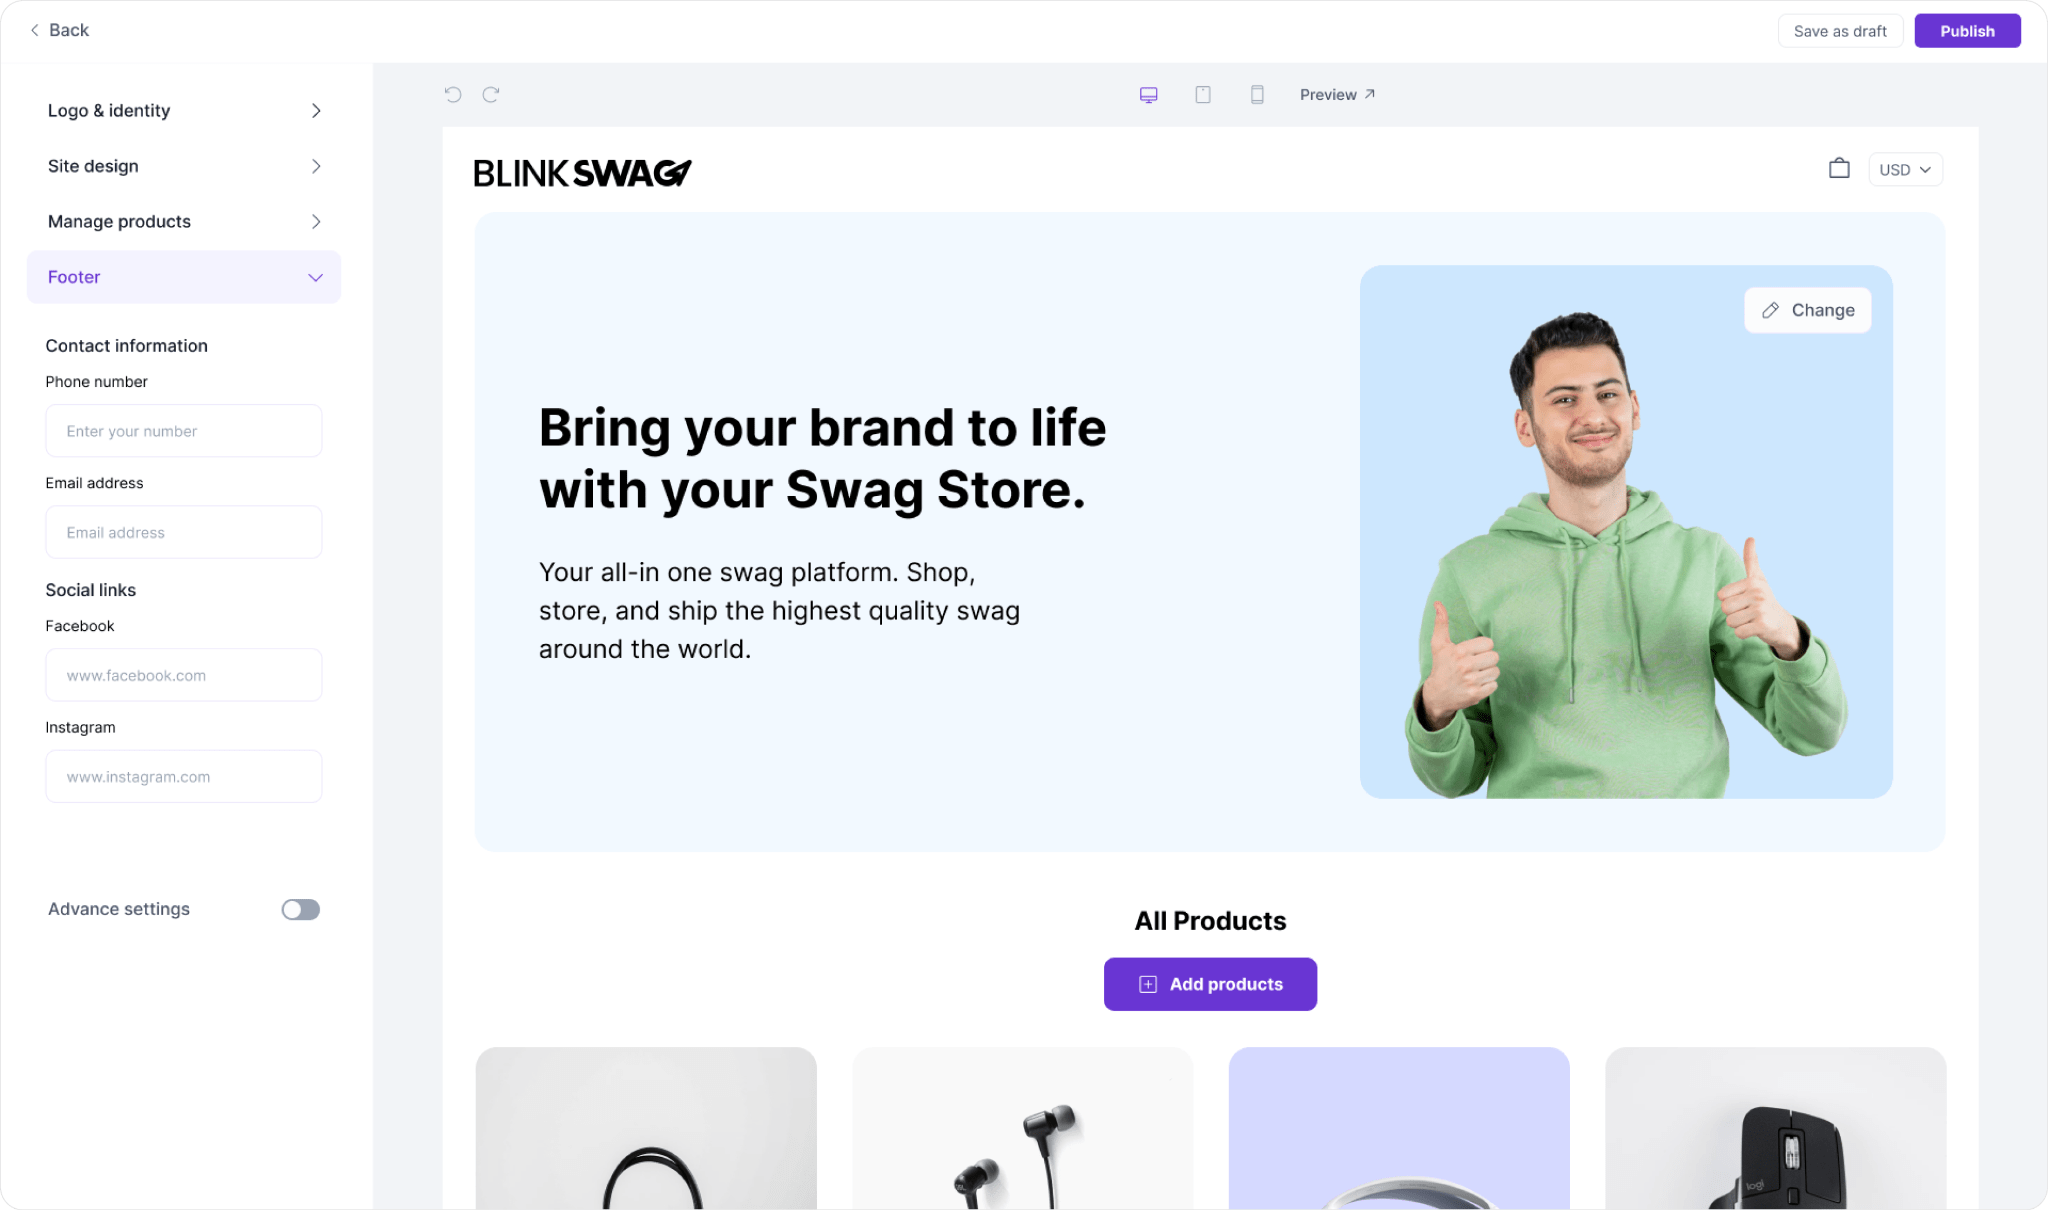
Footer of Your Swag Store
1. Access the Footer Settings: In your Swag Store dashboard, navigate to the left sidebar and click on Manage Products. Then, select Footer from the dropdown menu. This will bring you to the footer settings, where you can customize your contact information and social media links.
2. Add Contact Information:
- Phone Number: Enter your business phone number in the designated field. Customers can reach you at this number displayed in the footer.
- Email Address: Please provide your business email address so customers can contact you directly.
3. Link Your Social Media Accounts:
- Facebook: Enter the URL of your Facebook page in the provided field.
- Instagram: Enter the URL of your Instagram profile.
4. Save Your Changes: After entering all the desired information, ensure you save your changes by clicking on the Publish button at the top right corner of the page.
5. Preview the Changes: You can preview your footer on the storefront to see how the contact information and social media links appear to customers.
By following these steps, you will successfully edit and customize the footer of your Swag Store, providing essential contact information and enhancing your online presence.
Advanced Settings for Your Swag Store
1. Access Advanced Settings: In your Swag Store dashboard, navigate to the left sidebar and select Advance Settings Toggle. This will open up more configuration options for your store.

2. Enable or Disable Price Visibility:
- To enable price visibility, ensure the toggle is set to ON (usually represented by a green switch). This will allow customers to see the prices of the products listed in your store.
- To disable price visibility, switch the toggle to the OFF position (typically indicated by a grey switch). This will hide prices from all users visiting your store.
Product Settings: Configure, Customize, and Optimize!

- Access Product Settings: In your Swag Store dashboard, navigate to the left sidebar. Click on Manage Products to expand the options available under this section.
- Navigate to Product Settings: Click on Product Settings from the list below the Price option toggle. This will allow you to configure settings related to your products.
- Markup Products Price %: Here, you can set a percentage for markup on your products. Enter a value (for example, 10%) to increase the prices of all products by that percentage. This setting allows you to maintain a profit margin on your products.
- Add Google Analytics: To track visitor behavior and performance on your store, enter your Google Analytics tracking ID in the field provided (it should look like G-XXXXXX). This will help you gather insights into your store’s performance.
- Domain Provisioning: In the Domain Provisioning field, you can enter a custom domain for your store if you have one. For example, you might input www.yourcustomdomain.com to ensure your store is accessible via that domain.
- Guest Checkout: You can toggle the Guest checkout option on or off. Enabling this will allow customers to purchase without creating an account, simplifying the buying process.
- Budget-Limited Purchasing: Enable the budget-limited purchasing option to restrict purchases based on a budget. This feature allows you to limit how much customers can spend in your store.
Optimize Your Store: SEO Settings Made Easy!
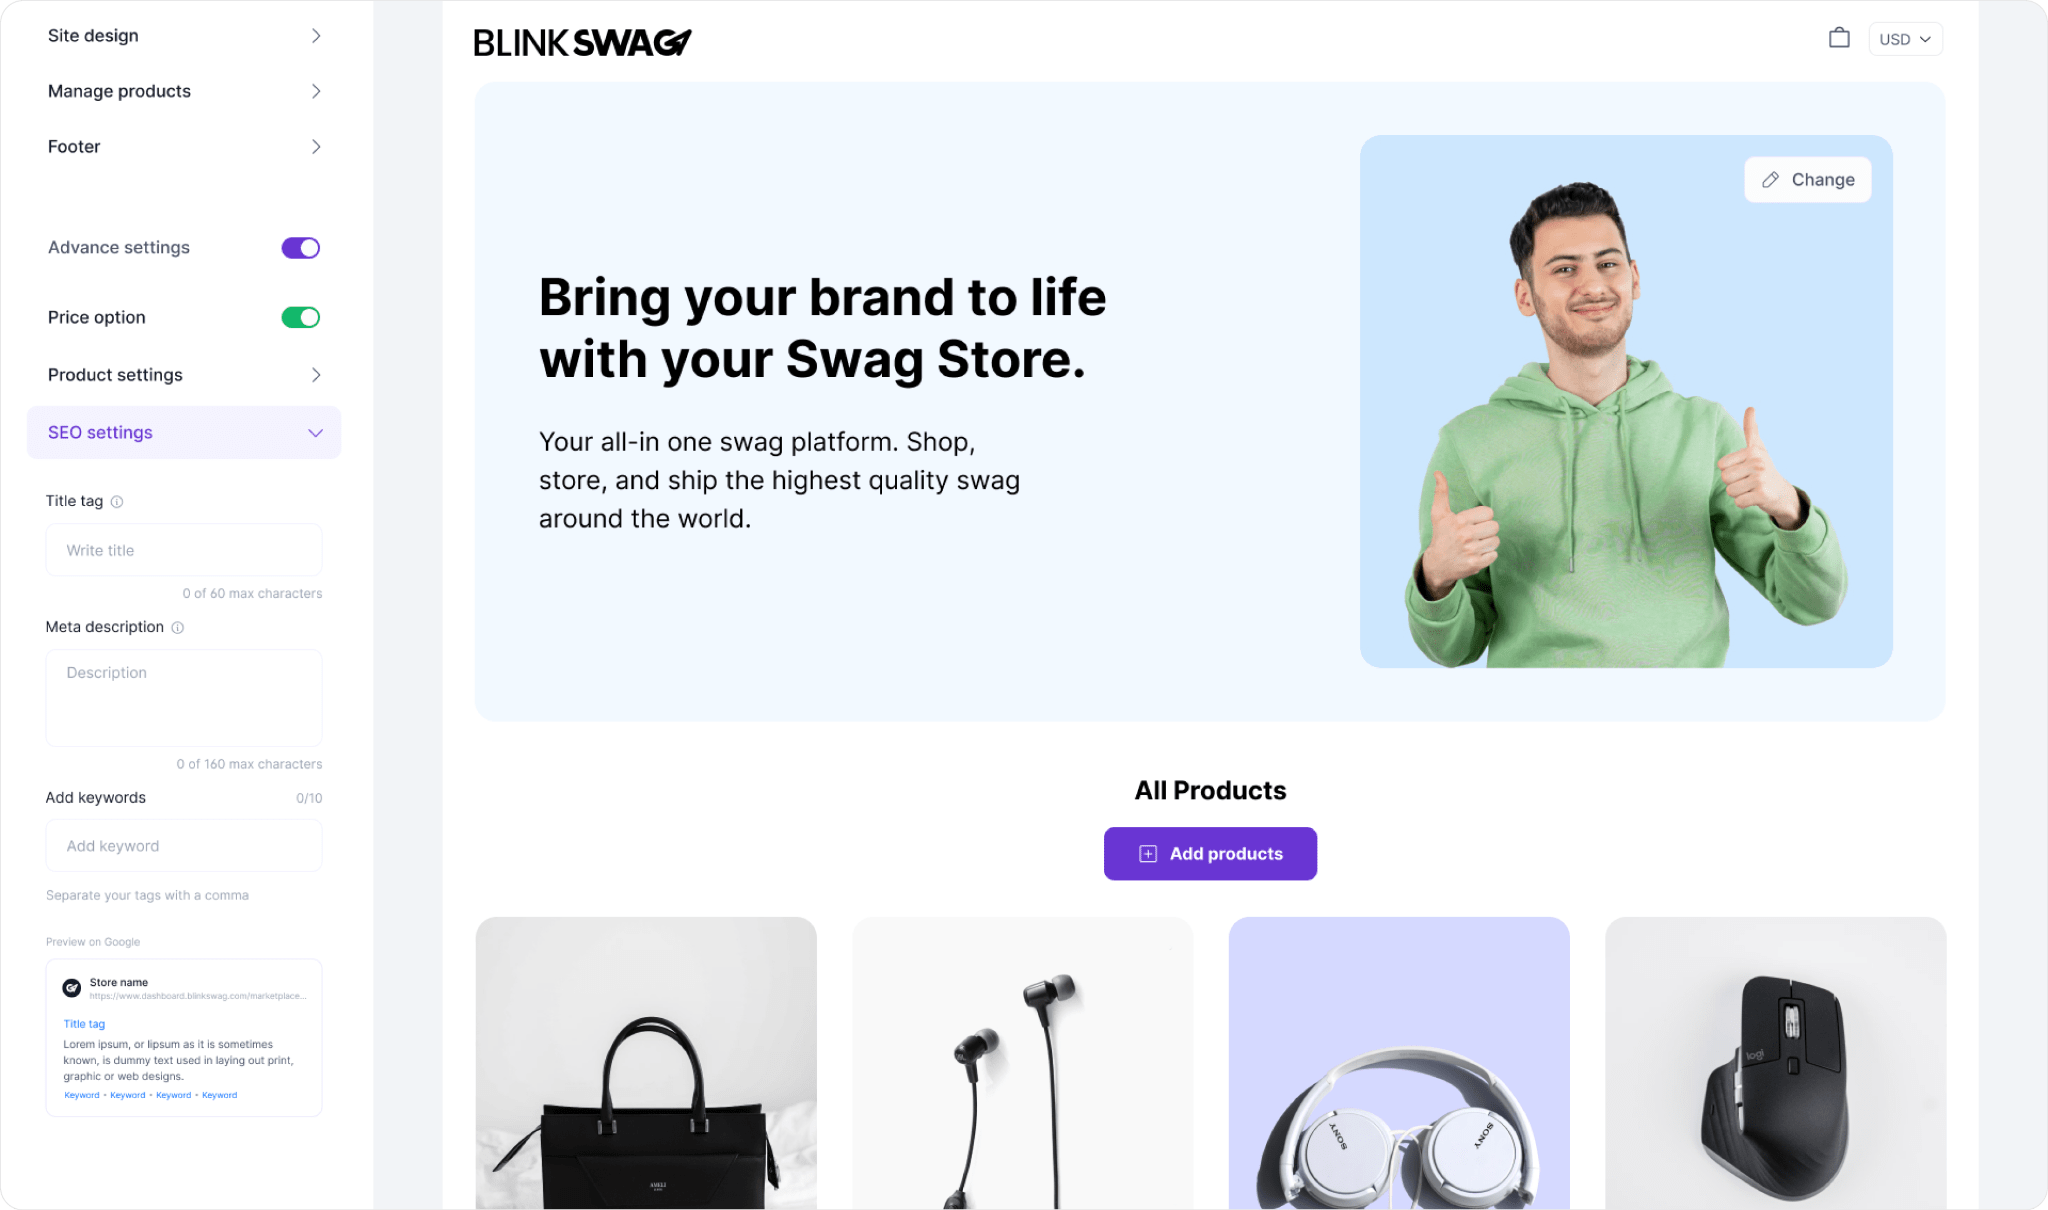
- Access SEO Settings: In your Swag Store dashboard, click on Manage Products from the left sidebar. Then select SEO settings from the options that appear under Product settings. This will open the SEO configuration panel.
- Title Tag: In the Title tag field, enter a brief and descriptive title for your store that reflects your brand and your products. This title will appear in search engine results and should be kept within 60 characters for optimal display.
- Meta Description: Fill in the Meta description field with a concise summary of your store. This description should highlight your store’s offers and include relevant keywords to improve search visibility. Aim to keep this description under 160 characters to ensure it fits well in search engine results.
- Add Keywords: Use the Add Keywords section to input relevant keywords that describe your store and products. This can help improve your store’s SEO. You can add up to 10 keywords, separated by commas. Consider what potential customers might search for for products like yours.
- Preview on Google: Pay attention to the Preview on Google section as you fill out the title tag and meta description. This will show you how your store might appear in search results. Ensure your title and description are compelling, as this can affect click-through rates.
Preview Your Swag Store on Multiple Devices

1. Locate the Device Preview Icons:
Look for the preview section at the top of the screen in the Swag Store editor. Here, you will see icons representing different devices (such as a desktop, tablet, and smartphone). These icons allow you to switch between views of your store as they appear on various screen sizes.
2. Click on the Desired Device Icon:
Click on the icon corresponding to the device you want to preview:
- Desktop: This will show your store’s appearance on a computer screen.
- Tablet: This provides a view tailored for tablet users.
- Mobile: Click this to see how your store will appear on smartphones.
3. Undo / Redo

- Click the Undo Button: Click this icon to reverse your most recent change. This is useful if you’ve made an edit that you want to discard quickly.
- Redo Option: If you change your mind after undoing, you can use the Redo button (forward arrow icon) to reapply the change.
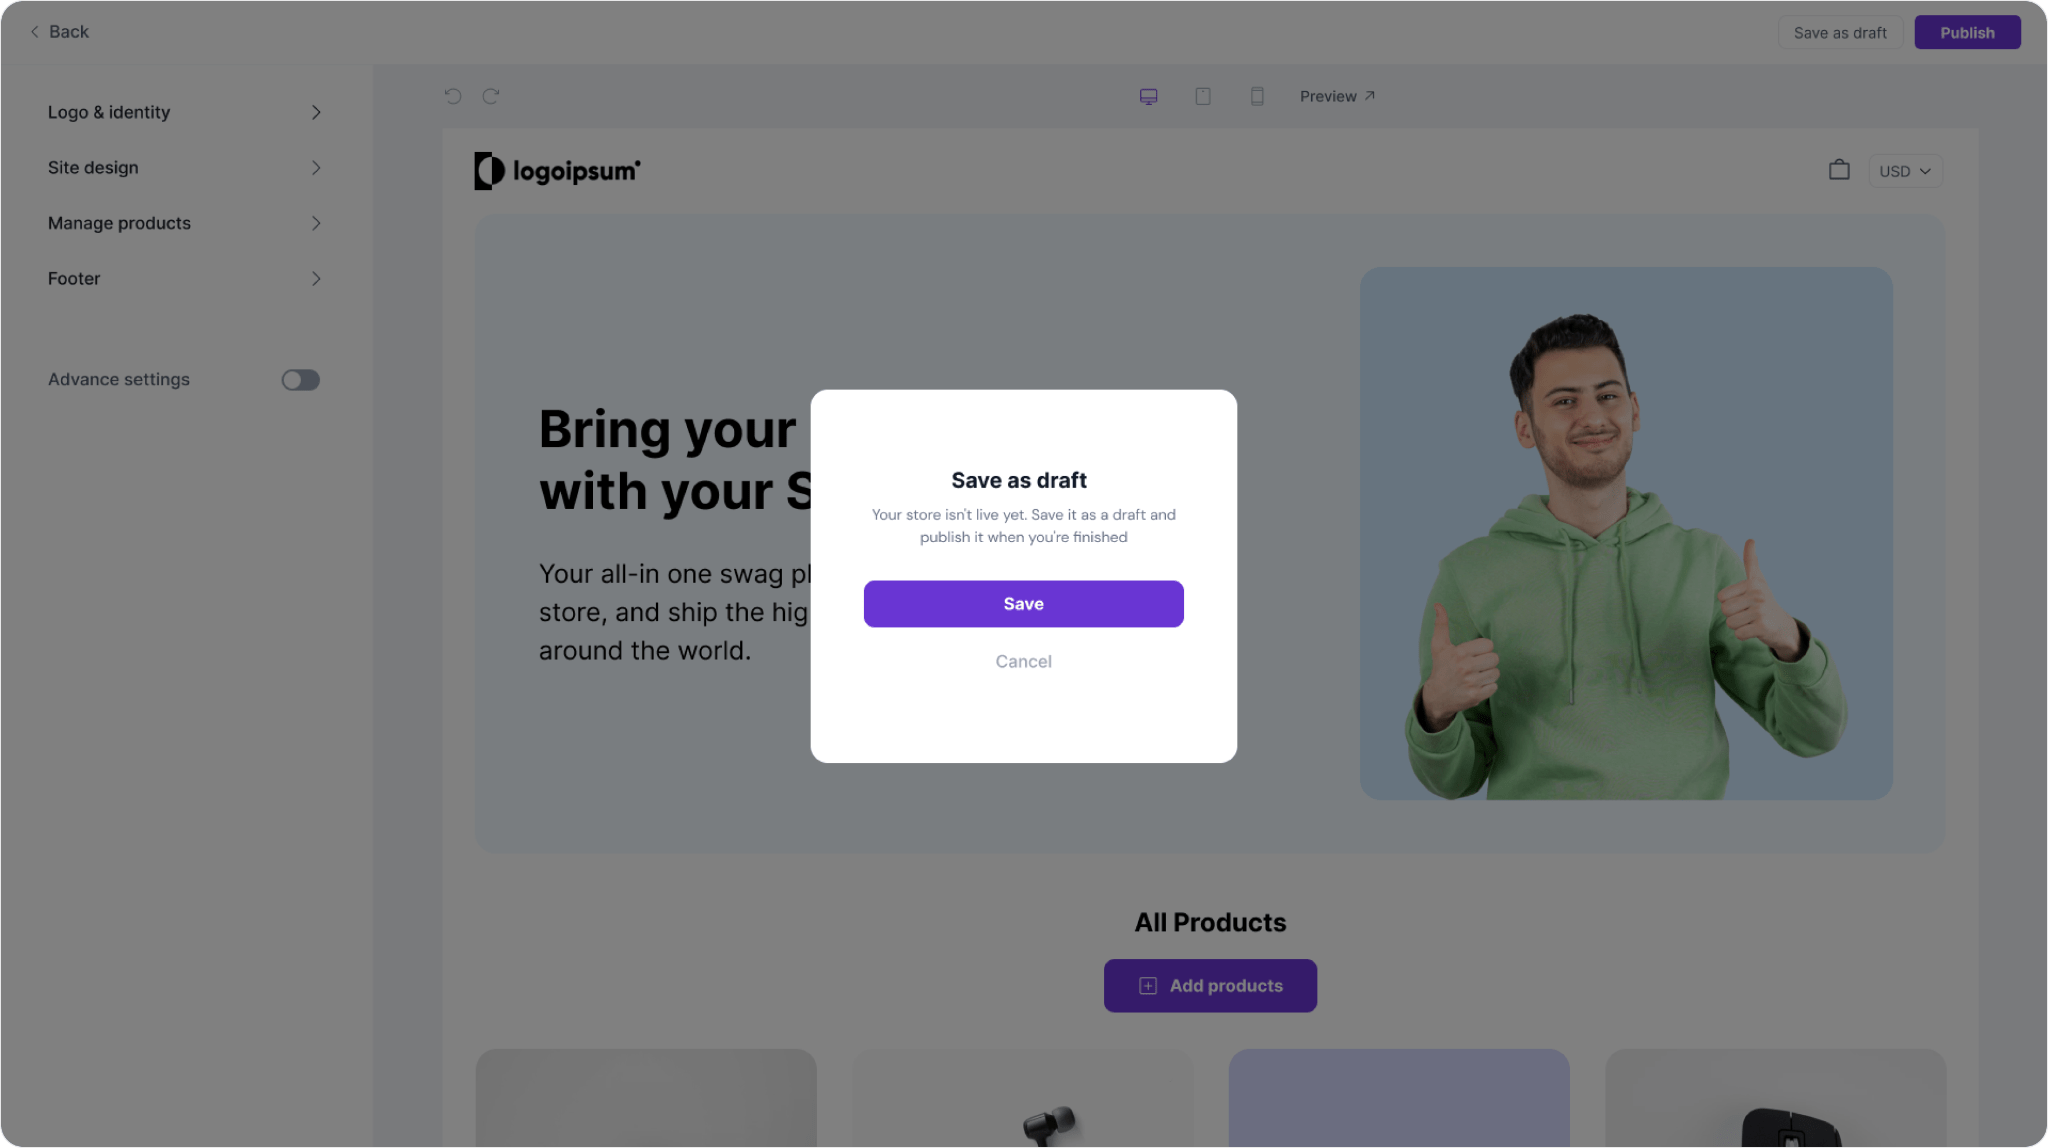
Save Your Swag Store as a Draft
1. Locate the “Save as Draft” Button: Find the “Save as draft” button in the upper-right corner of the screen. This button allows you to save your progress without publishing the store for public view.
2. Click “Save as Draft”: Click the “Save as draft” button. This action will save all your current settings, design, and content changes in a draft format, allowing you to edit later without making the store live.

After saving, you should receive a confirmation that your draft has been saved, which ensures that all your edits are securely stored.
Add Custom Field on Product
1. Locate the Product: Go to the catalog and find the product you want to edit. You can use filters or search to locate it quickly.
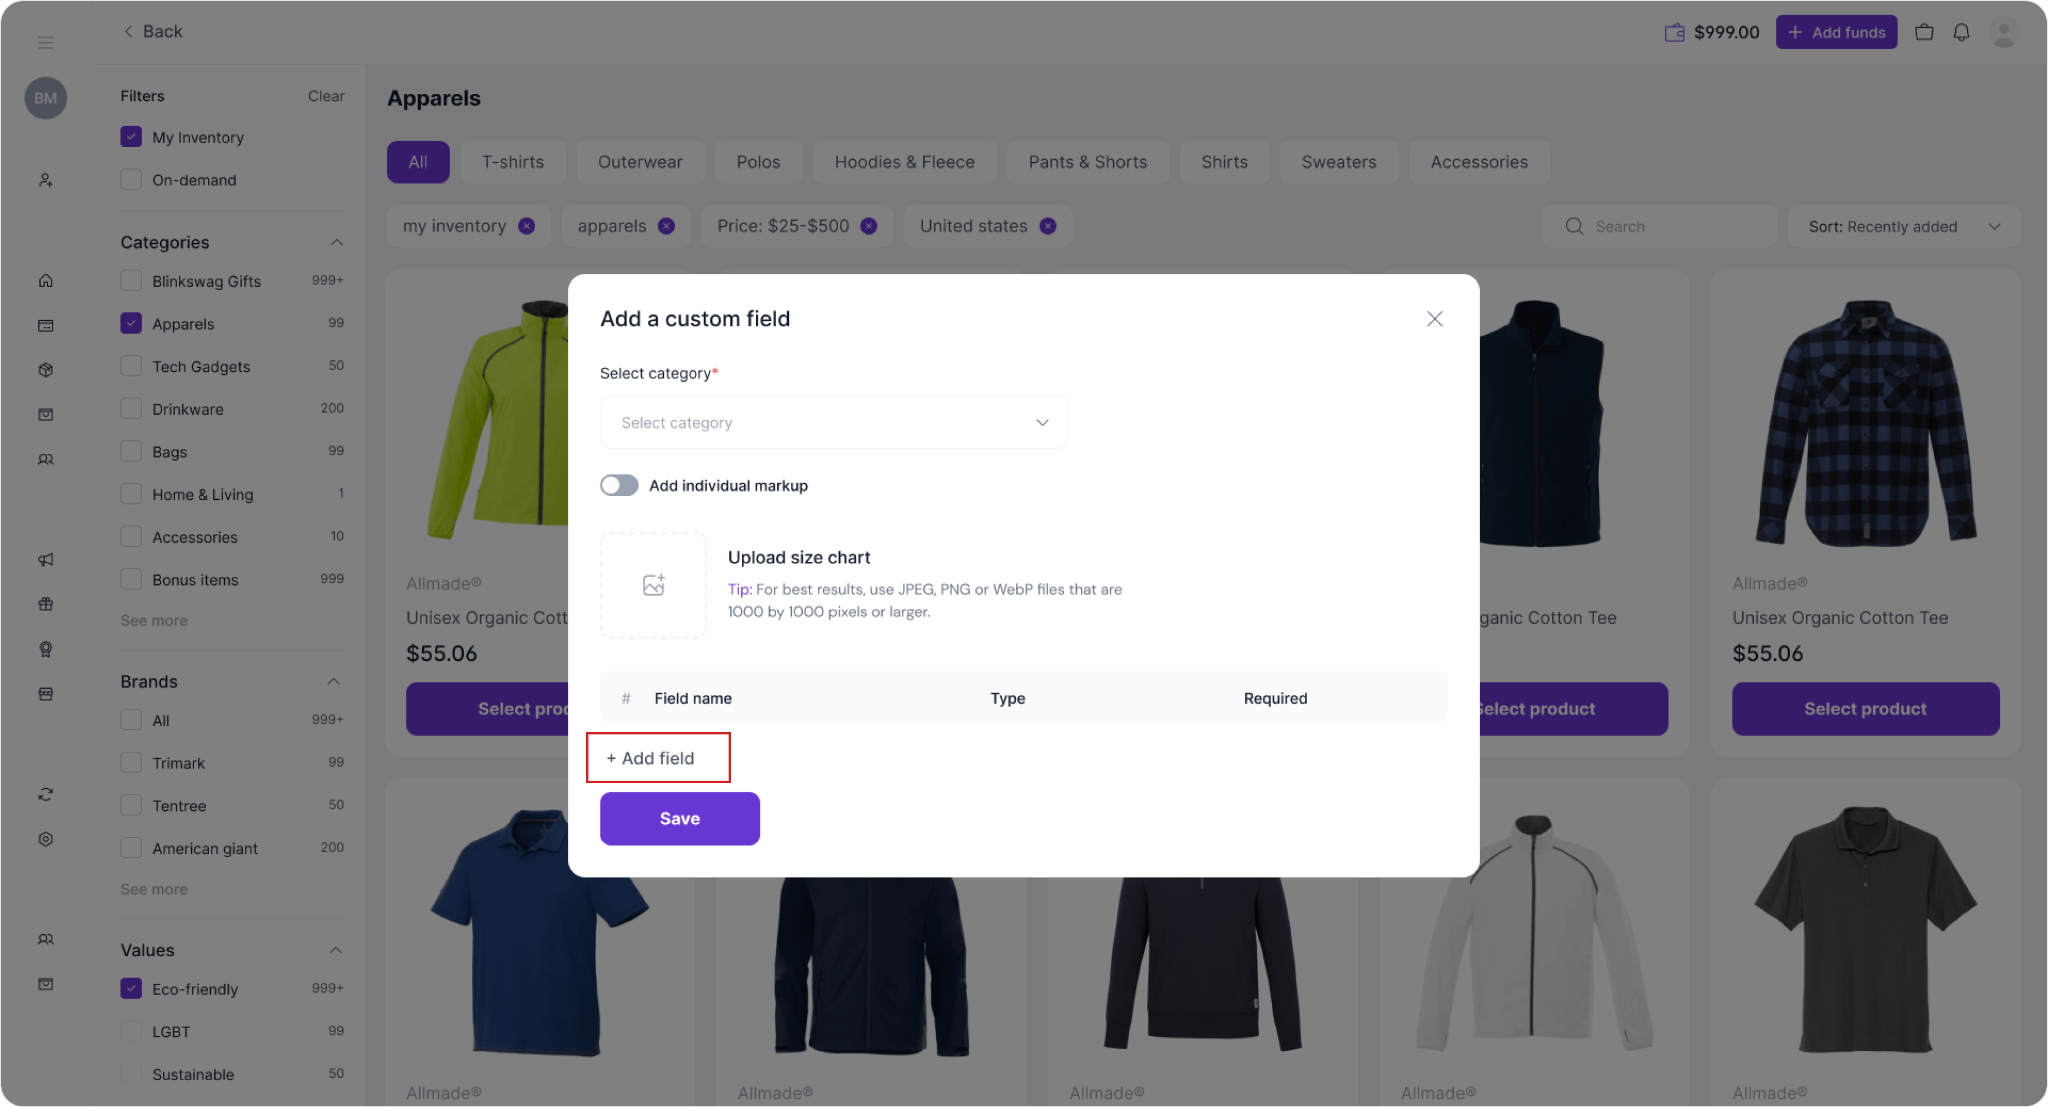
2. Edit Icon: Click the pencil/edit icon (highlighted in red in the image) for the specific product you want to add a custom field. This will open the product’s detail page for editing.
3. Select Category: In the “Add a custom field” pop-up, select the category for your custom field from the Select category dropdown menu.
4. Add Individual Markup: Toggle the Add Individual Markup option to specify different prices or additional charges based on the custom field.

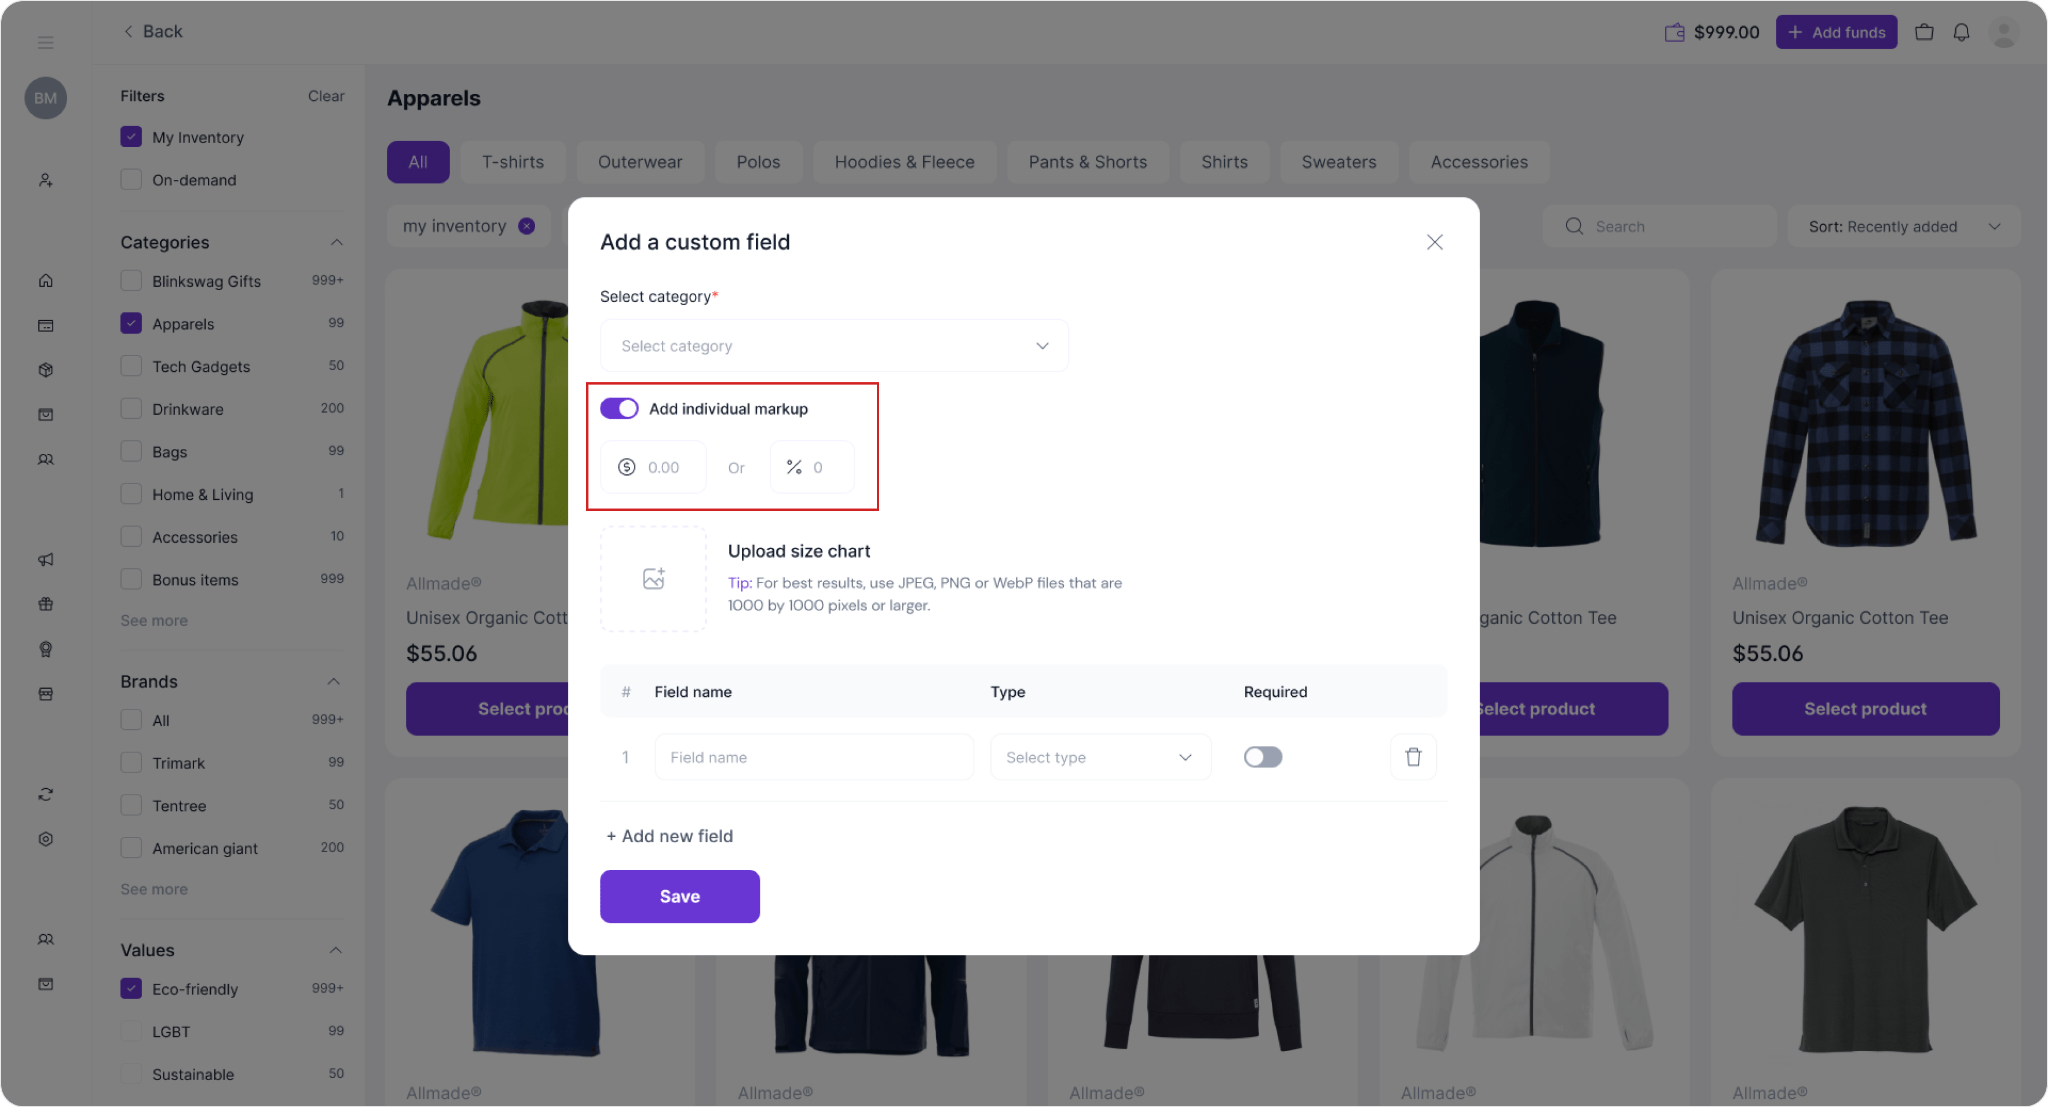
5. Set Markup Amount: You can specify the markup as either a fixed amount or a percentage.
- Fixed Amount: To set a price for this custom field, enter a dollar amount in the $ field.
- Percentage: Enter a percentage in the % field to apply a percentage increase based on the product’s price.
6. Upload Size Chart (Optional): If applicable, you can upload a size chart for products that require size options. Click on the Upload size chart area and select a JPEG, PNG, or WebP file (recommended size: 1000×1000 pixels or larger).
7. Open the Add Custom Field Panel: Navigate to the product you want to add a custom field and click on the “Edit” (pencil icon) next to it.
8. Enter Field Name: In the “Field name” box, type the name of your custom field (e.g., “Size Chart,” “Custom Message,” etc.).
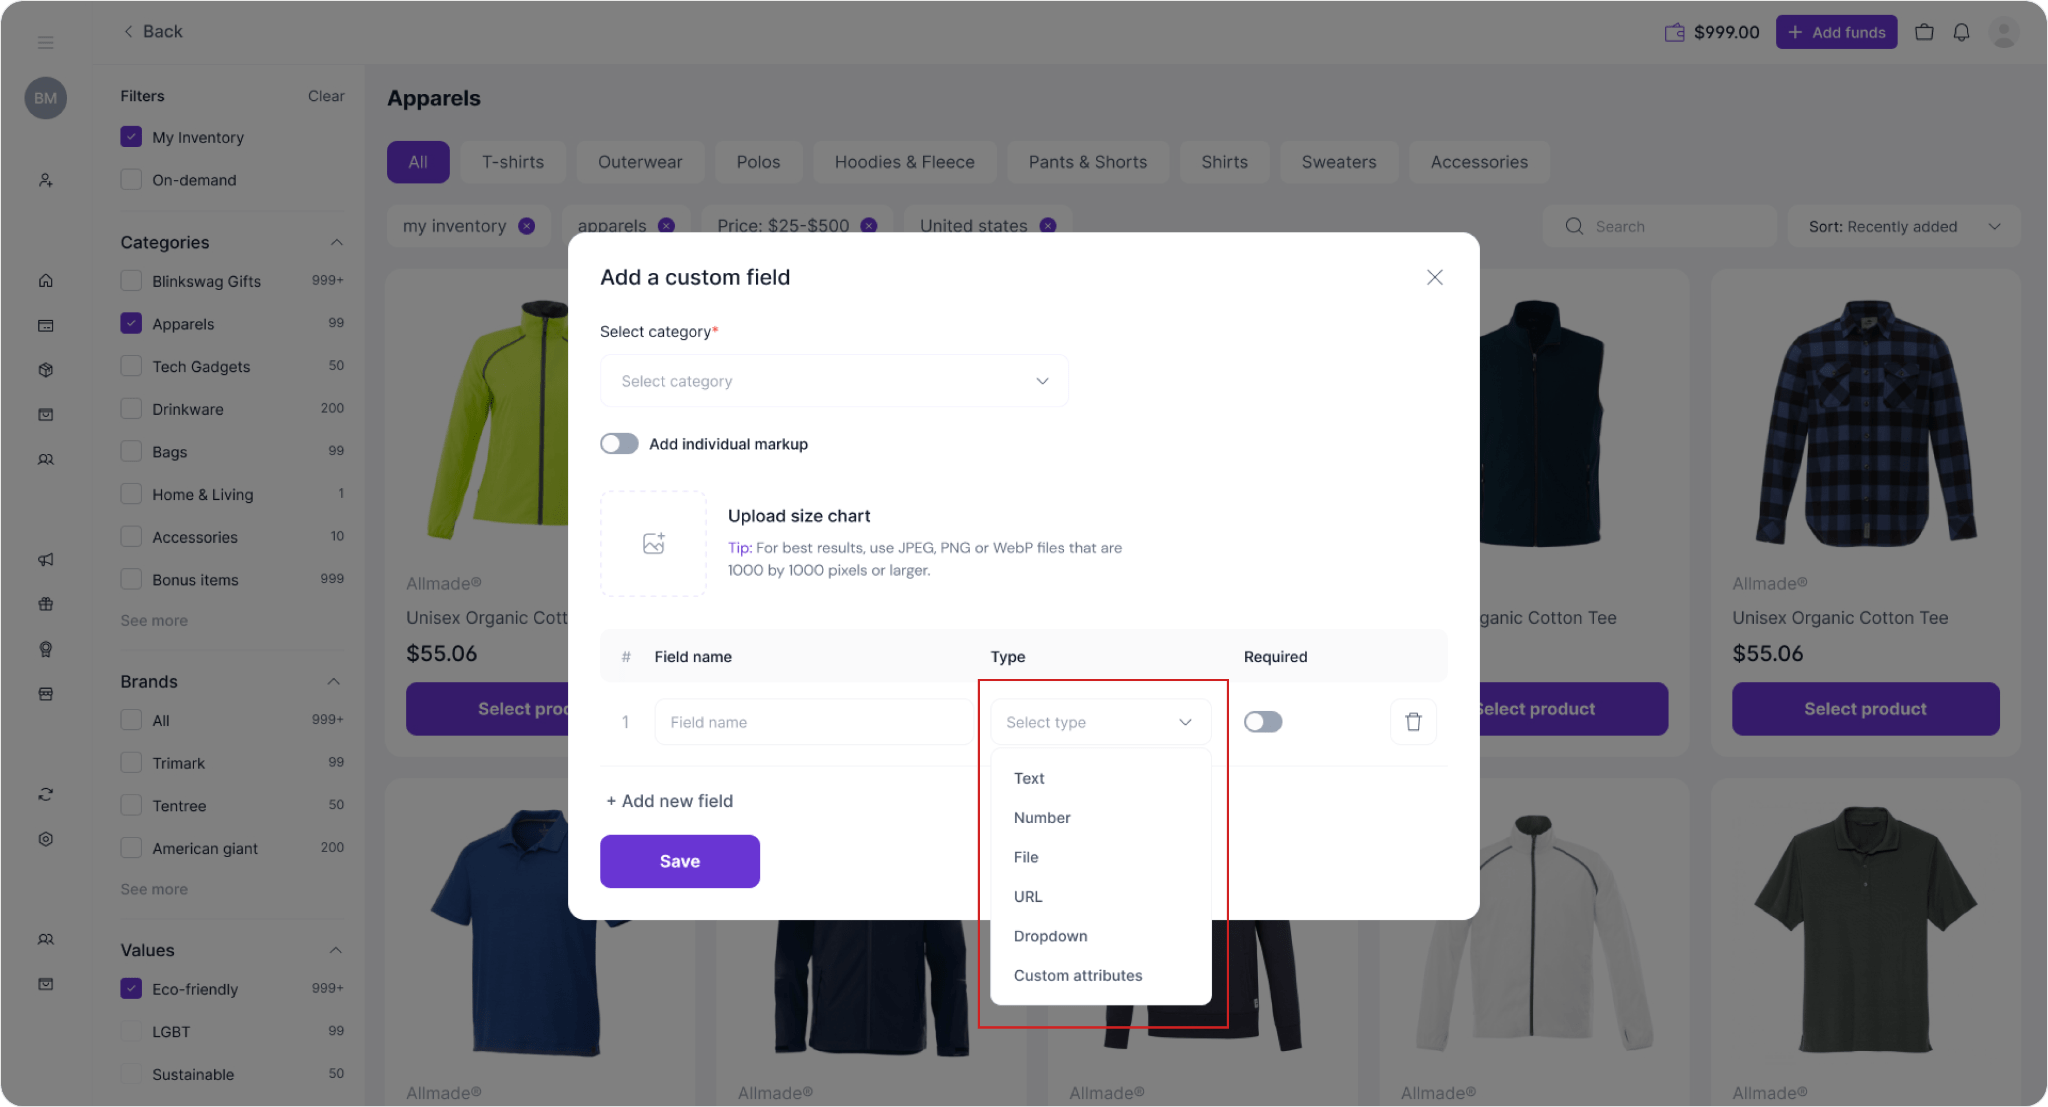
9. Select Field Type: Click on the dropdown menu under the Type column to select your desired field type. The available types include:
- Text: For short text inputs.
- Number: For numeric values.
- File: Allows users to upload a file.
- URL: For adding links.
- Dropdown: To create a dropdown menu with predefined options.
- Custom Attributes: For other specific attributes based on your store’s needs.
10. Set Required Option (Optional): Toggle the Required switch to make this field mandatory for the user.
11. Save: After setting up the fields, click Save to apply the custom field to the product.
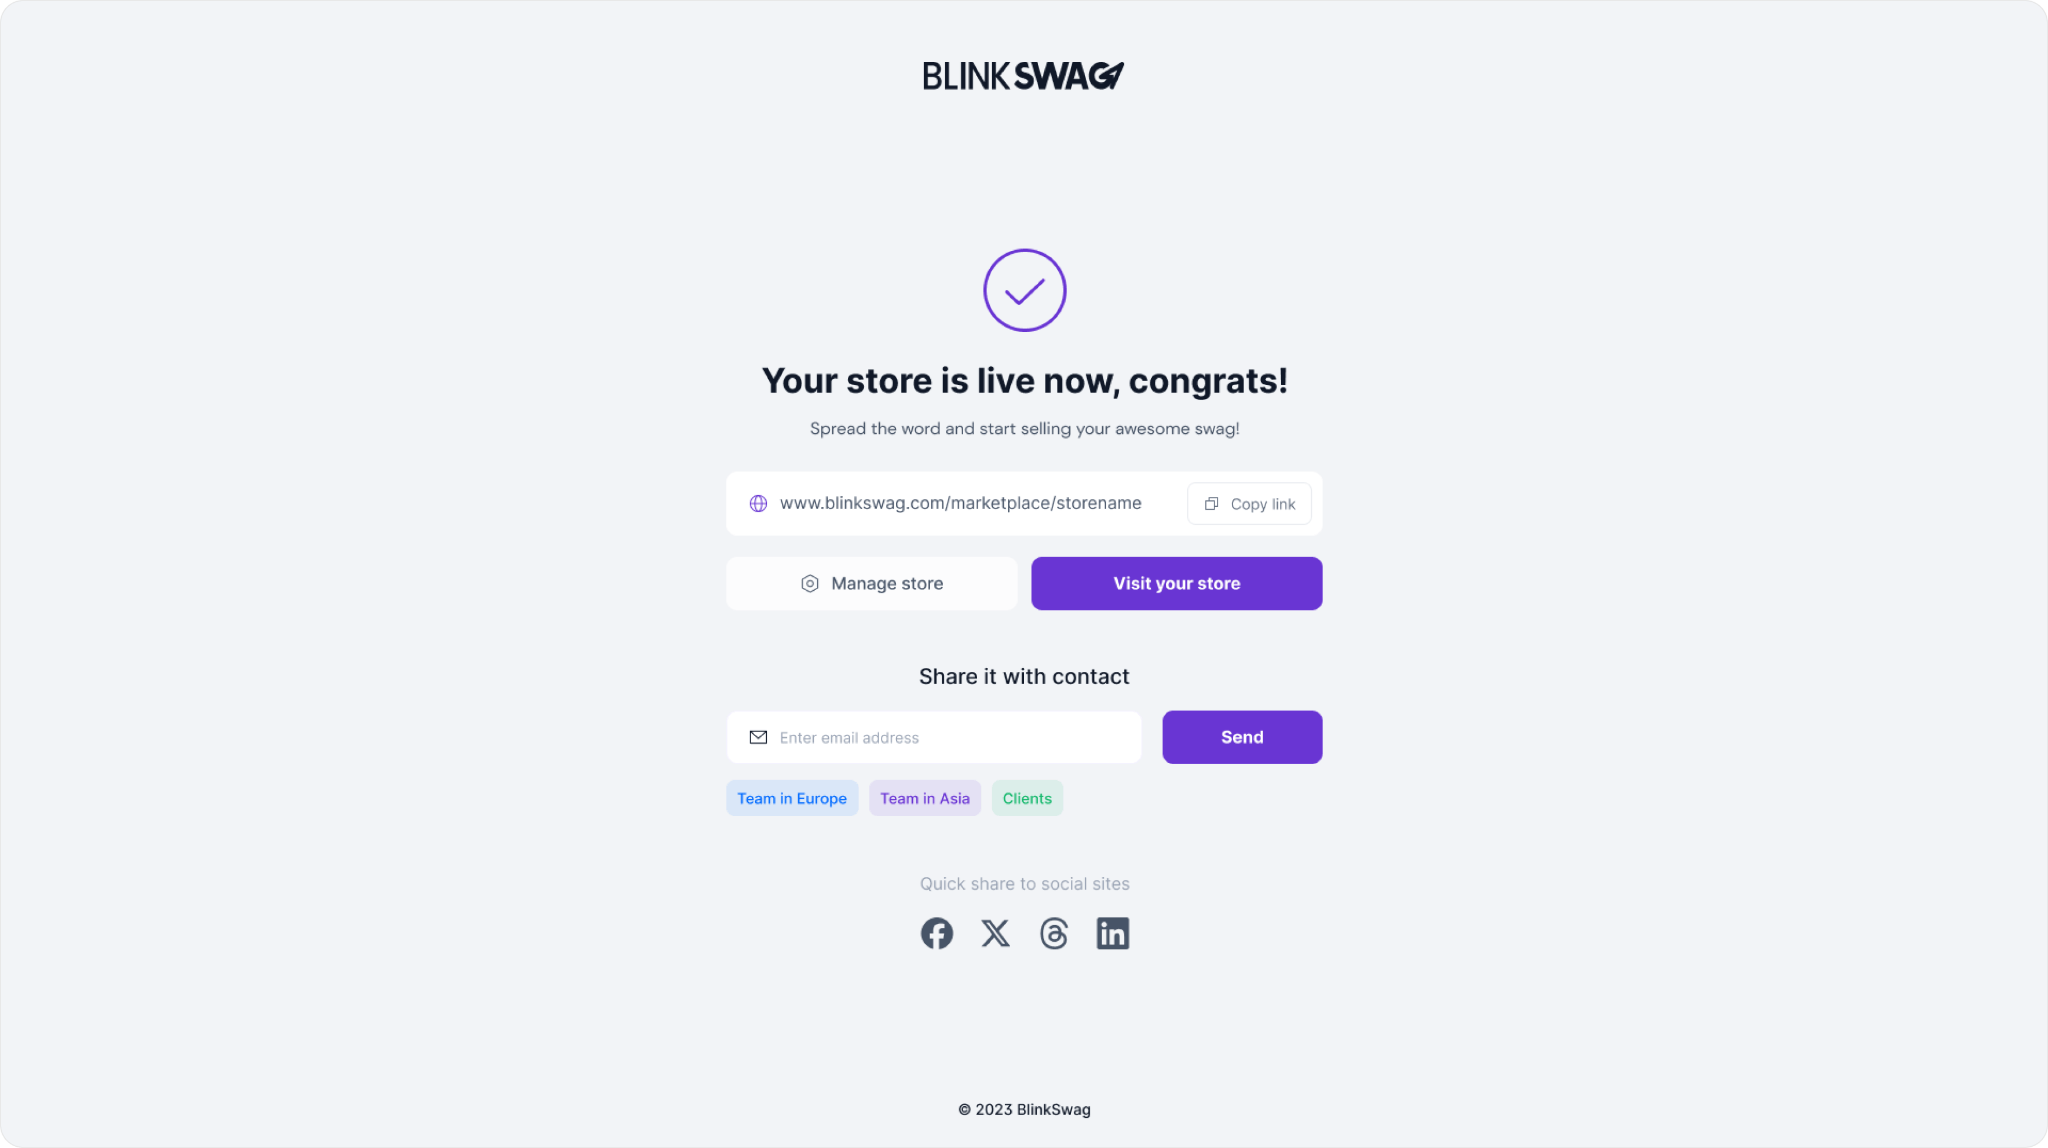
Publish Store Live

To publish your store live, follow these steps:
- Prepare Your Store: Ensure all settings, products, and custom fields are configured as desired.
- Locate the Publish Button: The Publish button, highlighted in purple, is at the top right corner of the store dashboard.
- Click Publish: Click the Publish button to make your store live and visible to customers.
- Confirm Publishing (if prompted): If there’s a confirmation prompt, confirm your decision to publish.
? Want to build a swag store that wows? ? Watch our step-by-step video tutorial and get started today!
? Ready to create your own swag store but need a hand? BlinkSwag’s experts are here to help! Get in touch today for tailored solutions and hassle-free setup.